The September release of HURMA opens a new page in the convenience and flexibility of HR tools. The update introduces key solutions designed to make daily team management and recruitment light, transparent, and visually polished. Features include a full No-Code career site builder, 12 color themes with custom loaders, the ability to modify 360-degree feedback evaluators during active cycles, a centralized positions library, and a talent pool to keep your candidates organized.
The “Settings” - “Career site” section now features a No-Code site builder for creating and customizing vacancy websites without developers.
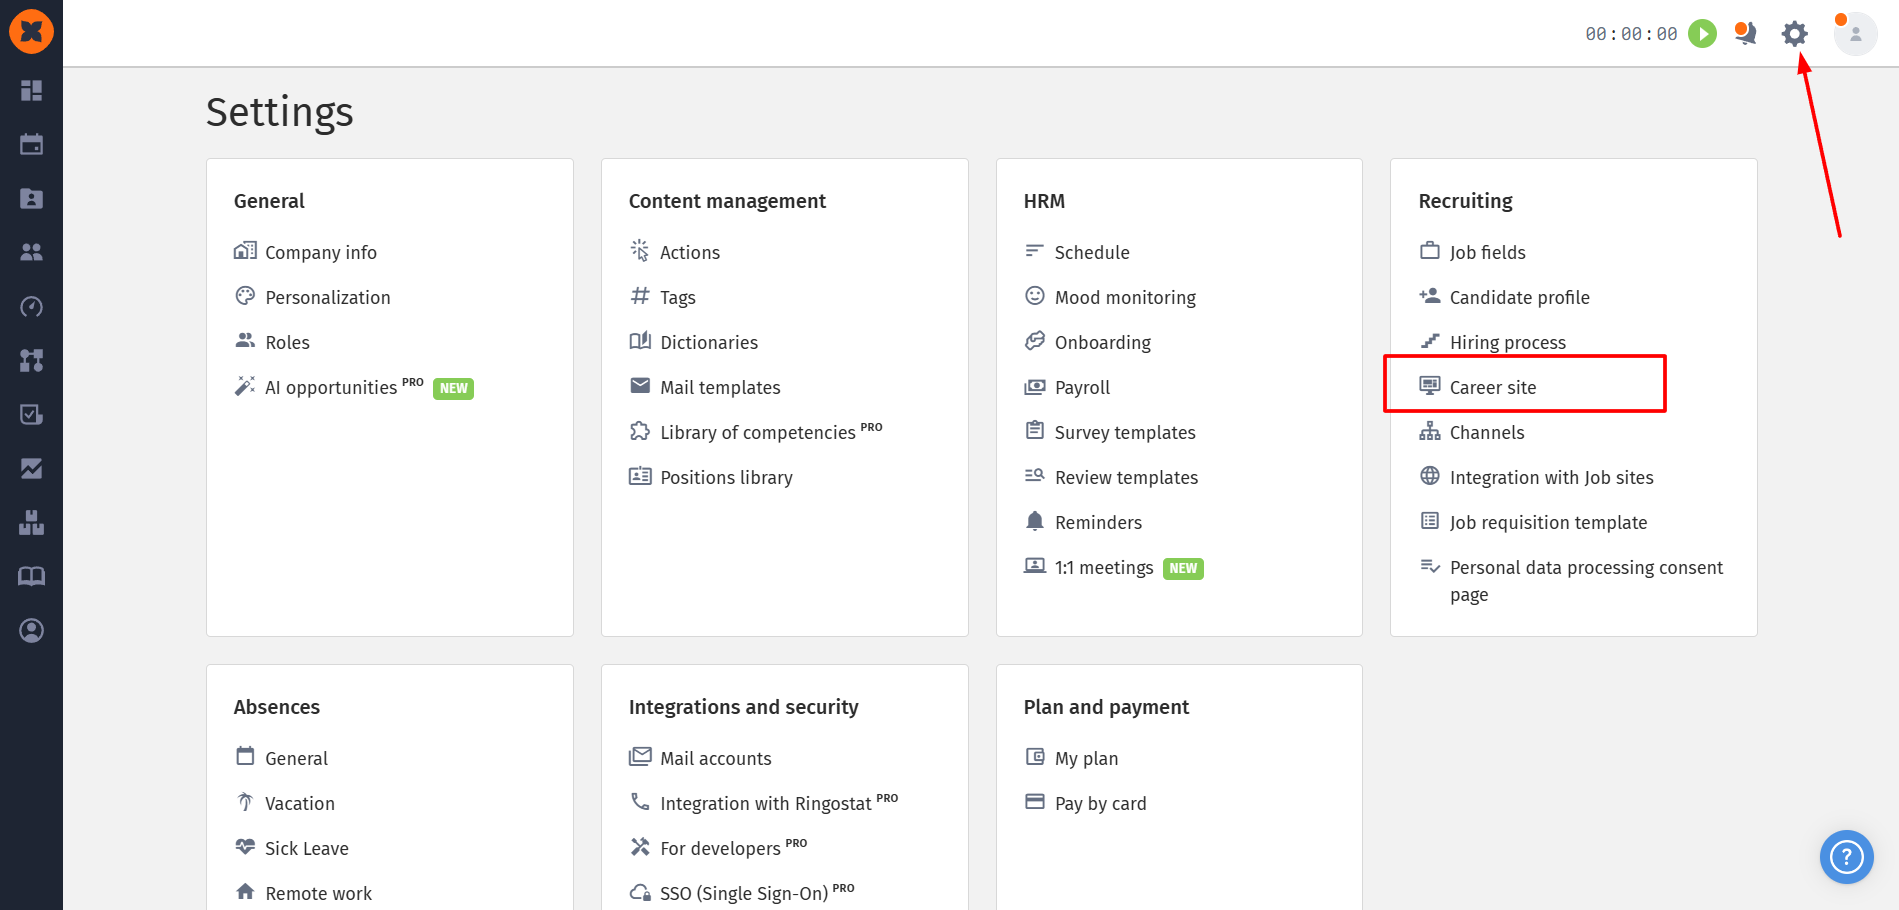
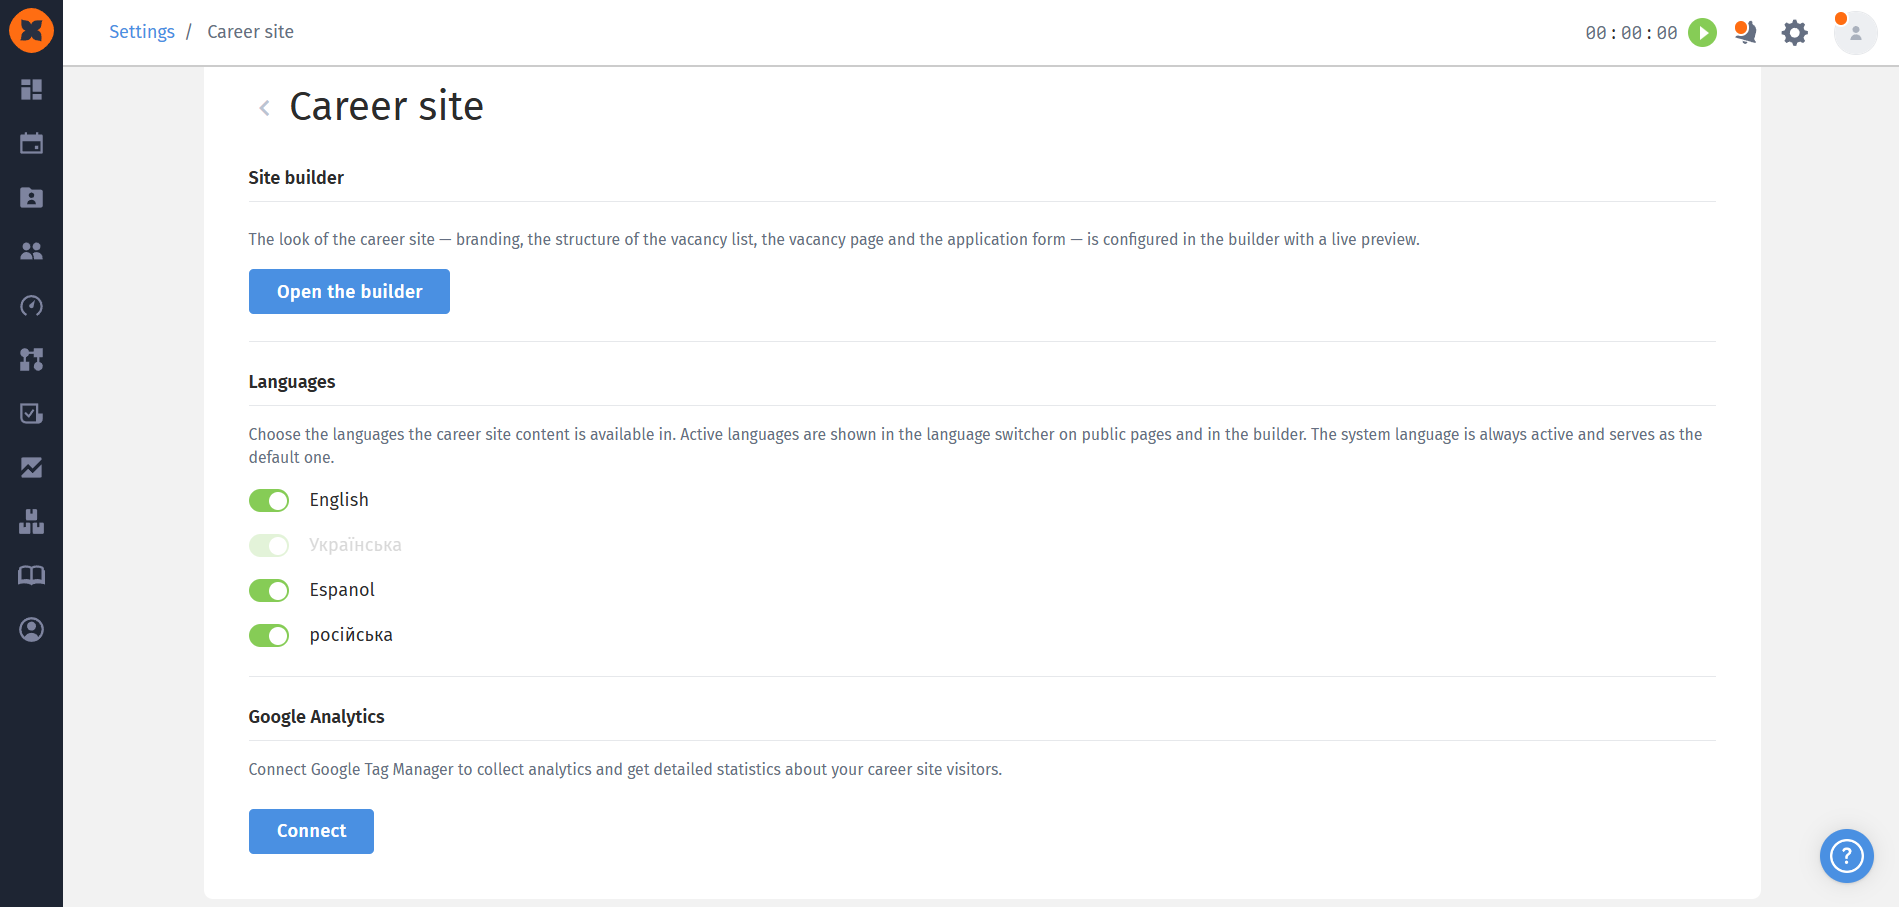
"Open the builder" button: opens the visual editor;
Languages: select candidate languages; adding 2 or more languages automatically enables a language switcher on the site;
Google Analytics: one-click connection to Google Analytics / Tag Manager.
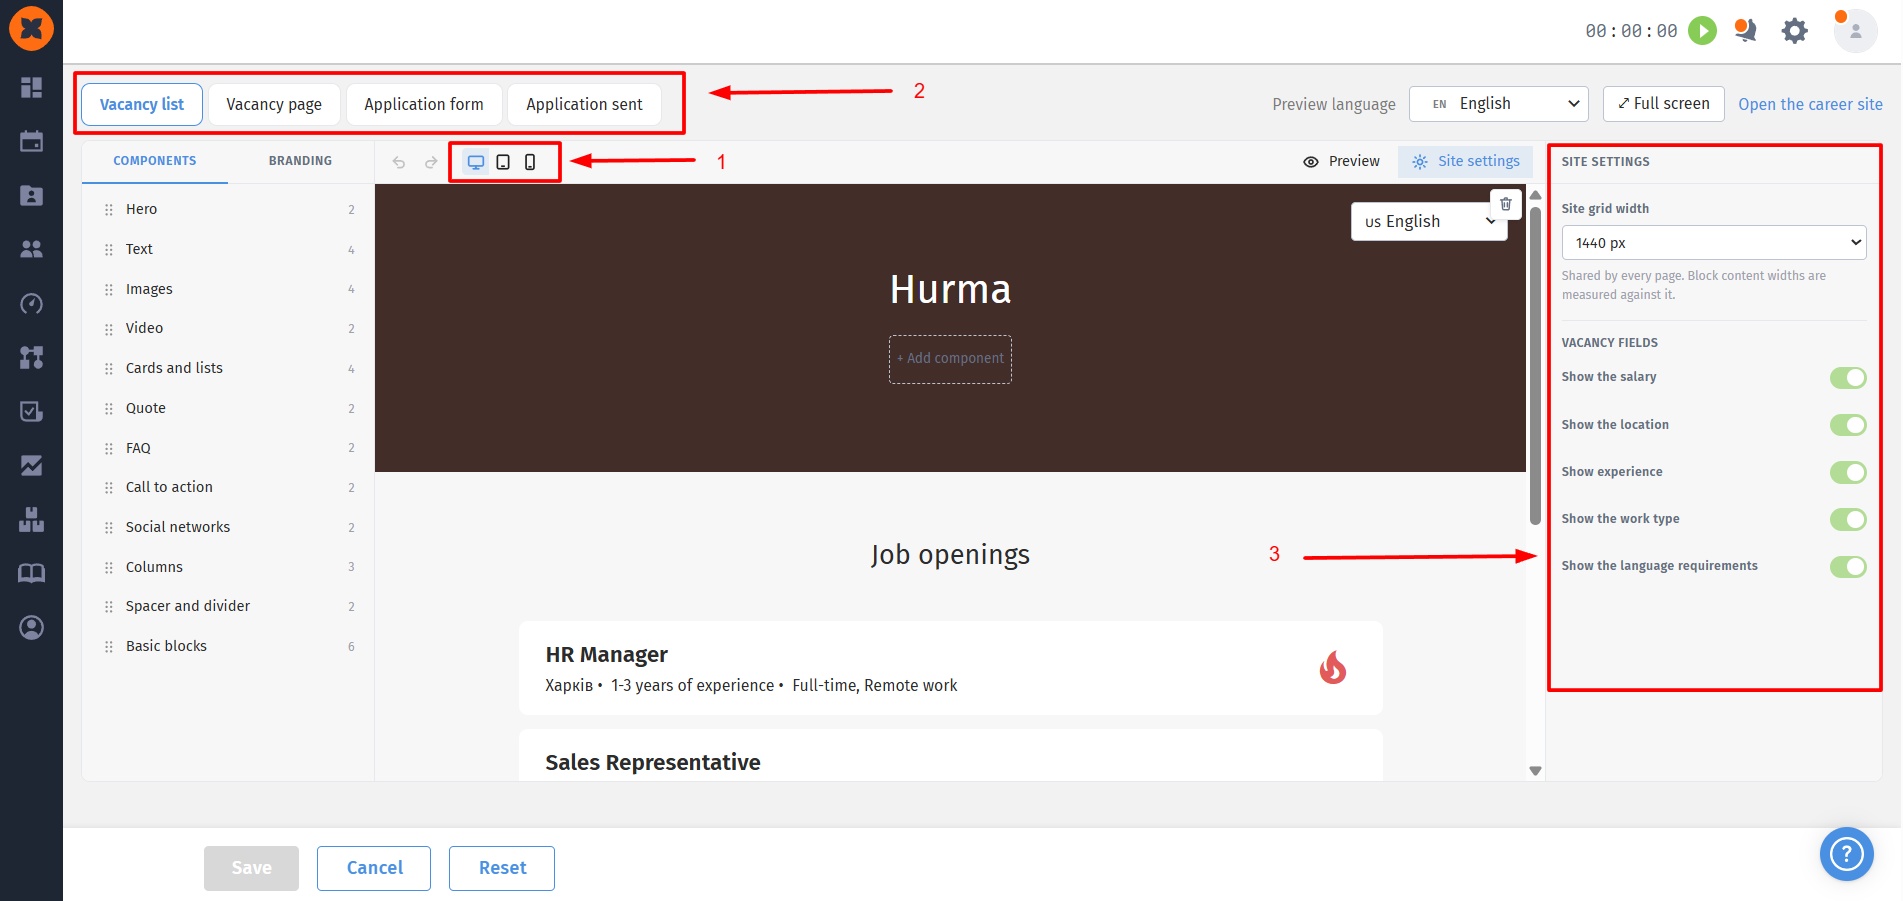
Live Preview: real-time preview across Desktop, Tablet, and Smartphone screens;
Editing 4 pages: independent customization of the vacancy list, vacancy page, application form, and "Application Sent" page;
Global grid: manage page width and hide salaries globally across the site.
Logo & Favicon: upload corporate logos and browser tab icons;
Fonts & Colors: choose from 8 system fonts and centralize color settings for headings, buttons, links, and backgrounds (solid color or photo).
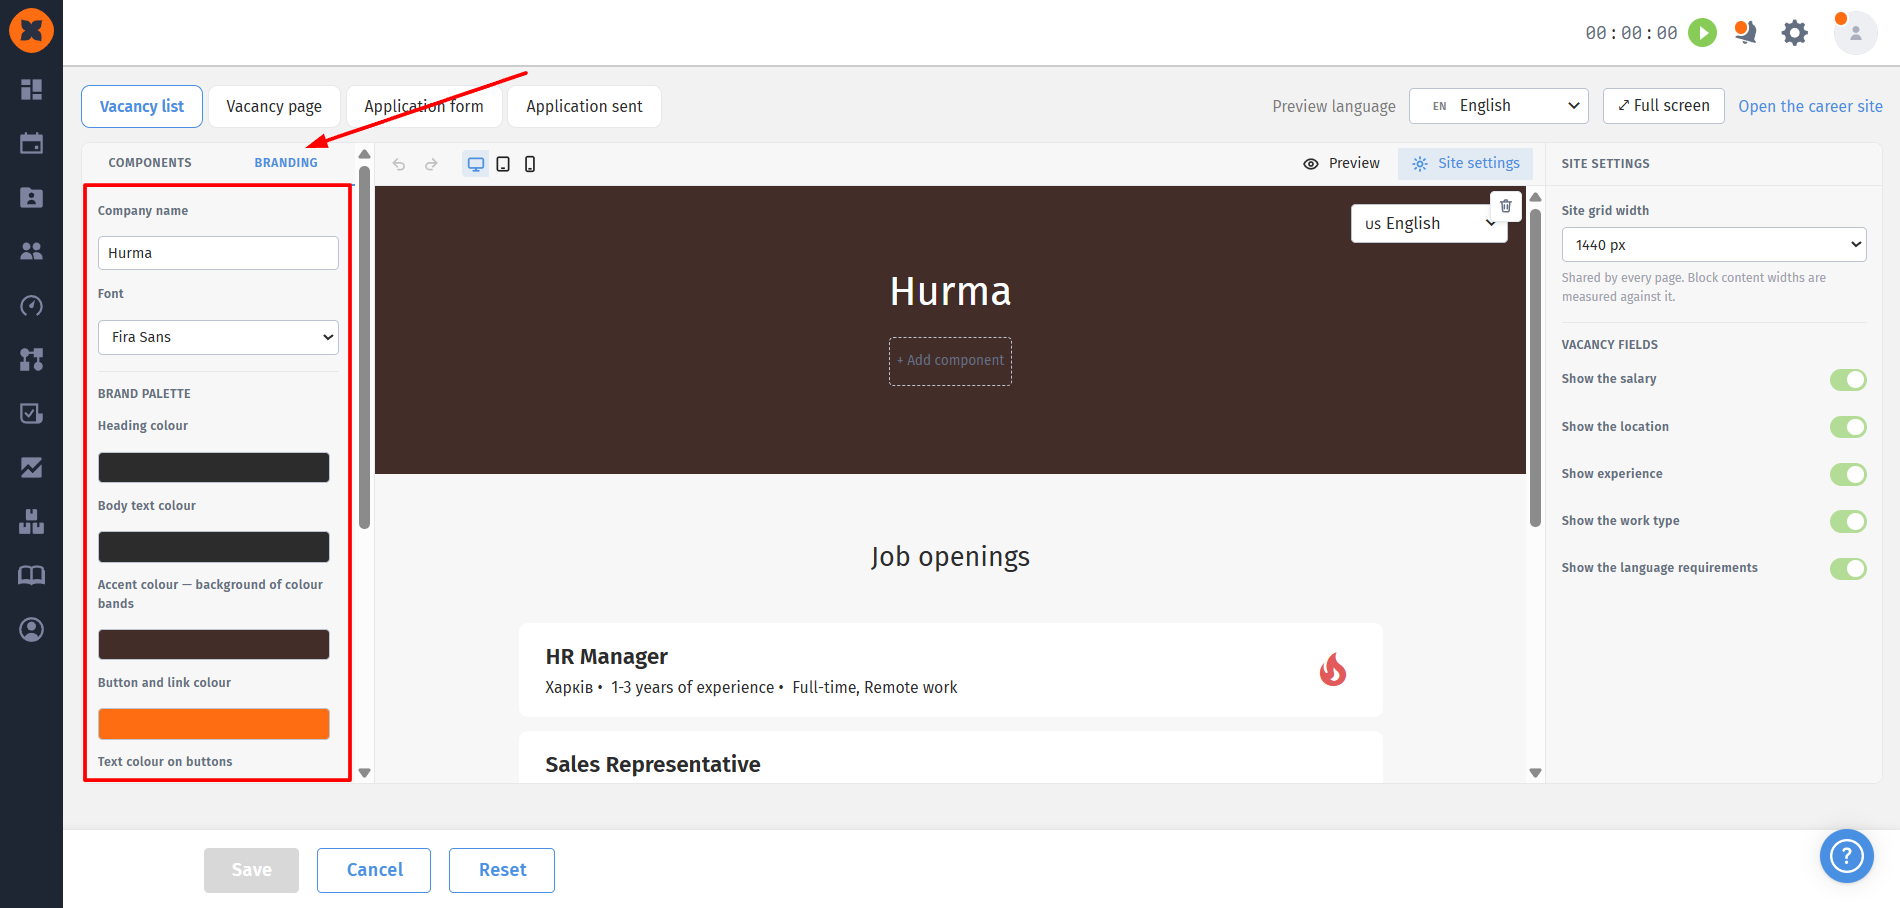
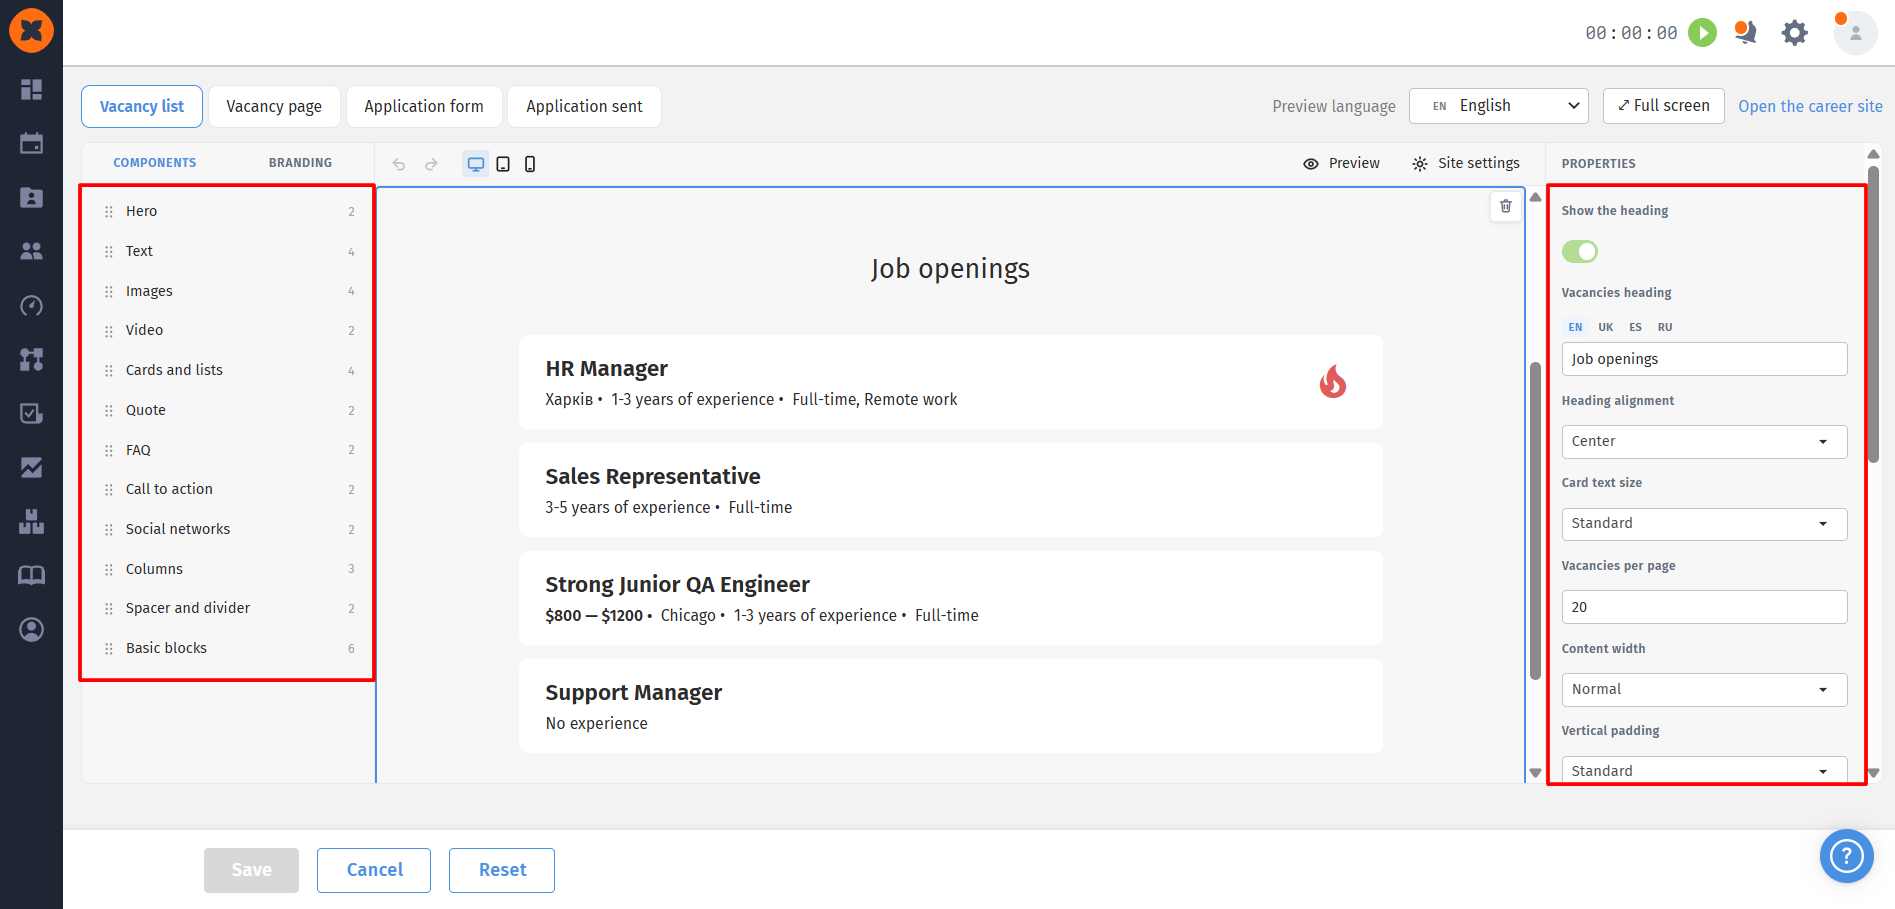
Block catalog: add cards, vacancy lists, text blocks, buttons, and video links;
Special blocks: Hero-block (main page only); Header, Footer, and Application Form can only be added once;
Flexibility: adjust padding, block colors, and mandate replacing template photos with custom images.
You can learn more about the functionality and its capabilities in the article “Stylization and localization of the career site”.
The new “Settings” - “Personalization” section allows companies to adapt the HURMA interface to match corporate brand identity or individual employee preferences.
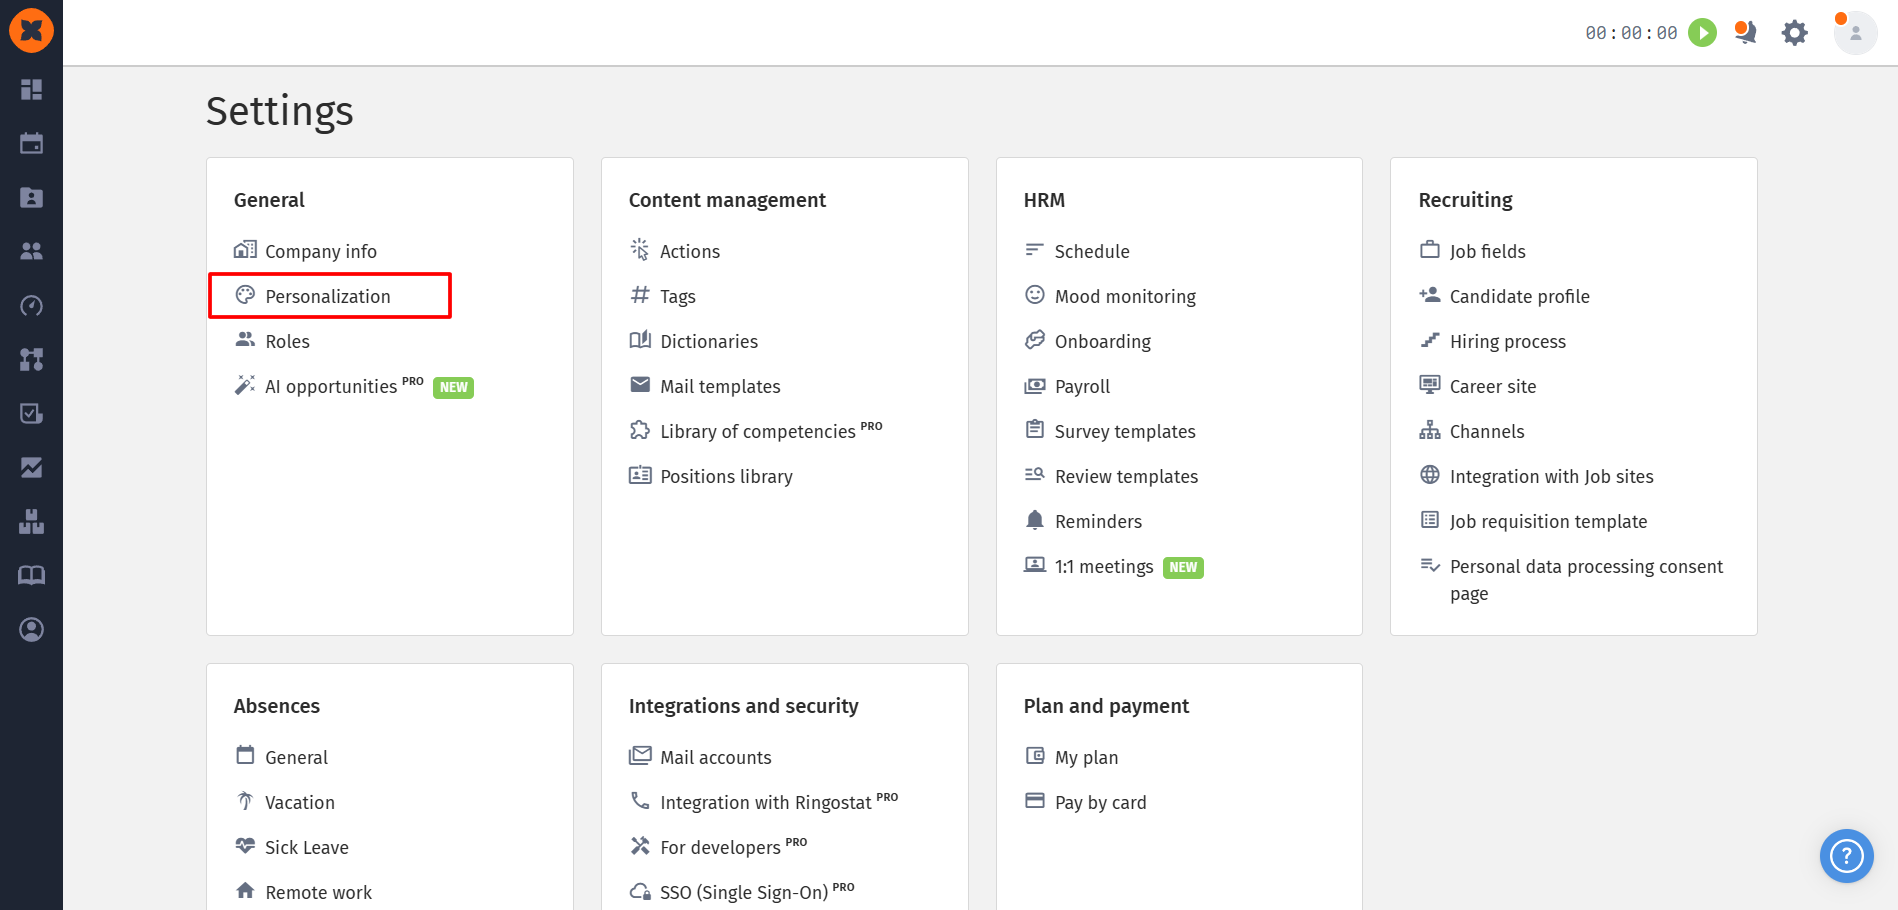
Administrators can establish a unified visual theme across the organization:
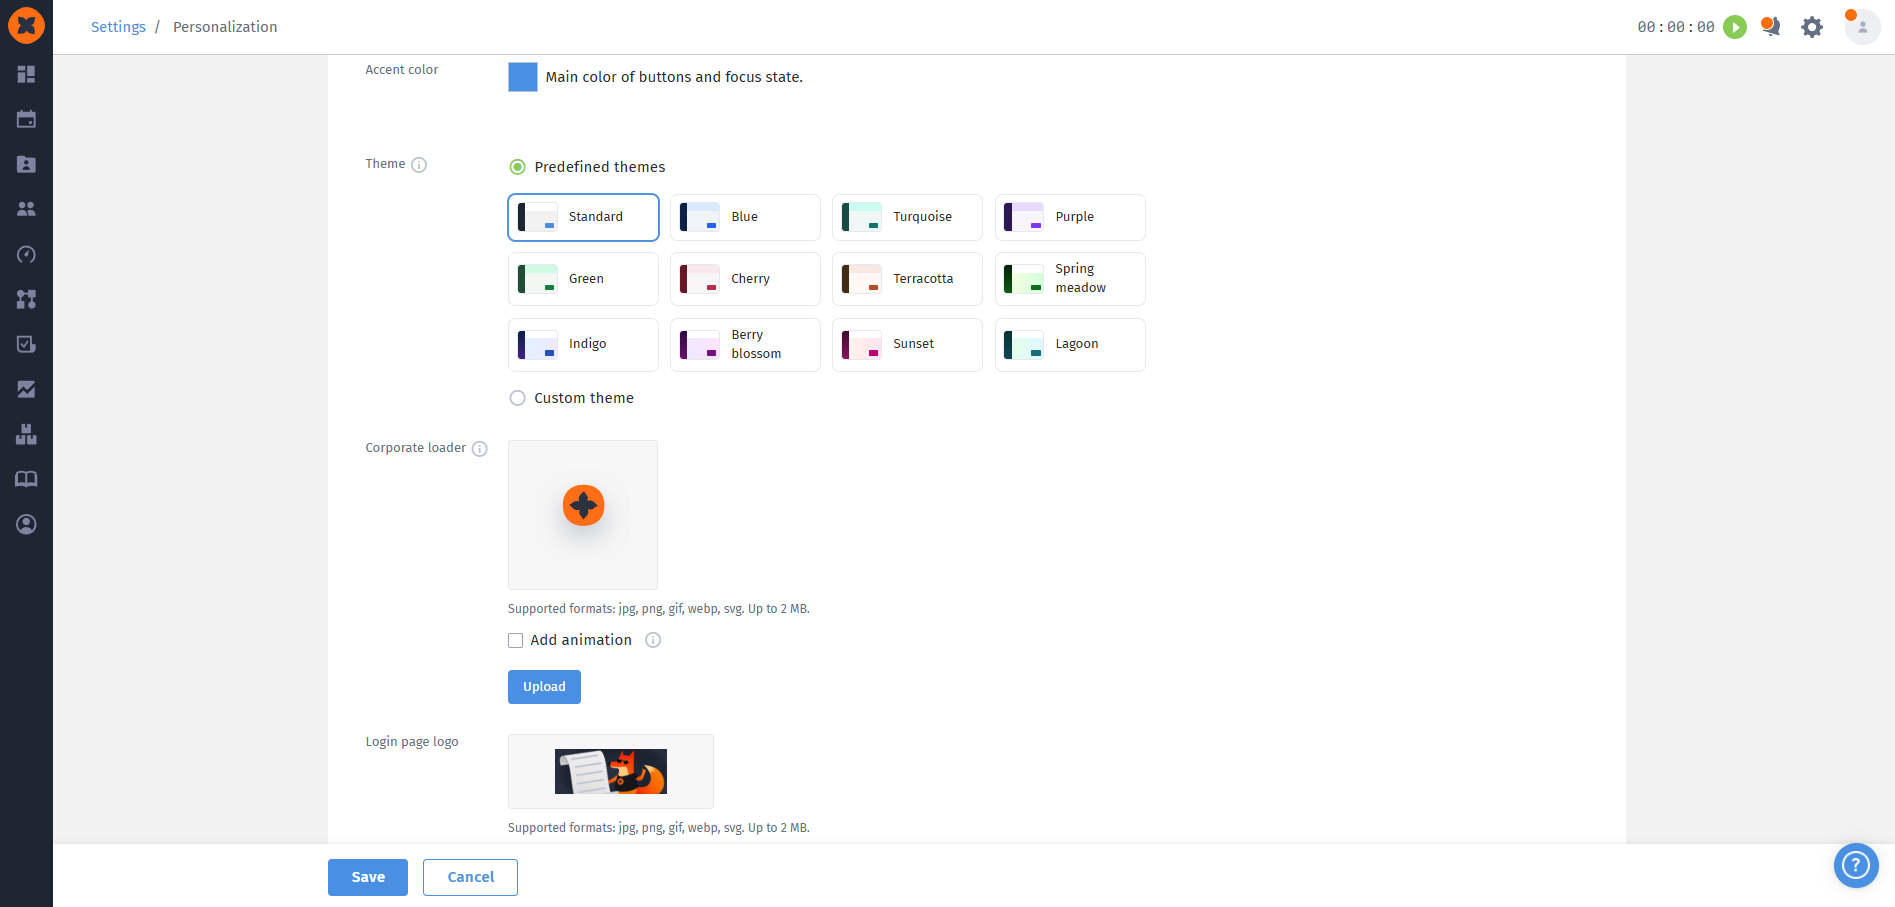
Accent color: flexible color selection for buttons and active elements via color gradient, eyedropper tool, or specific codes (HEX, RGB, HSL).

12 Pre-set color themes: ready-made palettes (Standard, Blue, Turquoise, Purple, Green, Cherry, Terracotta, Spring meadow, Indigo, Berry blossom, Sunset, Lagoon) that instantly update header, sidebar, and button styling system-wide;
Custom theme: step-by-step color assignment for workspace background, header, sidebar, and button accents;
Corporate loader: replace the standard HURMA loader icon with the company logo (JPG, PNG, GIF, WEBP, SVG up to 2 MB) with optional animation for static images;
Branded logos: upload custom logos for the login page and sidebar with animation support.
Accessible via “Account Settings” - “Personalization” in employee profiles:
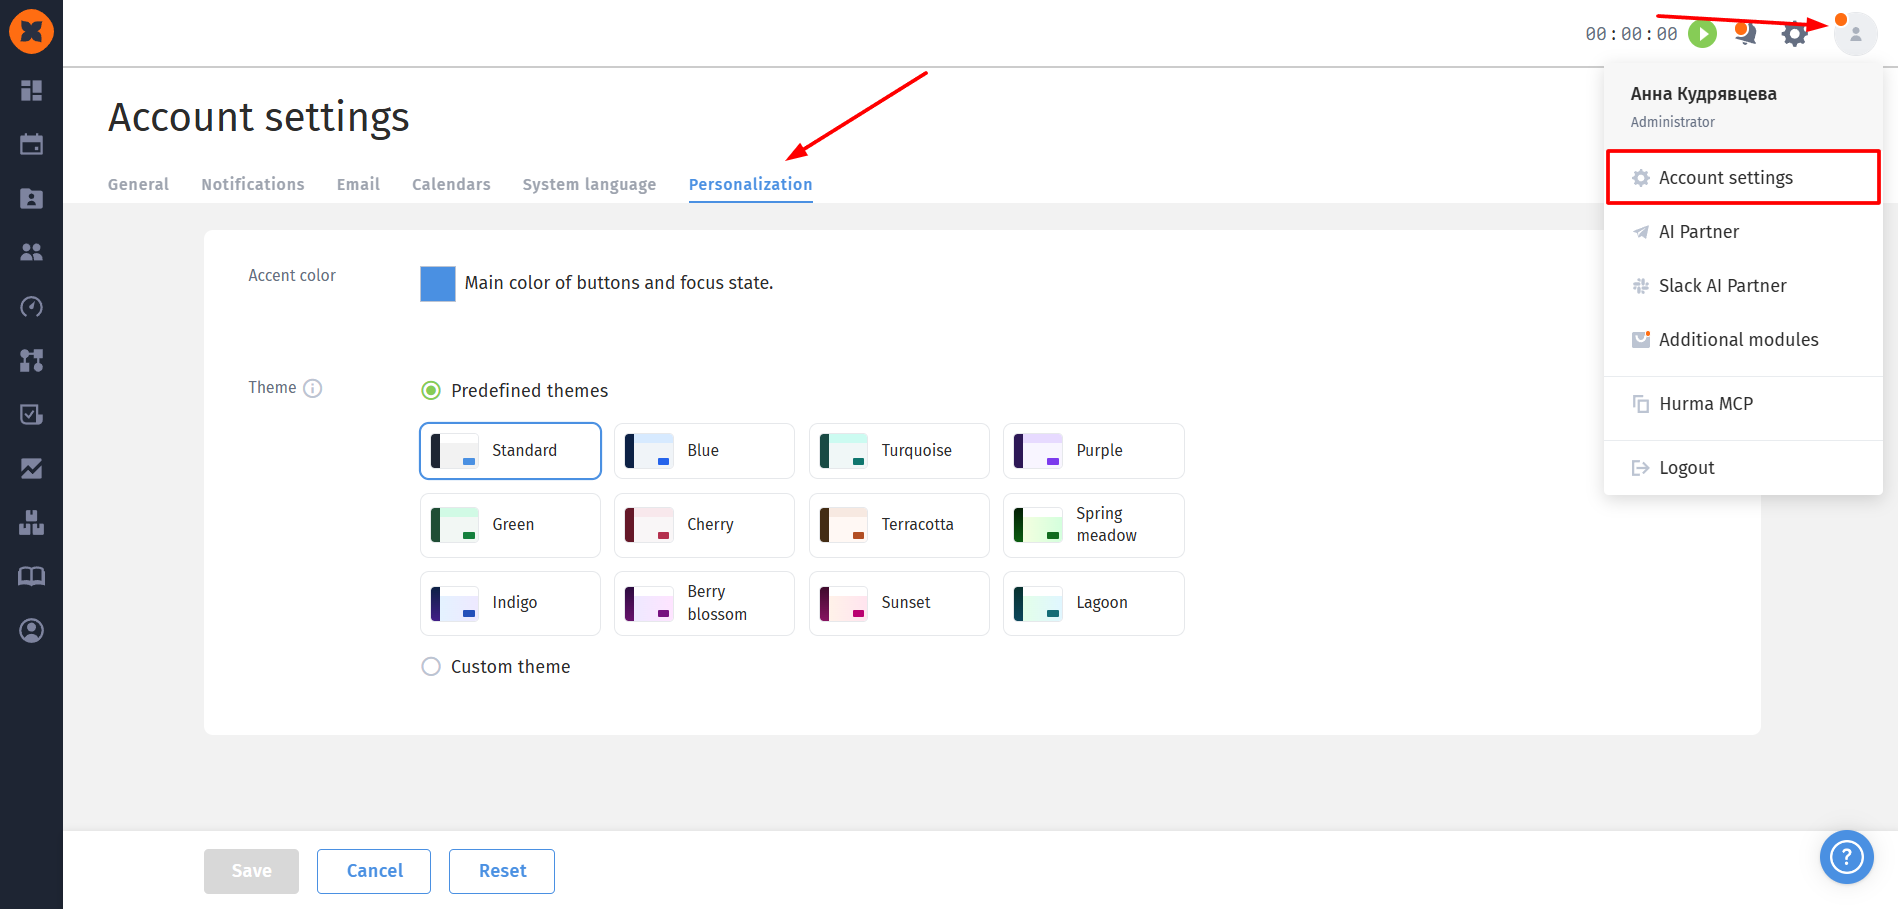
Individual theme selection: employees can choose their preferred theme or accent color without special permissions;
Personal priority: individual user themes override company themes for that user only, without affecting colleagues;
Brand integrity: corporate logos and loading animations remain centralized and editable only by administrators.
Previously, the list of evaluators was fixed when the cycle was launched, and if an employee left the company, their manager changed, or an error was made, the cycle had to be restarted. In the updated version, cycle administrators can flexibly change the list of evaluators directly within an active cycle without losing any responses that have already been collected.
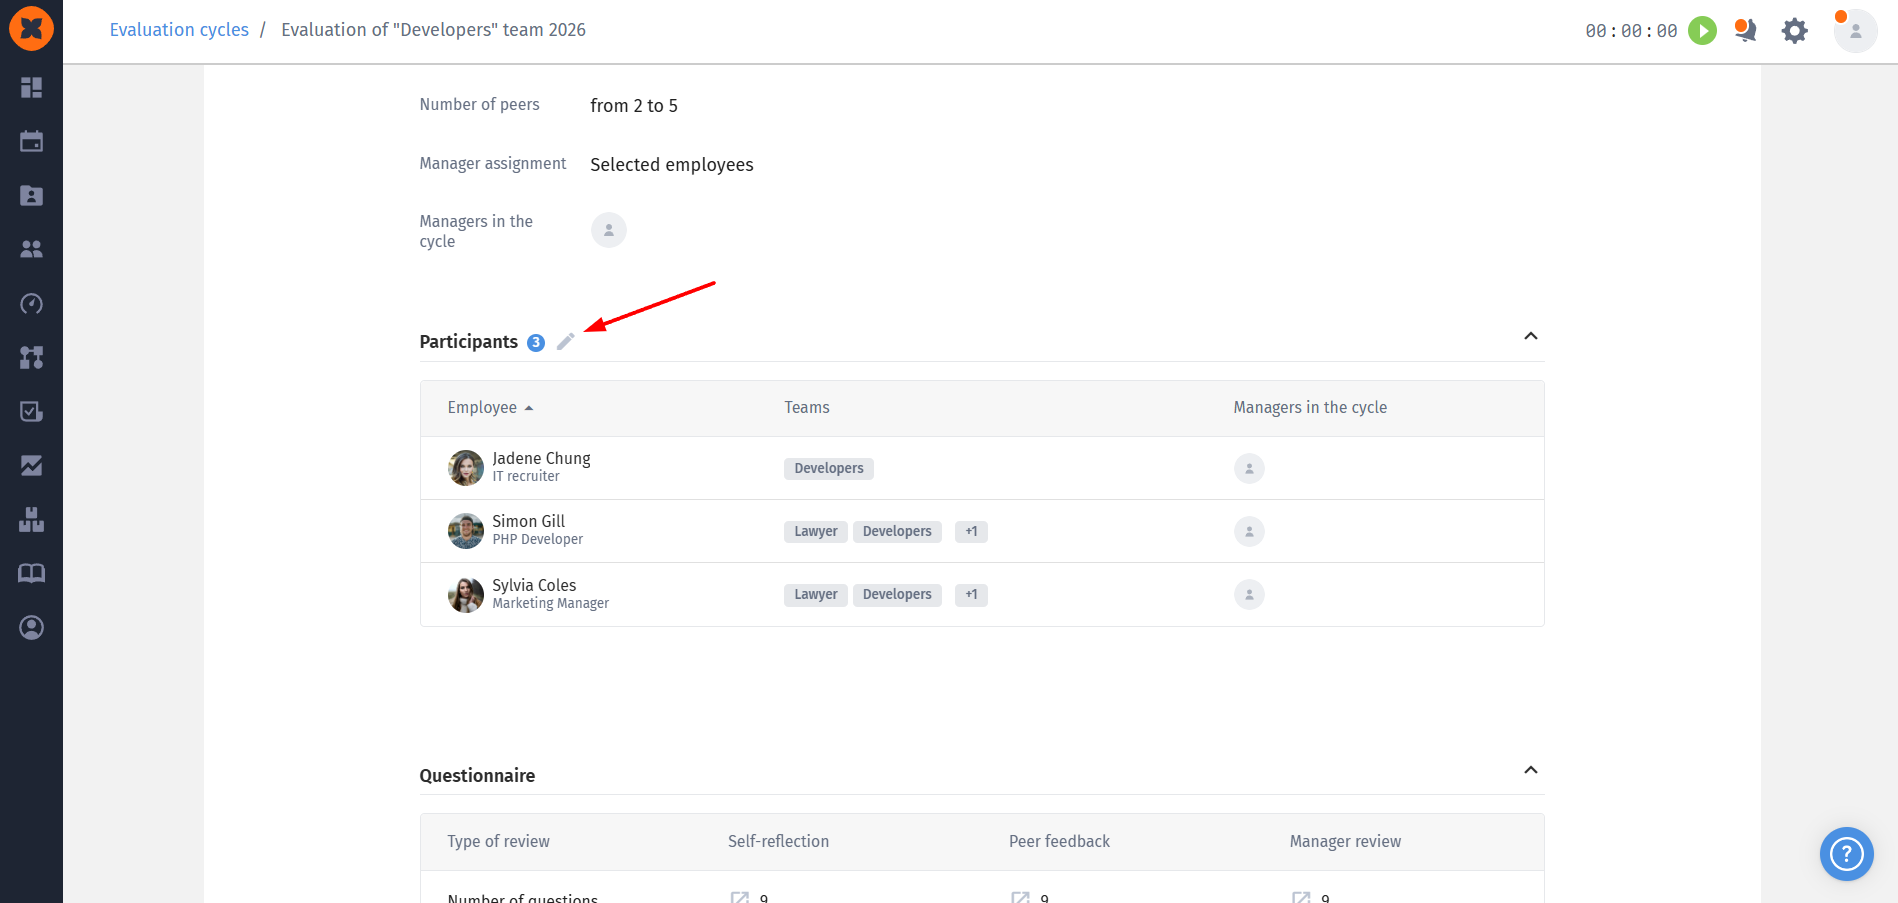
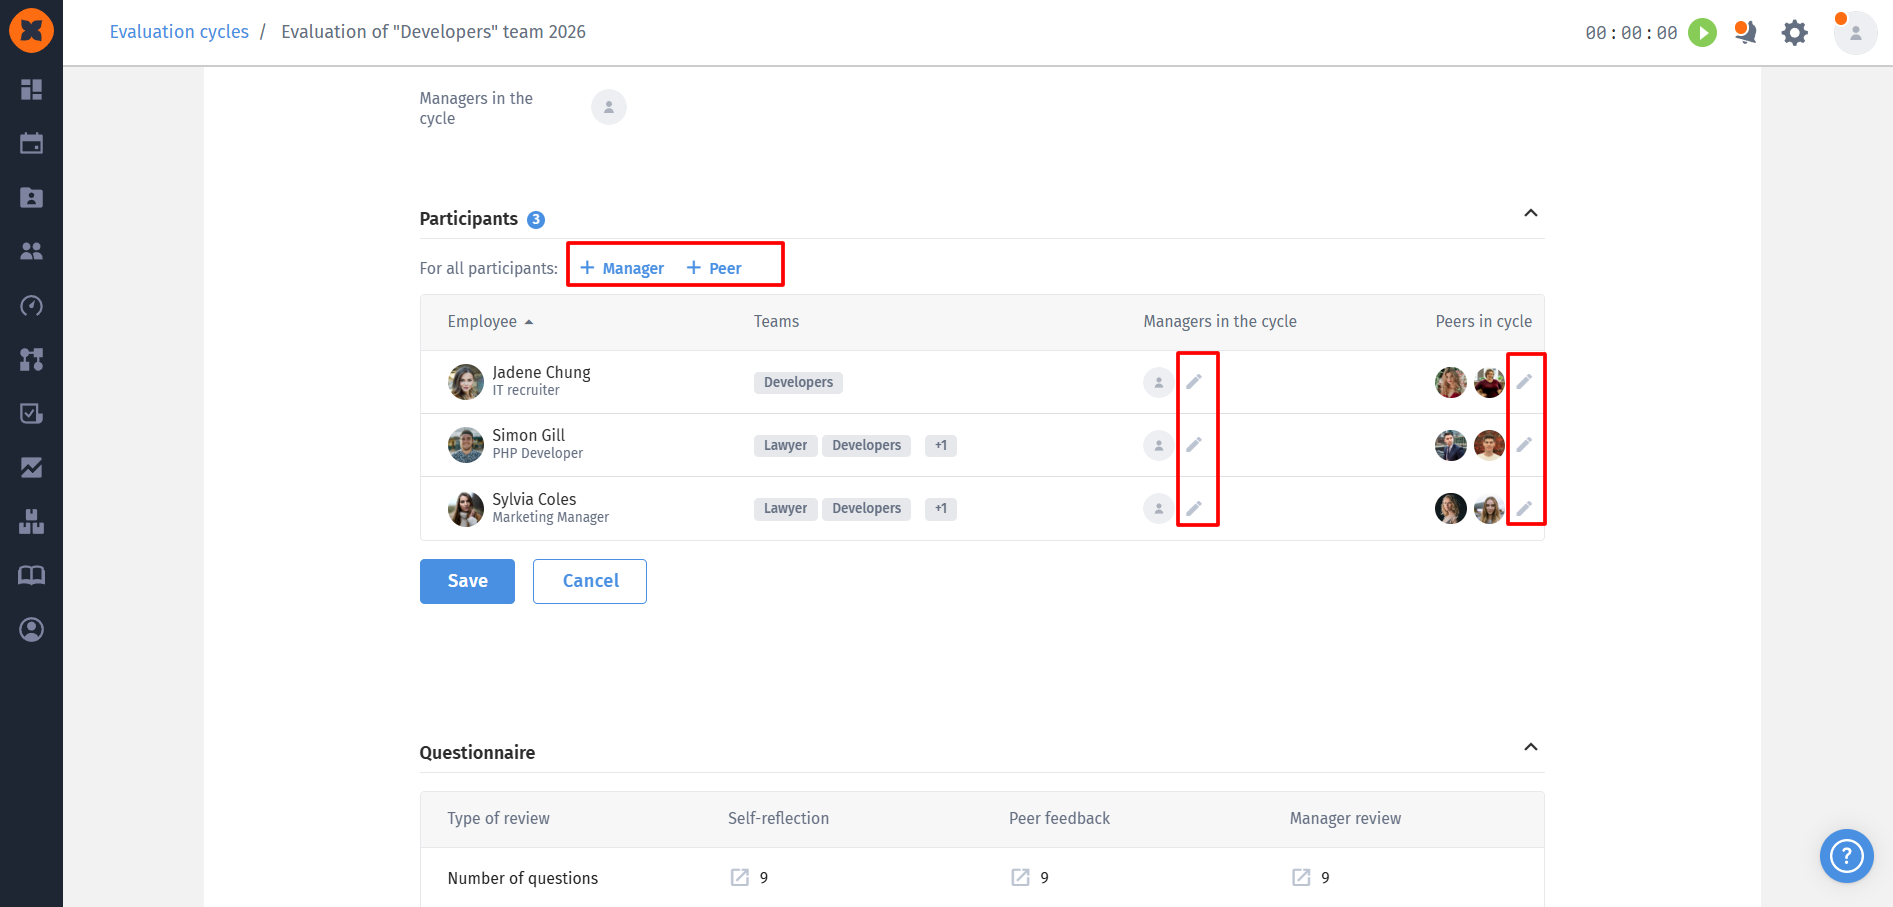
Preservation of submitted responses: evaluators who have already submitted surveys cannot be removed, ensuring their responses remain in historical records;
Individual & Bulk editing: add or remove evaluators individually or in bulk across participants (managers, peers, subordinates);
Automatic notifications & Tasks: system automatically assigns tasks and sends notifications to newly assigned evaluators upon saving;
Metric & progress updates: The “Progress” tab instantly recalculates execution tables and analytics metrics;
Administrator flexibility: peer assignments can be adjusted even after a participant makes choices, unconstrained by system limits;
Cycle duplication: targeted manual edits are not copied when duplicating a cycle - new cycles build on base evaluation types.
Previously, employee job titles in profiles and in the “Career” section were entered as a simple text field. Due to the lack of a unified database, inconsistencies in job title naming were common, accidental duplicates appeared, and renaming or correcting errors had to be done manually for each employee individually.
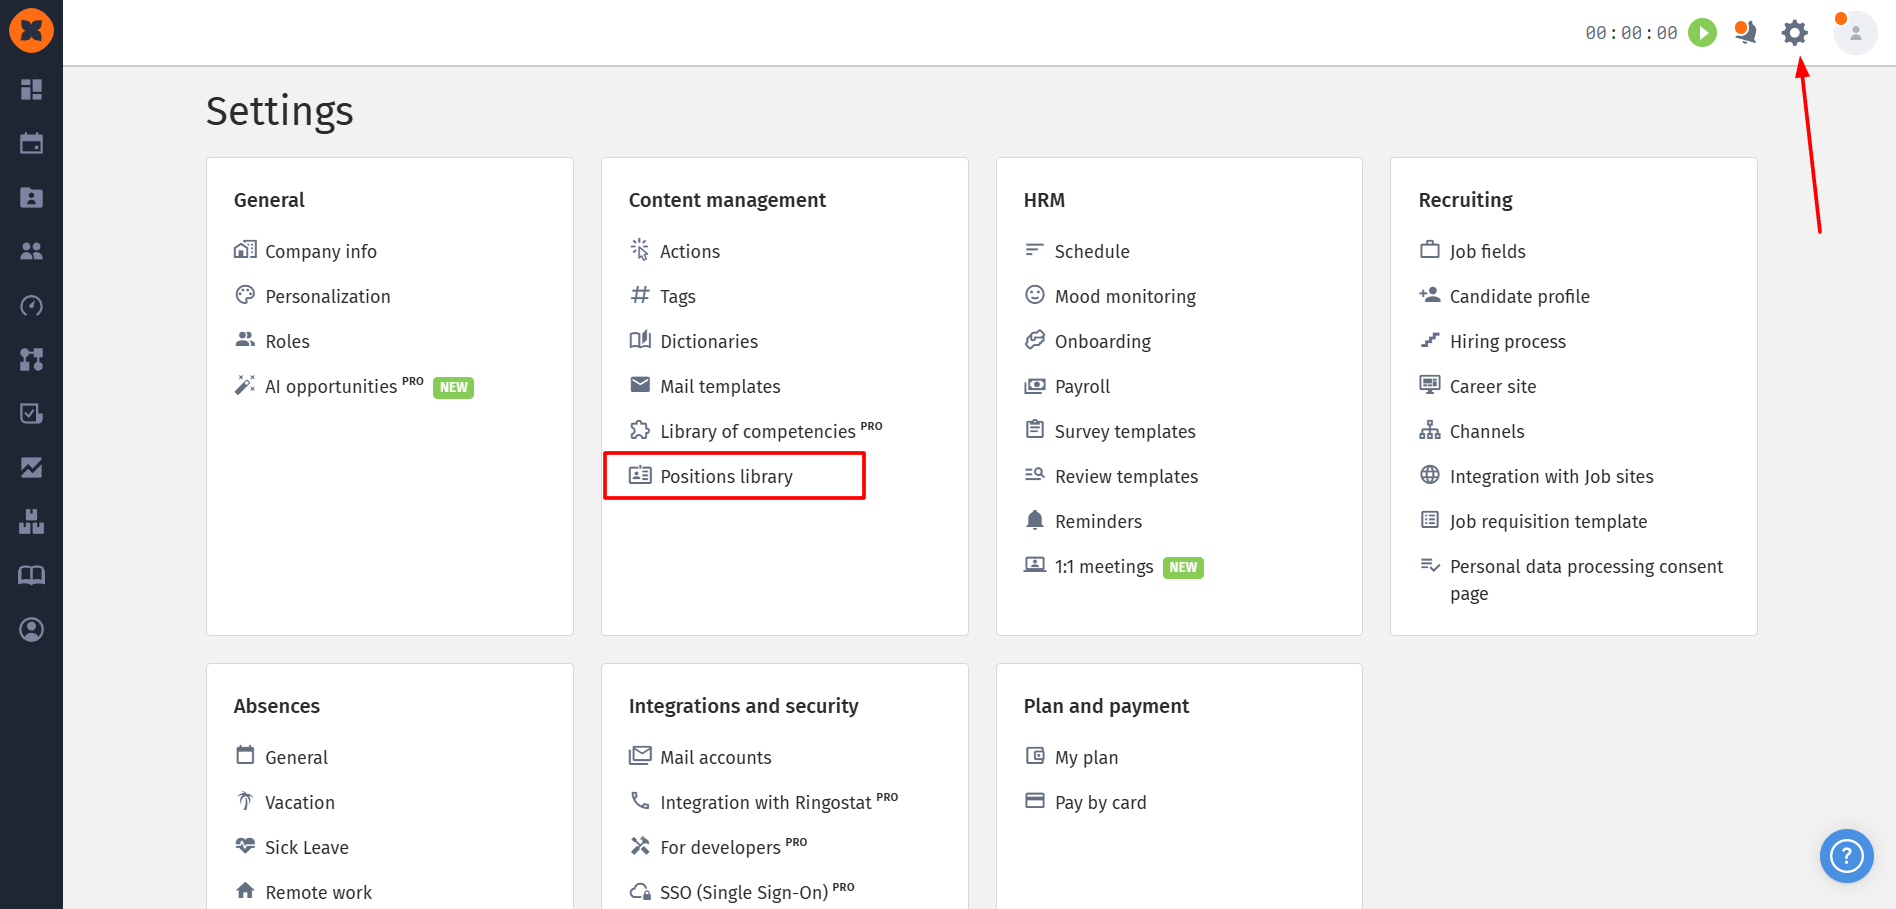
In the updated version of HURMA, we have introduced the “Positions library” - a single centralized directory in the system’s general settings that fully solves this problem and ensures clean, consistent HR data.
You can find the “Positions library” in the “Settings” section.
Automatic data migration: existing positions migrate automatically upon update; active positions stay "Active", while former employee positions move to "Archive".
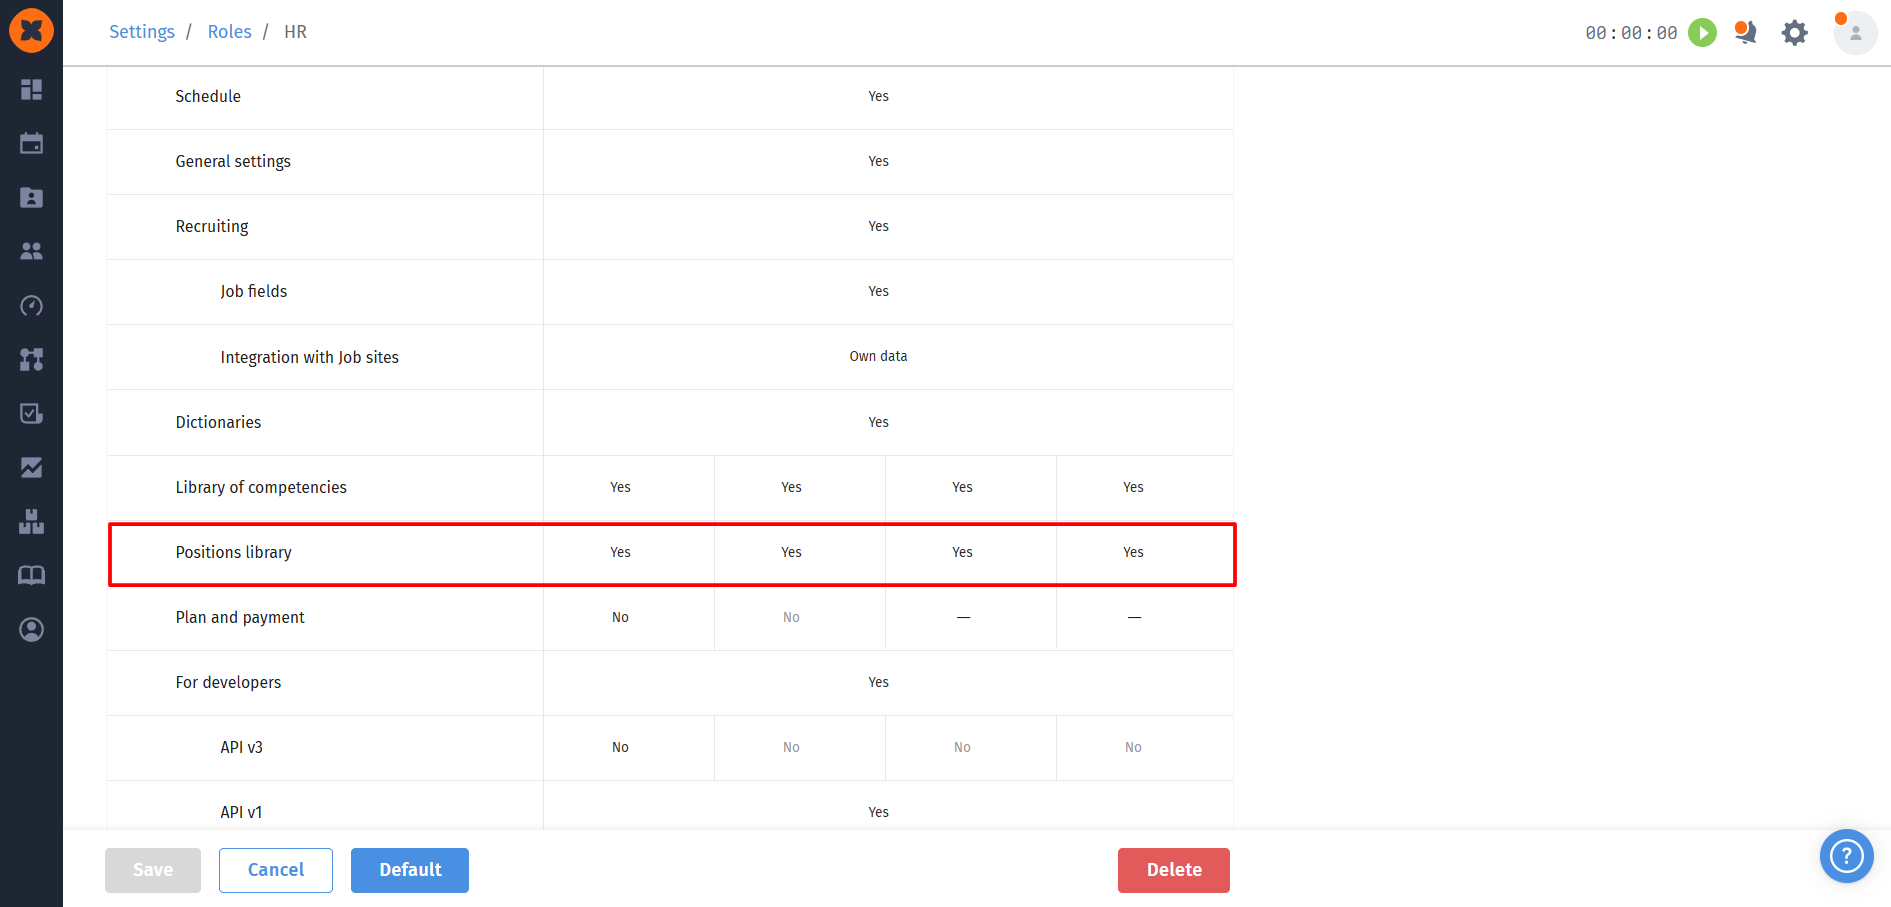
Access control: administrators and HR have full access by default, with custom role permissions available for viewing, creating, editing, or deleting entries;
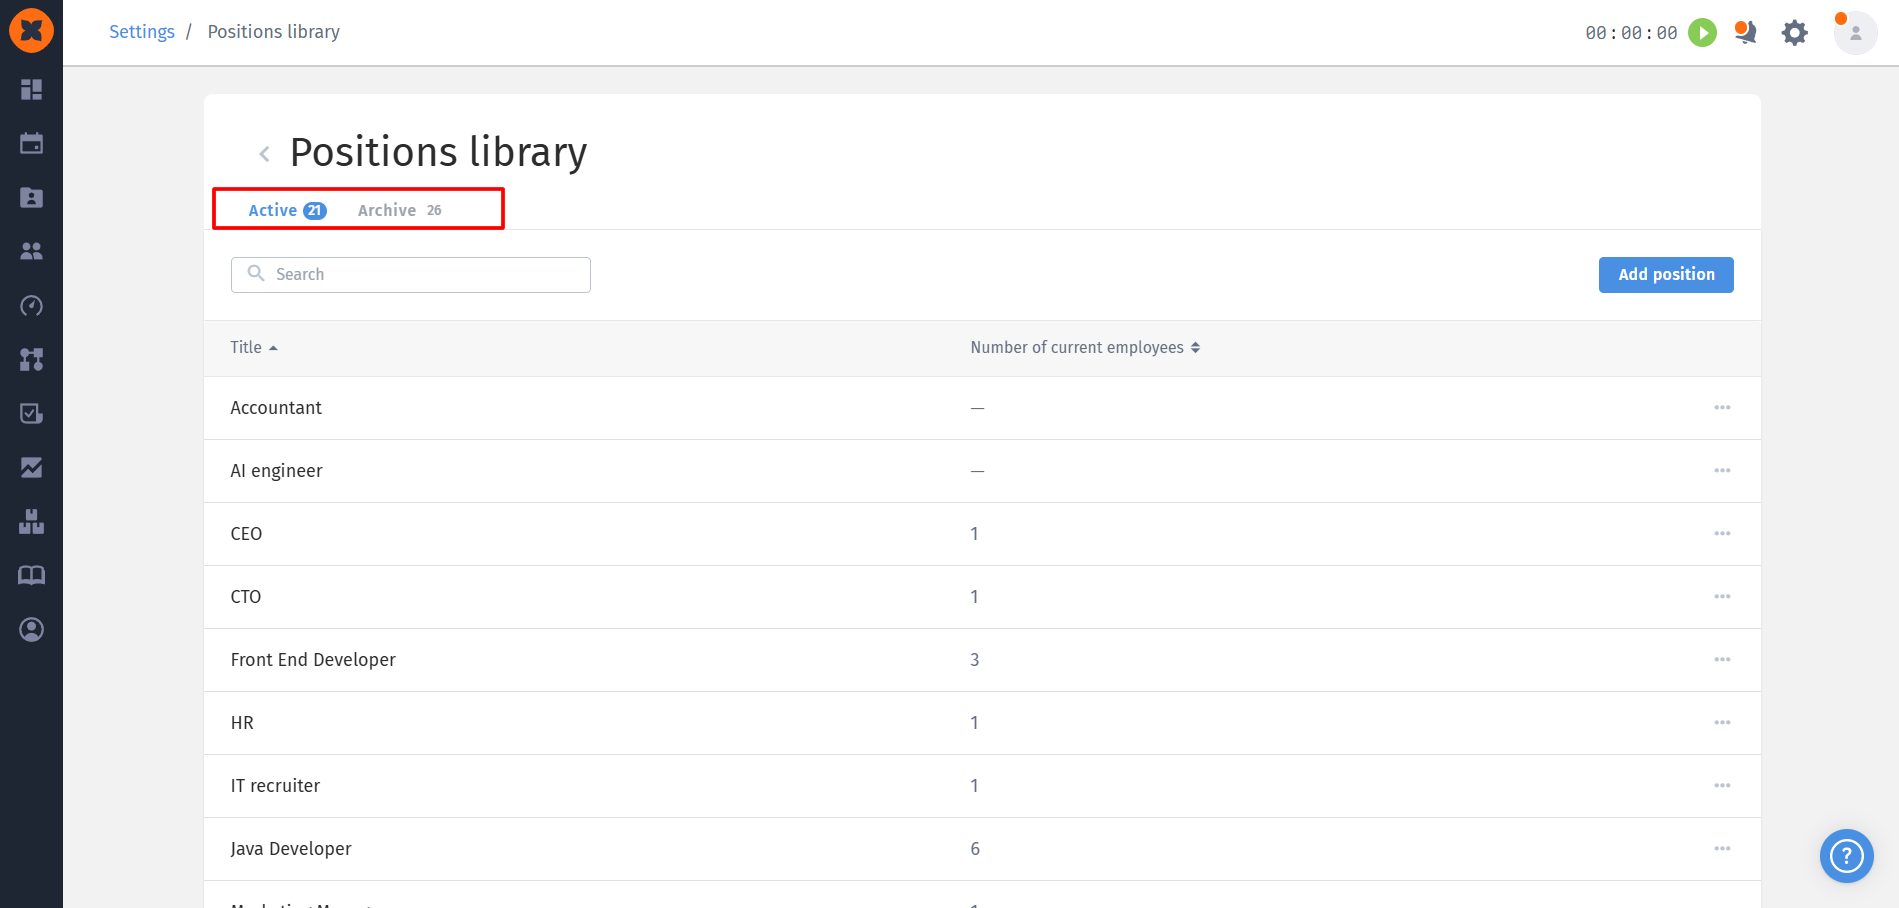
Interface & Employee counter: features "Active" and "Archive" tabs showing current employee counts per position (excluding former staff);
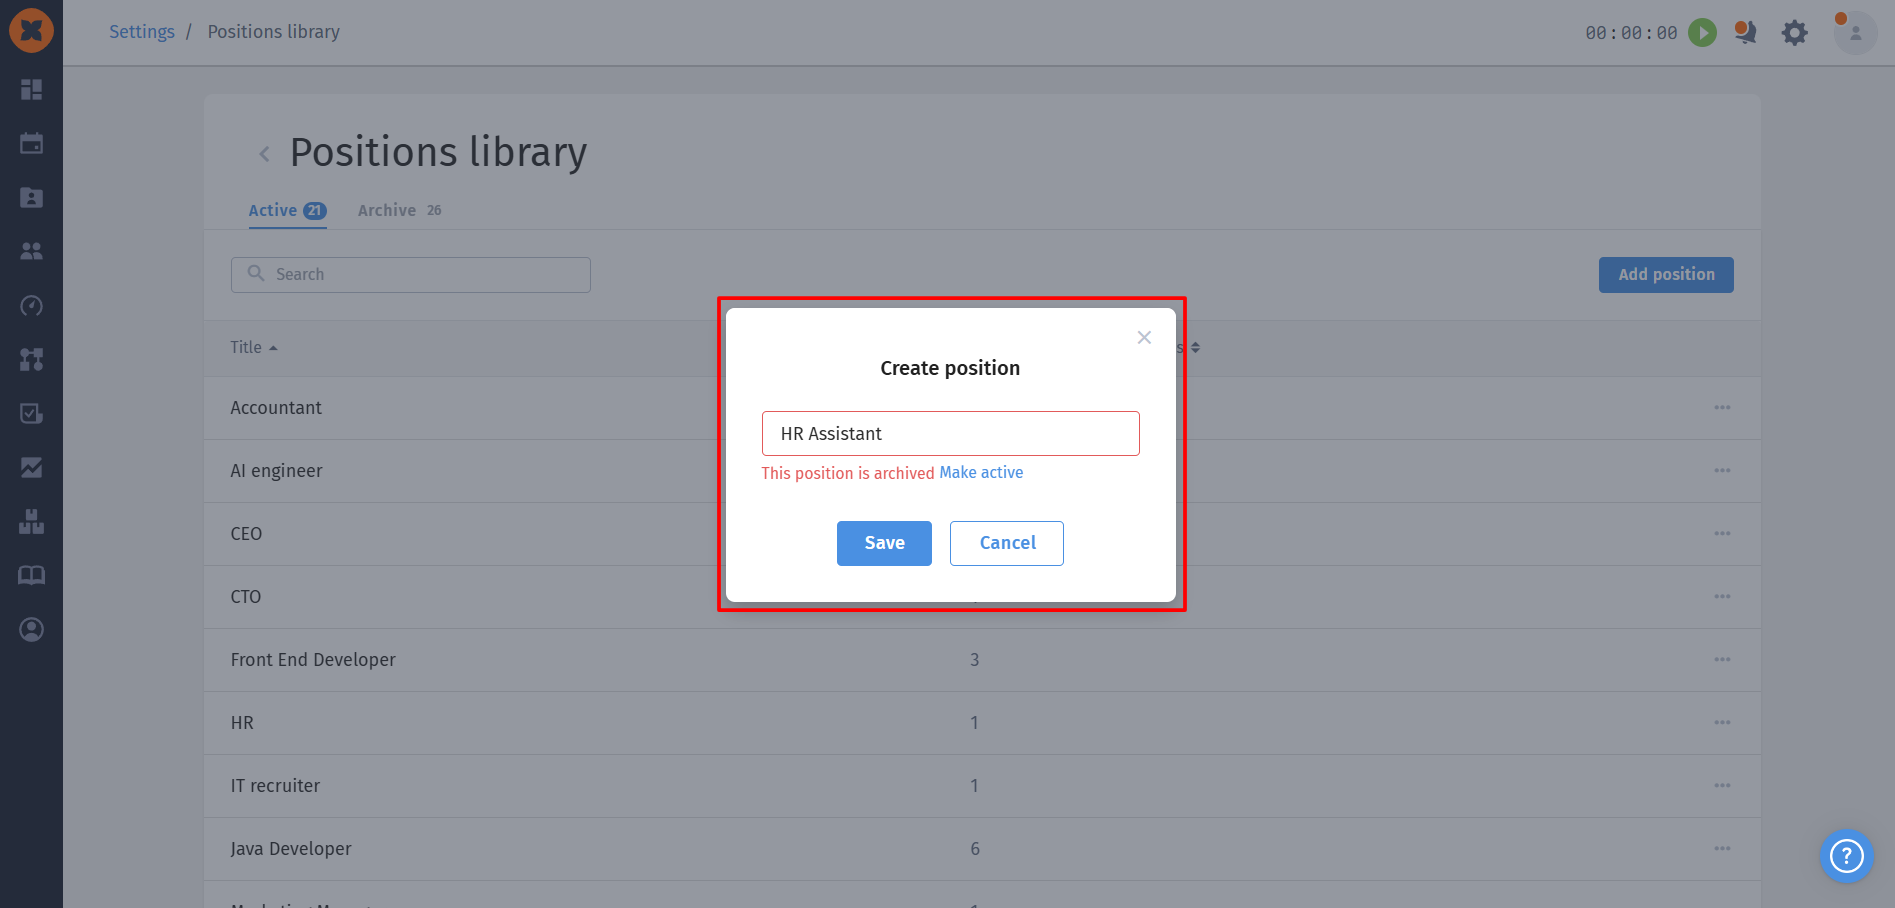
Duplicate protection: automatically checks database when creating positions, offering one-click restoration for archived positions;
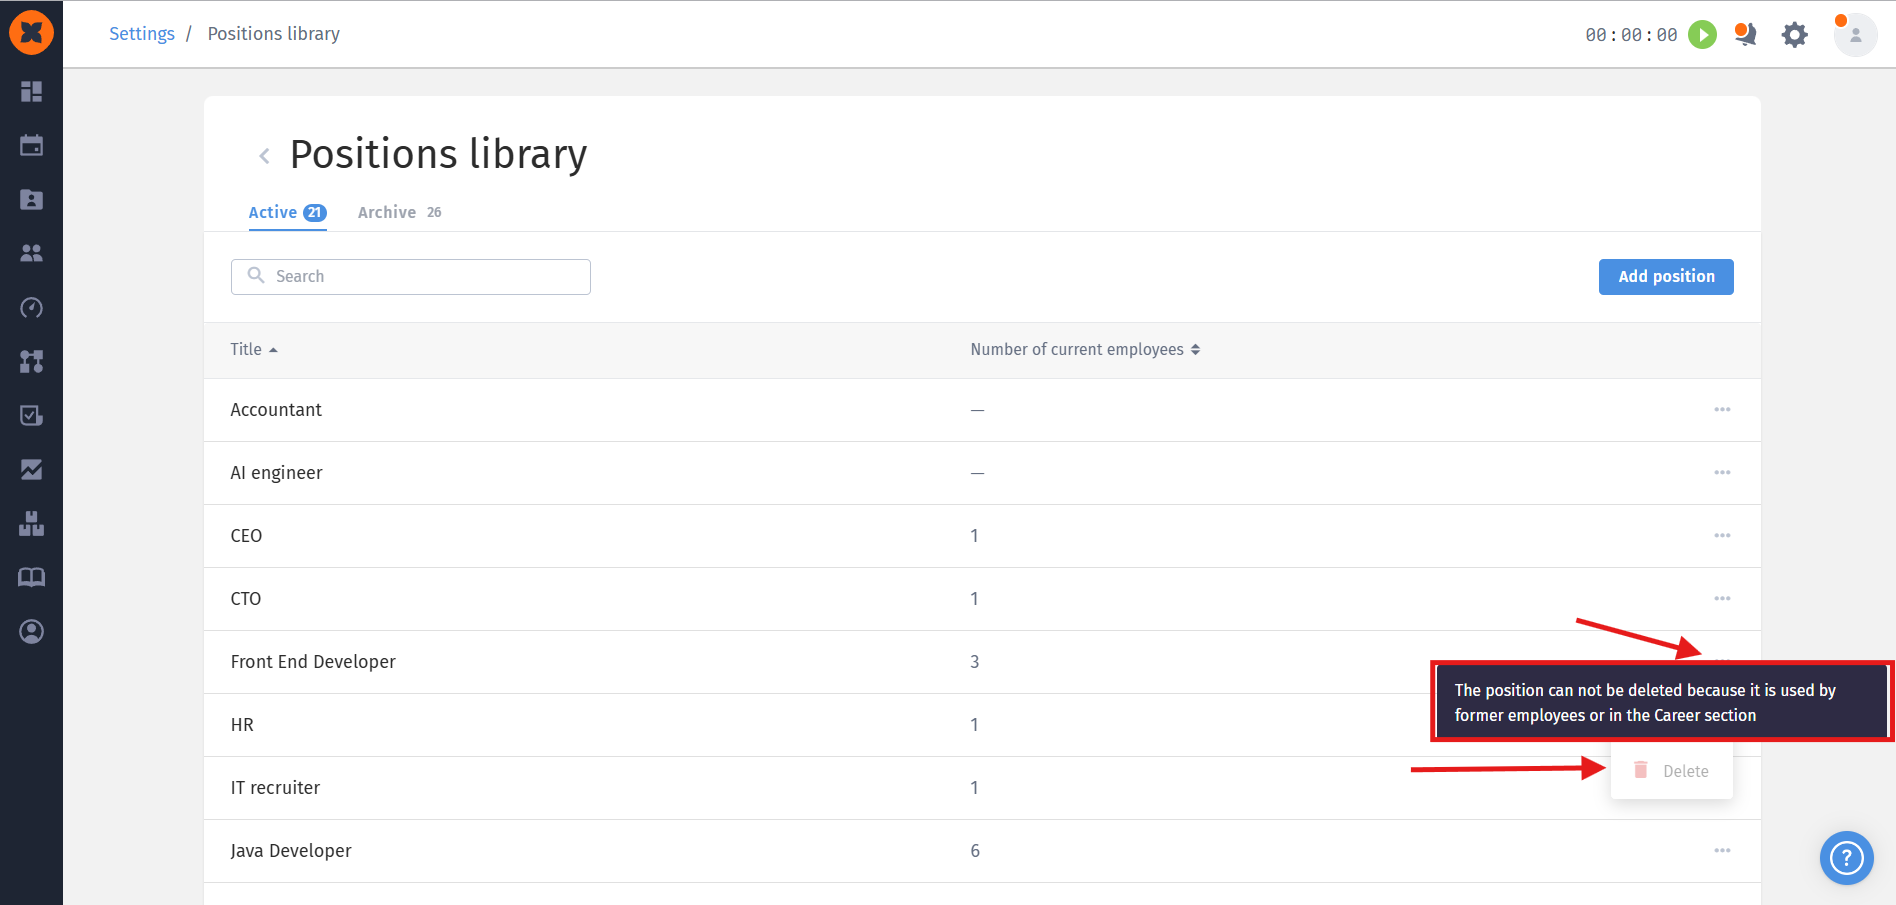
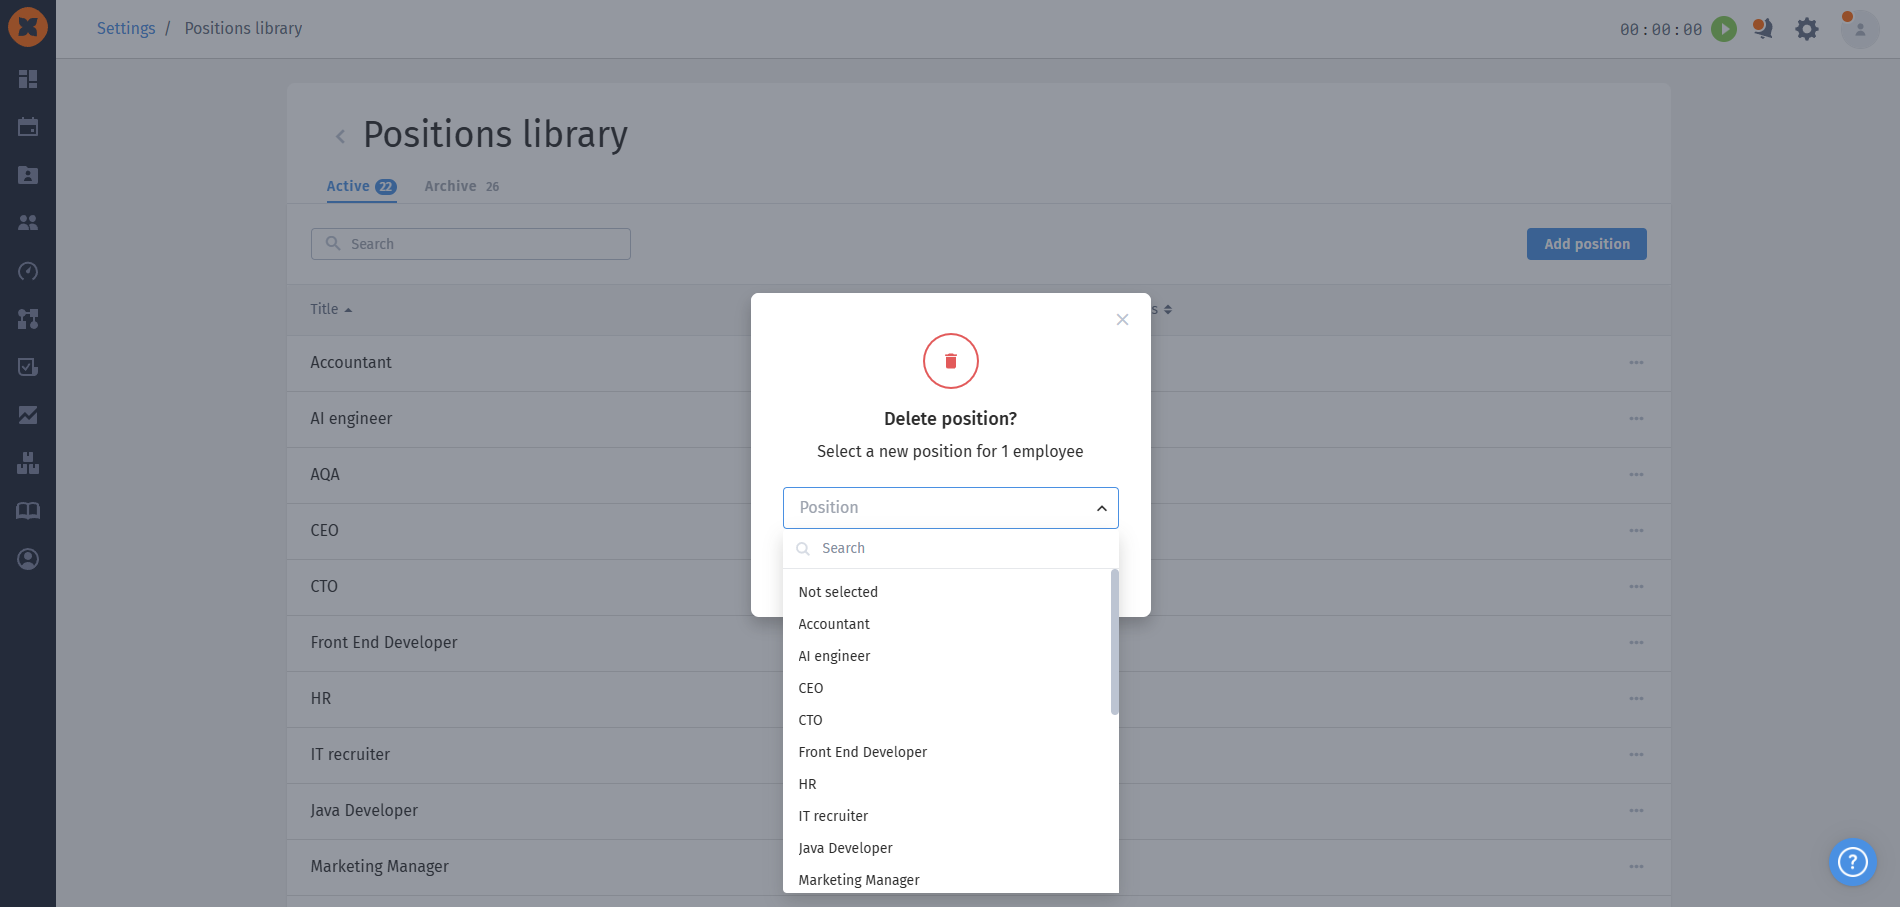
Deletion without losing associations: a position can only be deleted if it is not used in employees’ historical career records. For positions that are inactive in the system, a standard deletion confirmation window will appear. If a position is assigned to employees, when you try to delete it, the system will offer you the option to replace it with another active position or set it to “Not selected”.
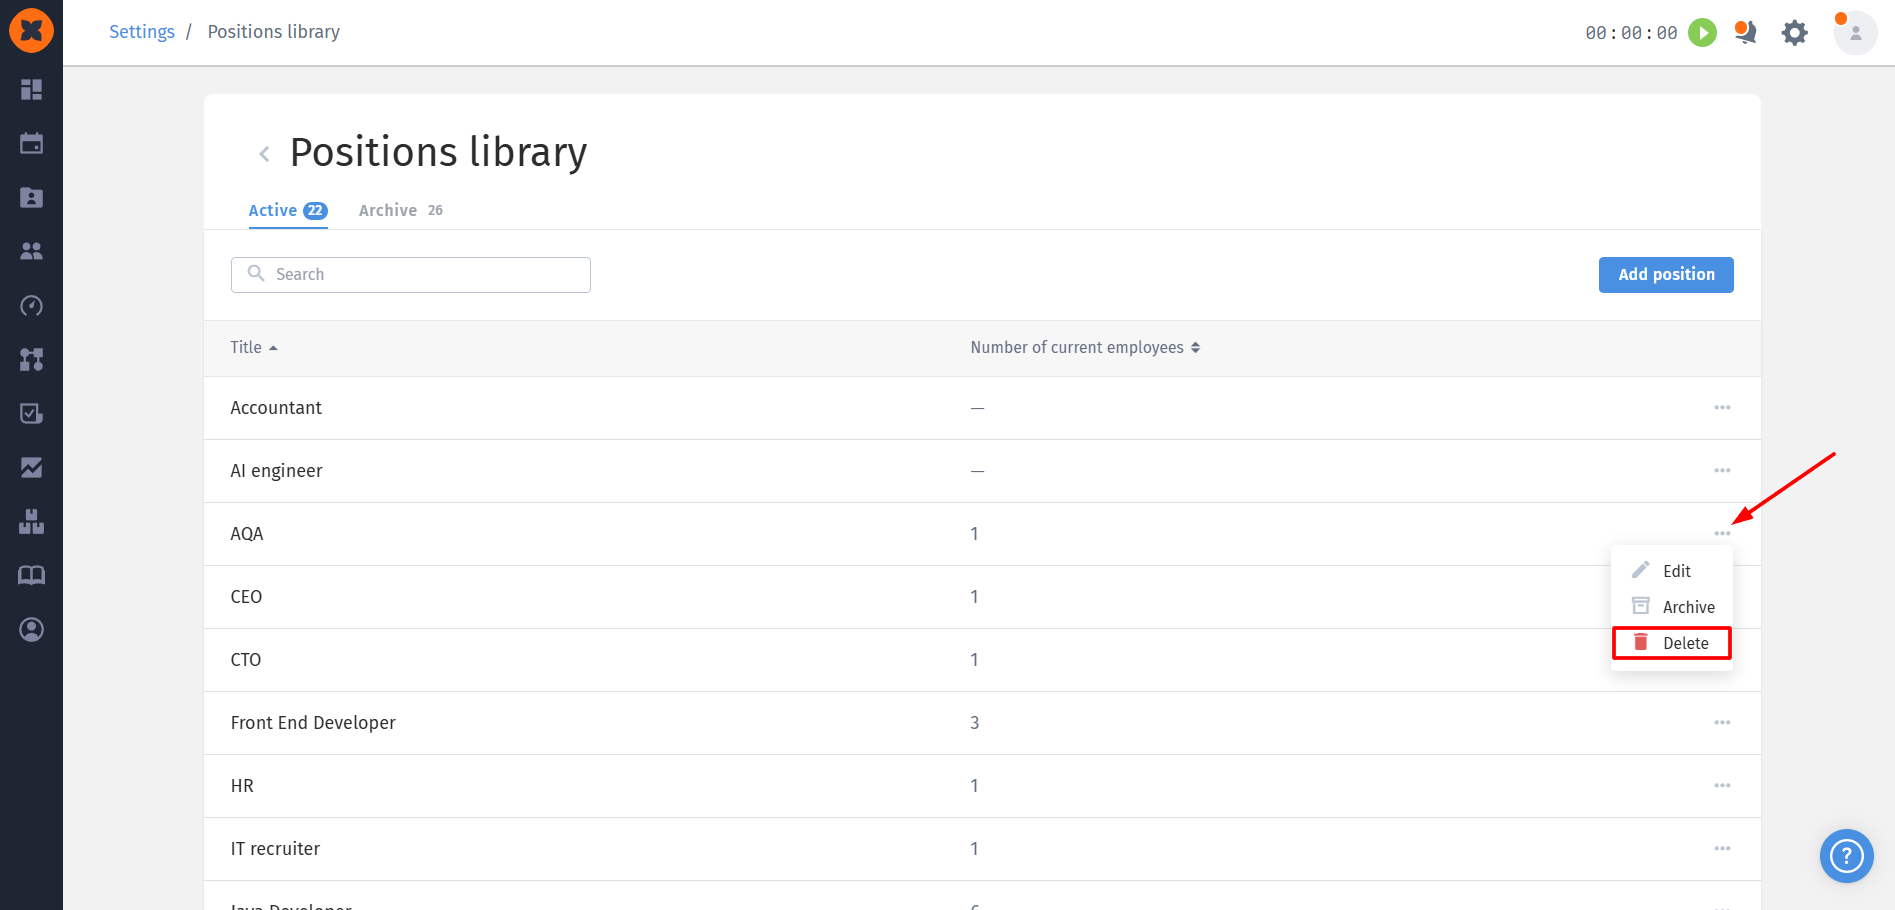
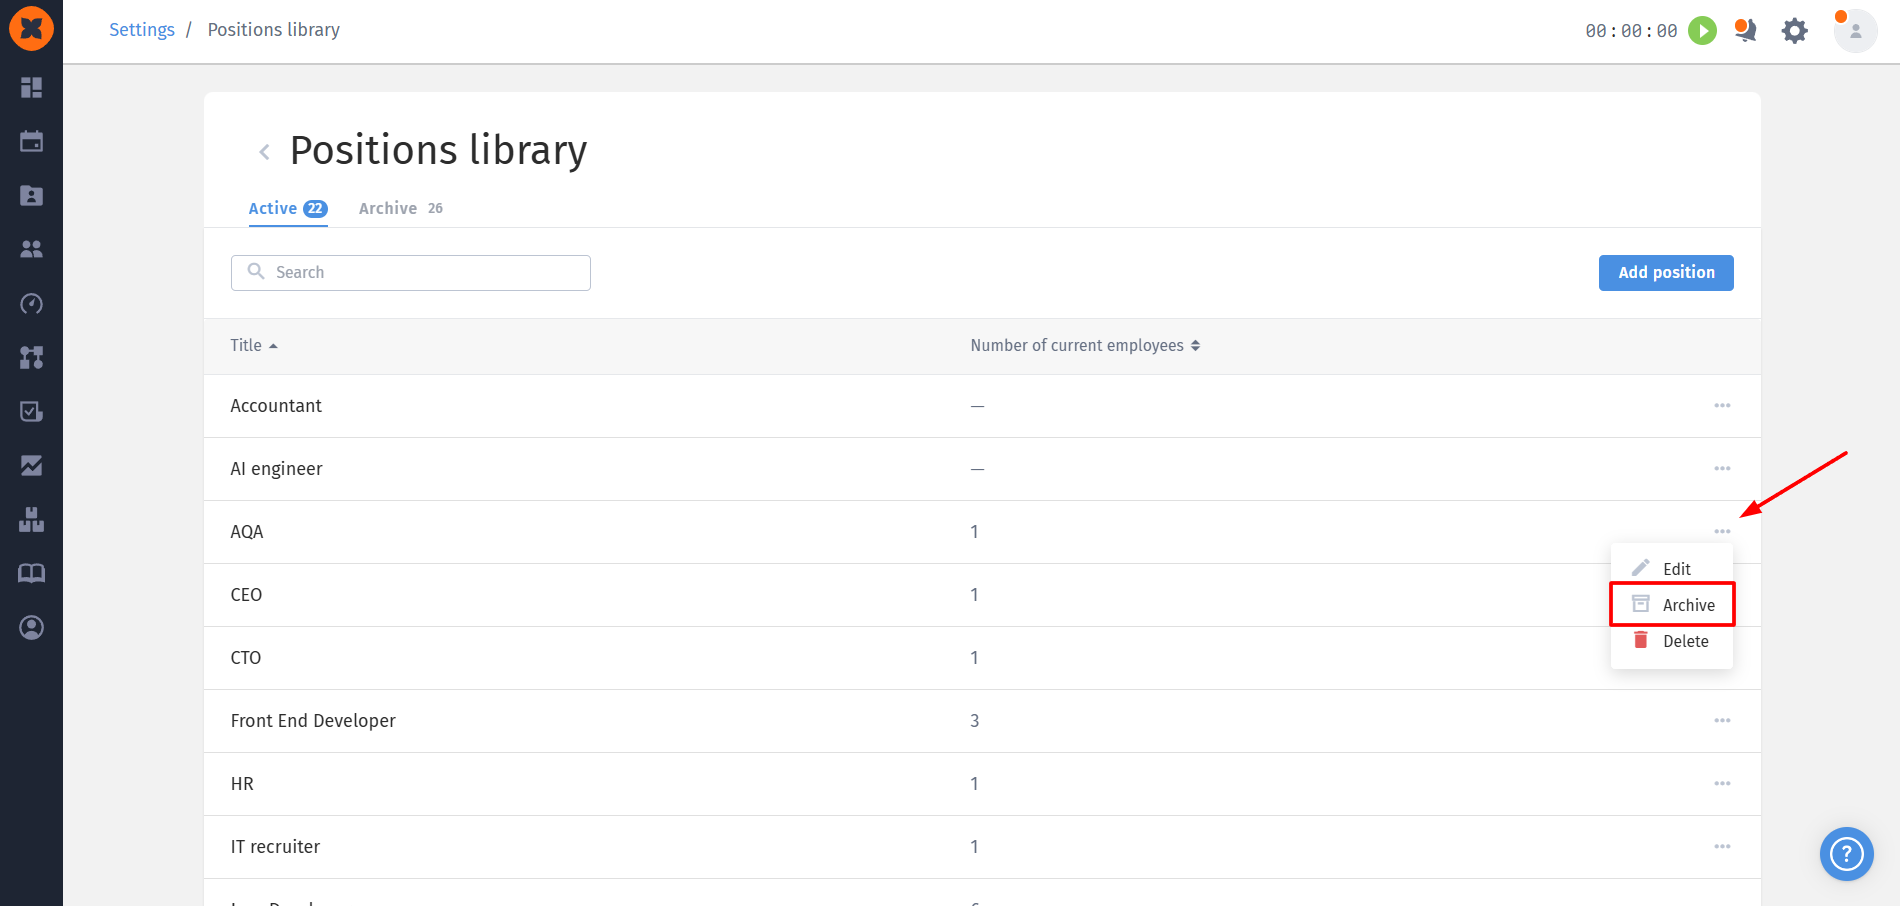
Archiving: unused positions can be archived to hide them from new profile creation while keeping existing records intact;
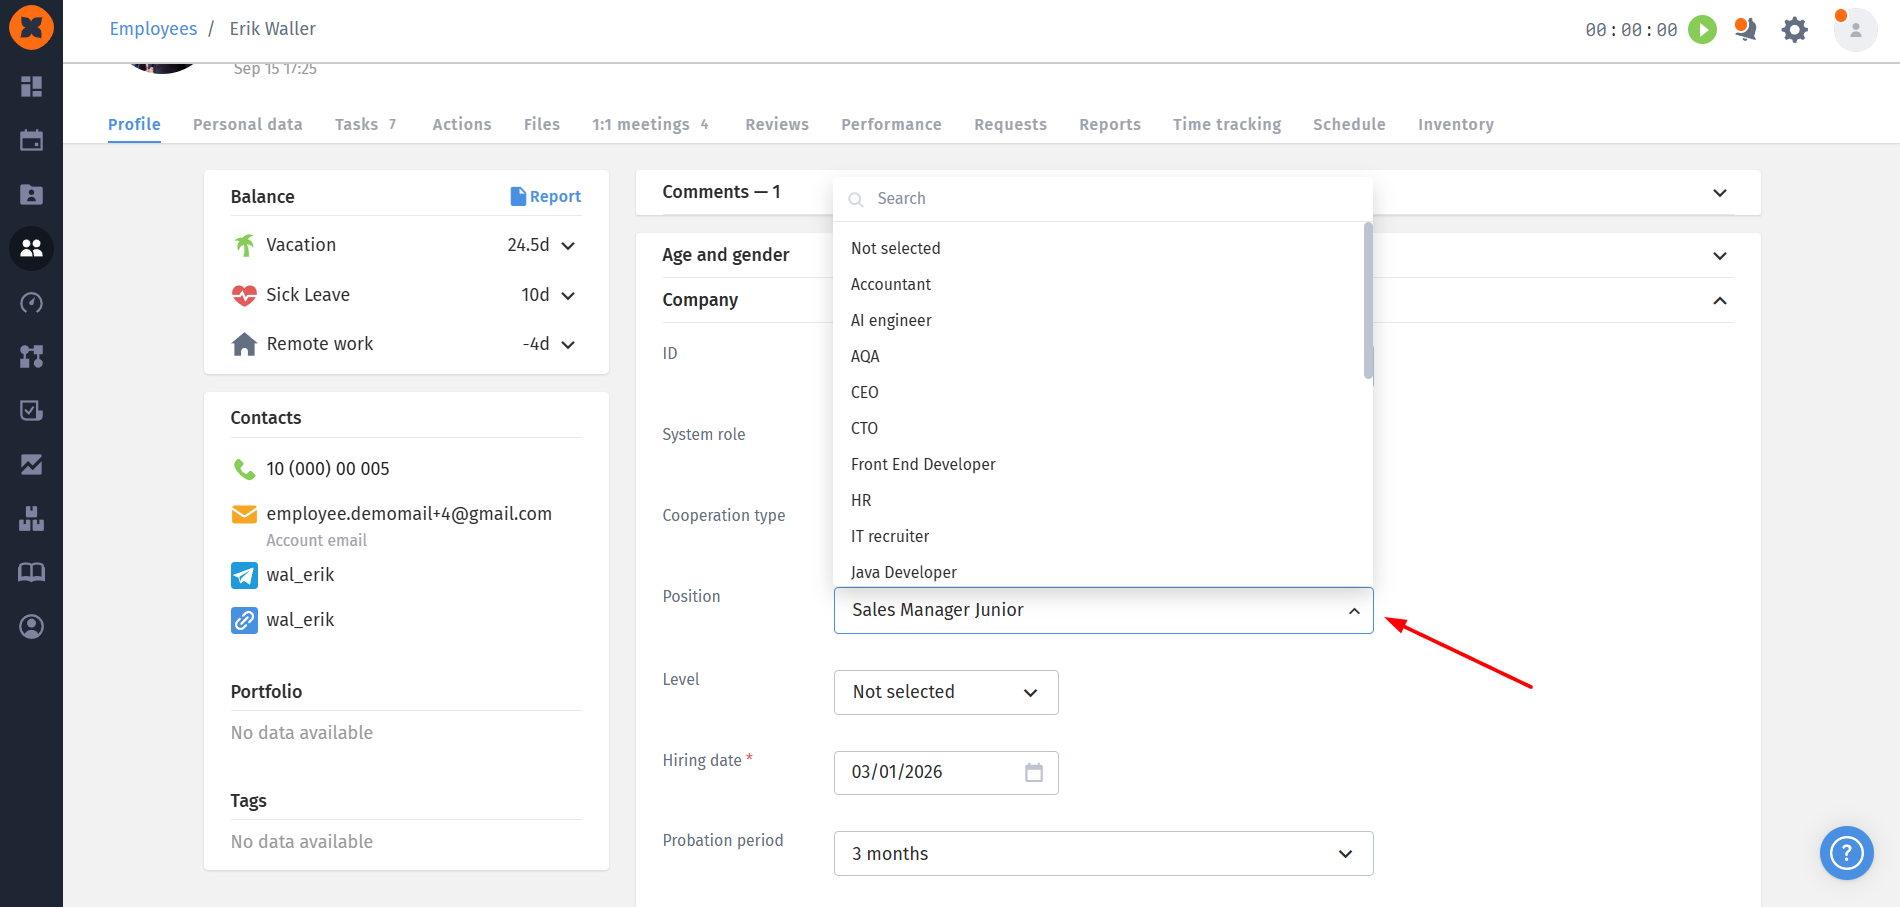
From text field to dropdown list: instead of manually entering text in employee profiles, the “Career” section, and when moving candidates to the employee roster, a selector with active positions is now available. The field is optional (the default value is “Not selected”, in which case the positions section is simply not displayed in the profile);
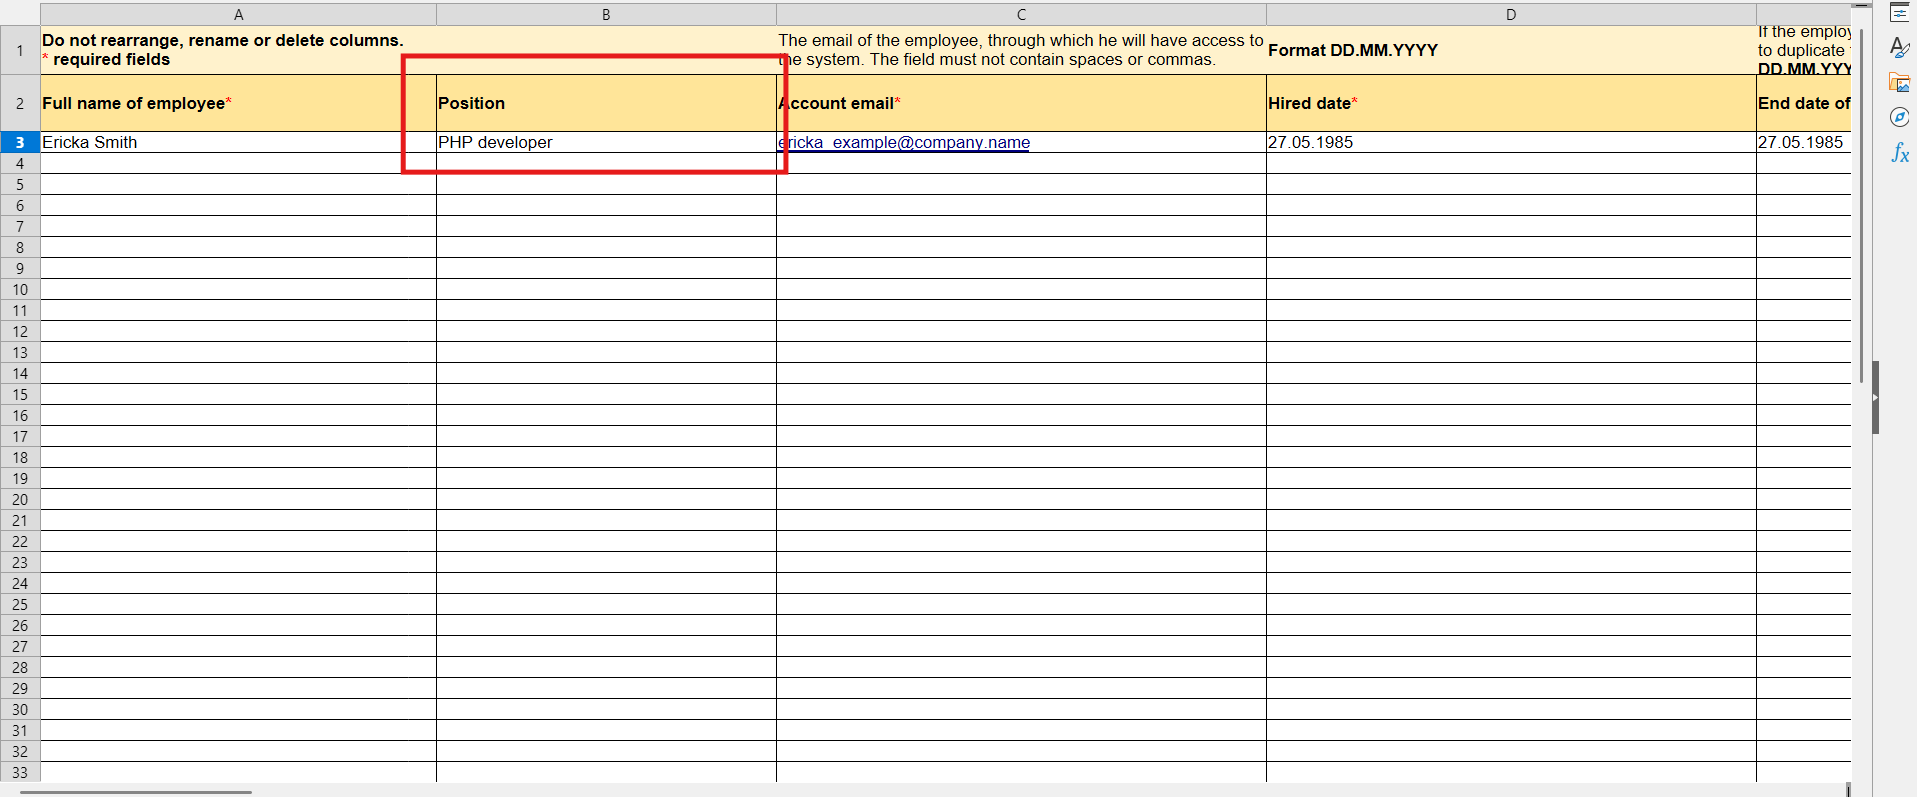
Updated employee import: the position column in the import templates is no longer mandatory. During import, HURMA automatically recognizes positions: it retrieves the required IDs, converts an archived position to an active one, or automatically creates a new entry in the library if no match is found;
Safe automation: positions can be used as criteria for triggering scenarios. Archiving a position will not stop the scenario, while attempting to delete it will pause the automation and highlight the field in red to prevent disruptions.
We’ve added a long-awaited feature for building your own talent pool. You can now efficiently collect, organize, and track candidates who may be a good fit for future company vacancies, without tying them to current active hiring processes.
New access permission: a separate “Talent pool” permission is now available in role settings;
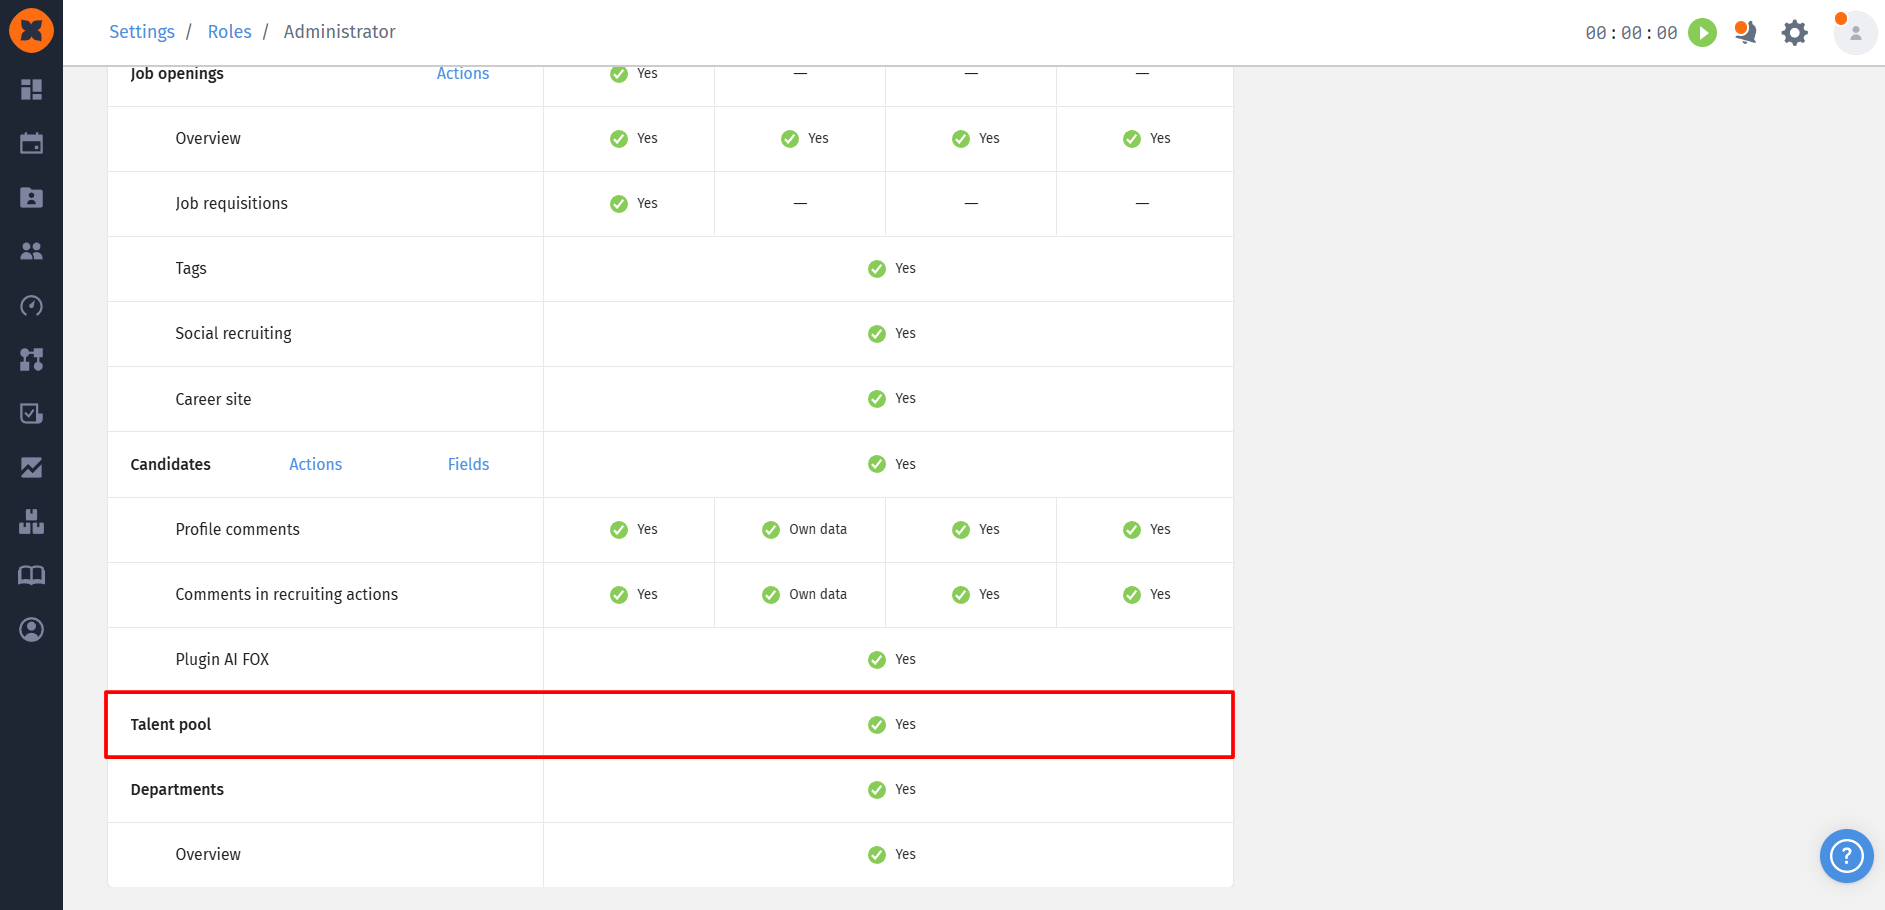
Security and interface: if a user does not have access, the “Talent pool” section is hidden from the “Recruitment” menu. All buttons for adding candidates to a pool are also hidden from candidate profiles, bulk actions, and the rejection process.
By default, users with the Administrator and Recruiter roles have access to the “Talent pool” section.
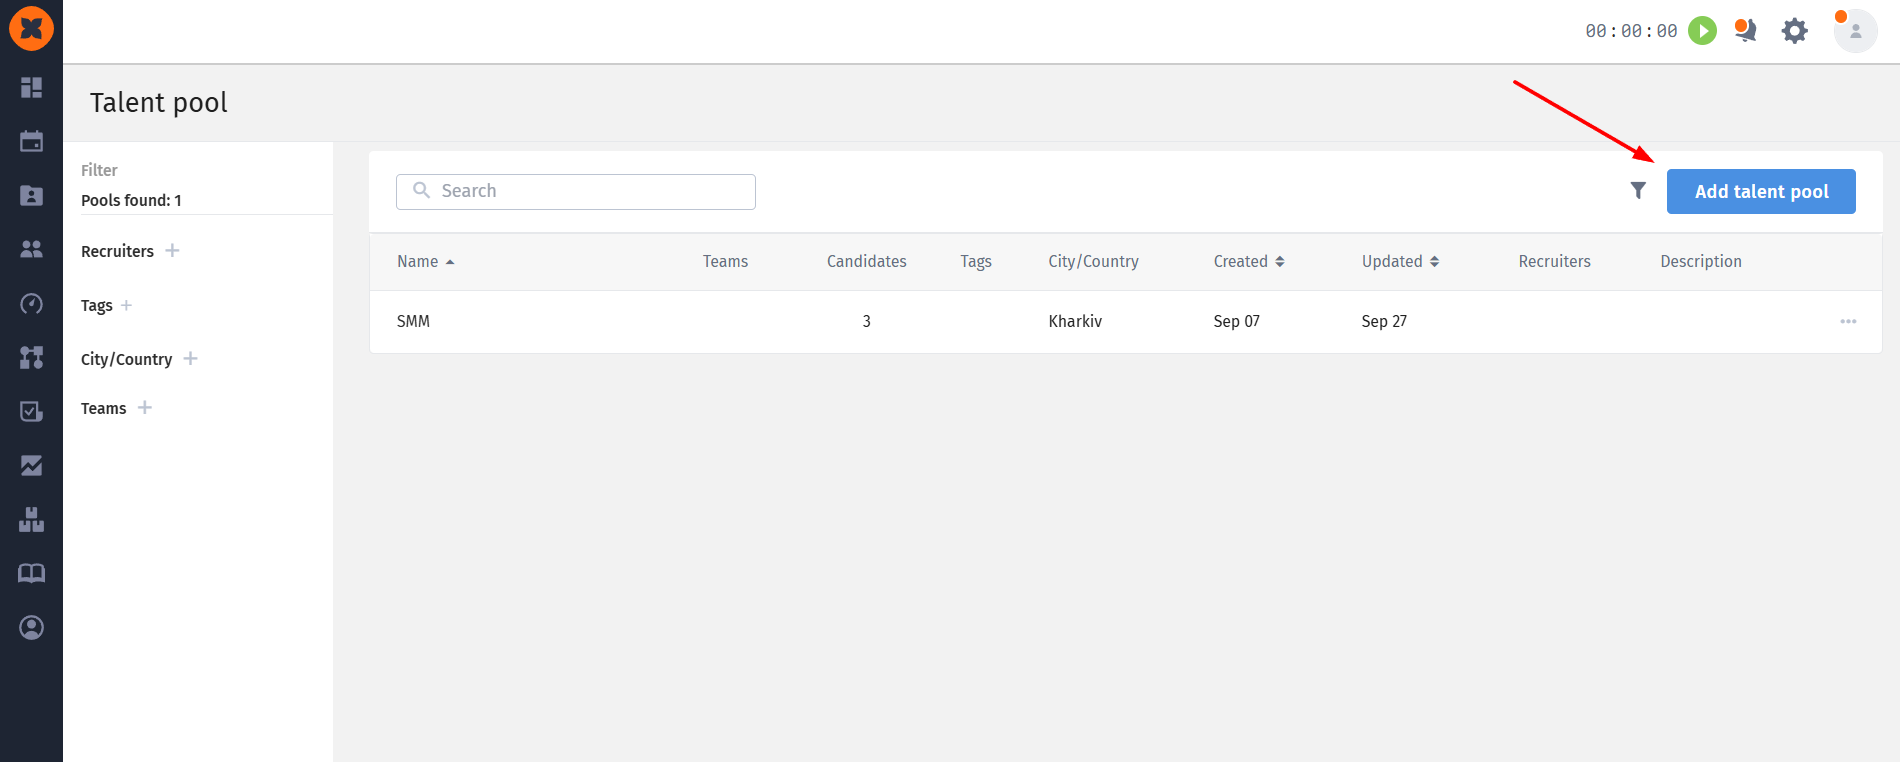
When you click “Add talent pool”, the creation page opens with the following fields:
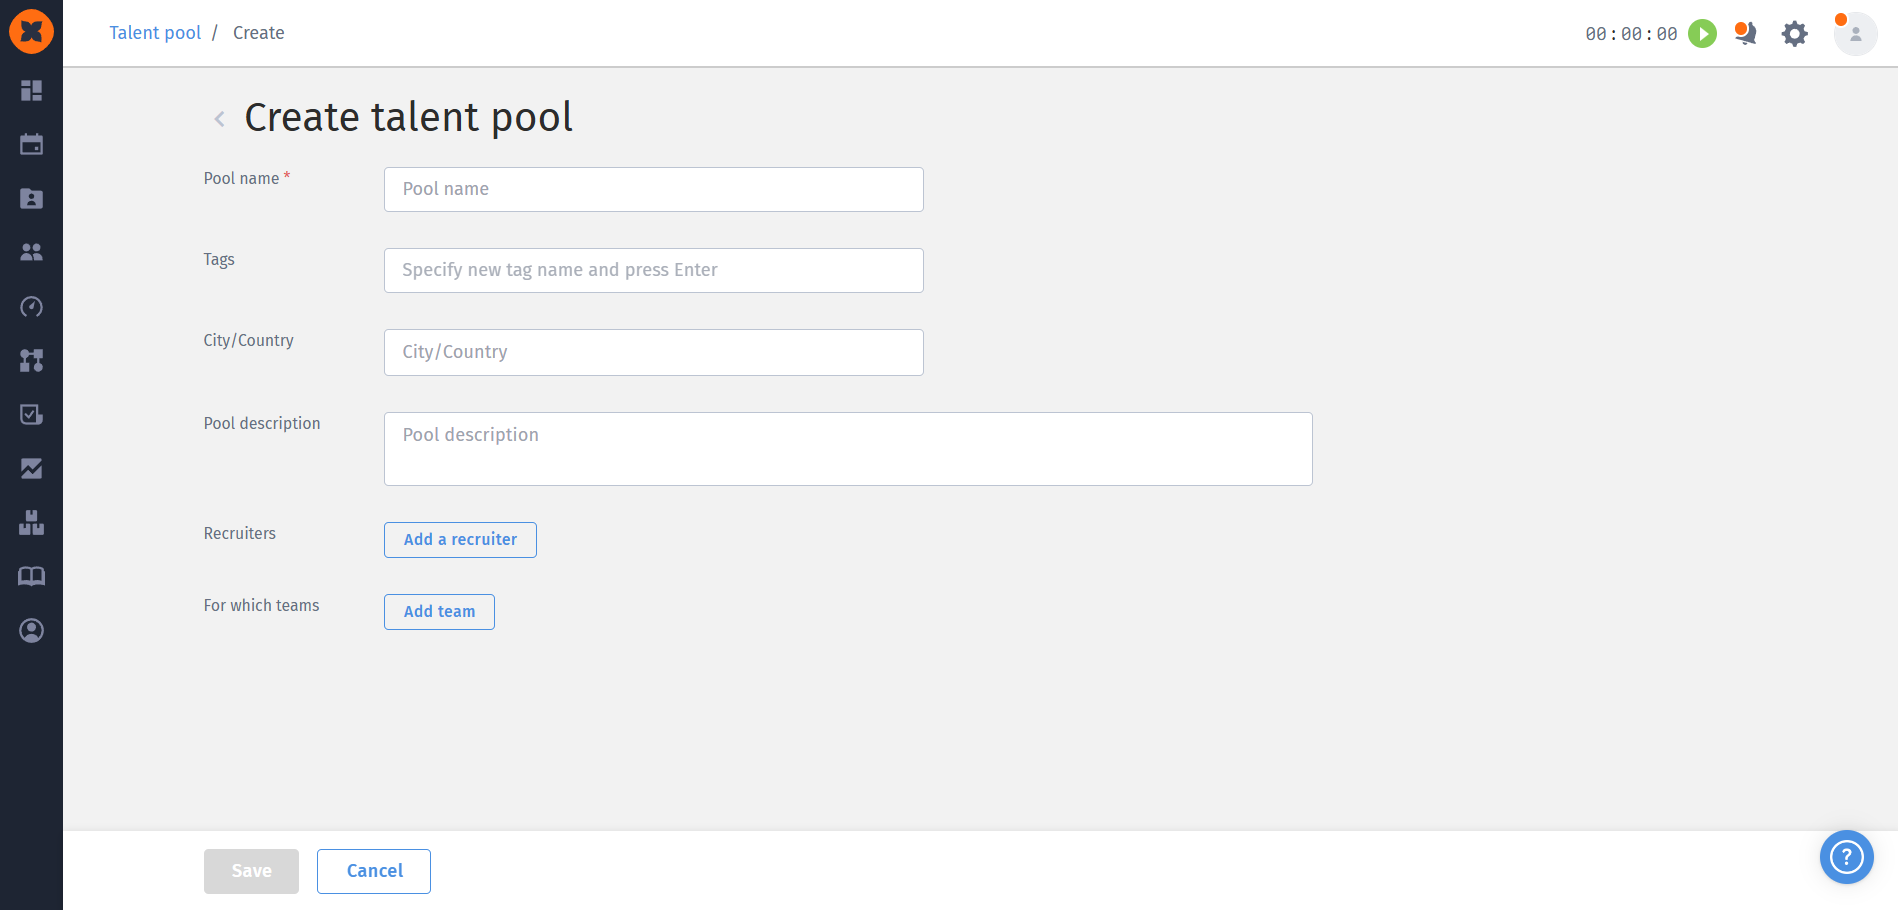
Pool name: a required field;
Tags: allows you to select existing tags or create new ones directly in the form;
City / Country: locations used in your vacancies are suggested automatically. You can also enter any unique values, which will be saved for future use;
Pool description: an optional text field for recording details or requirements for the candidate pool;
Recruiters: allows you to assign a recruiter responsible for the pool;
For which teams: allows you to select specific internal teams in the system for better coordination.
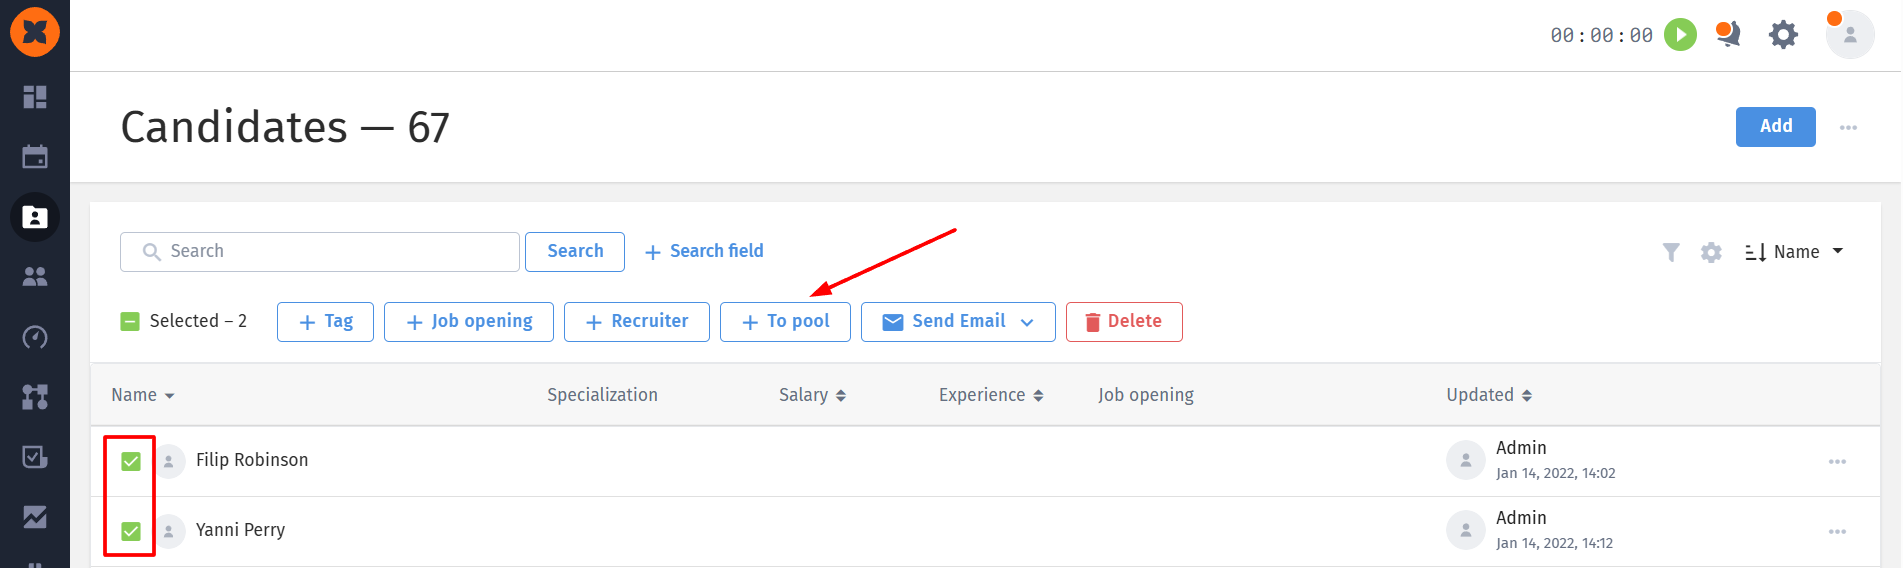
Bulk selection in the candidate list: select multiple candidates and click the new “To Pool” button in the top action bar;
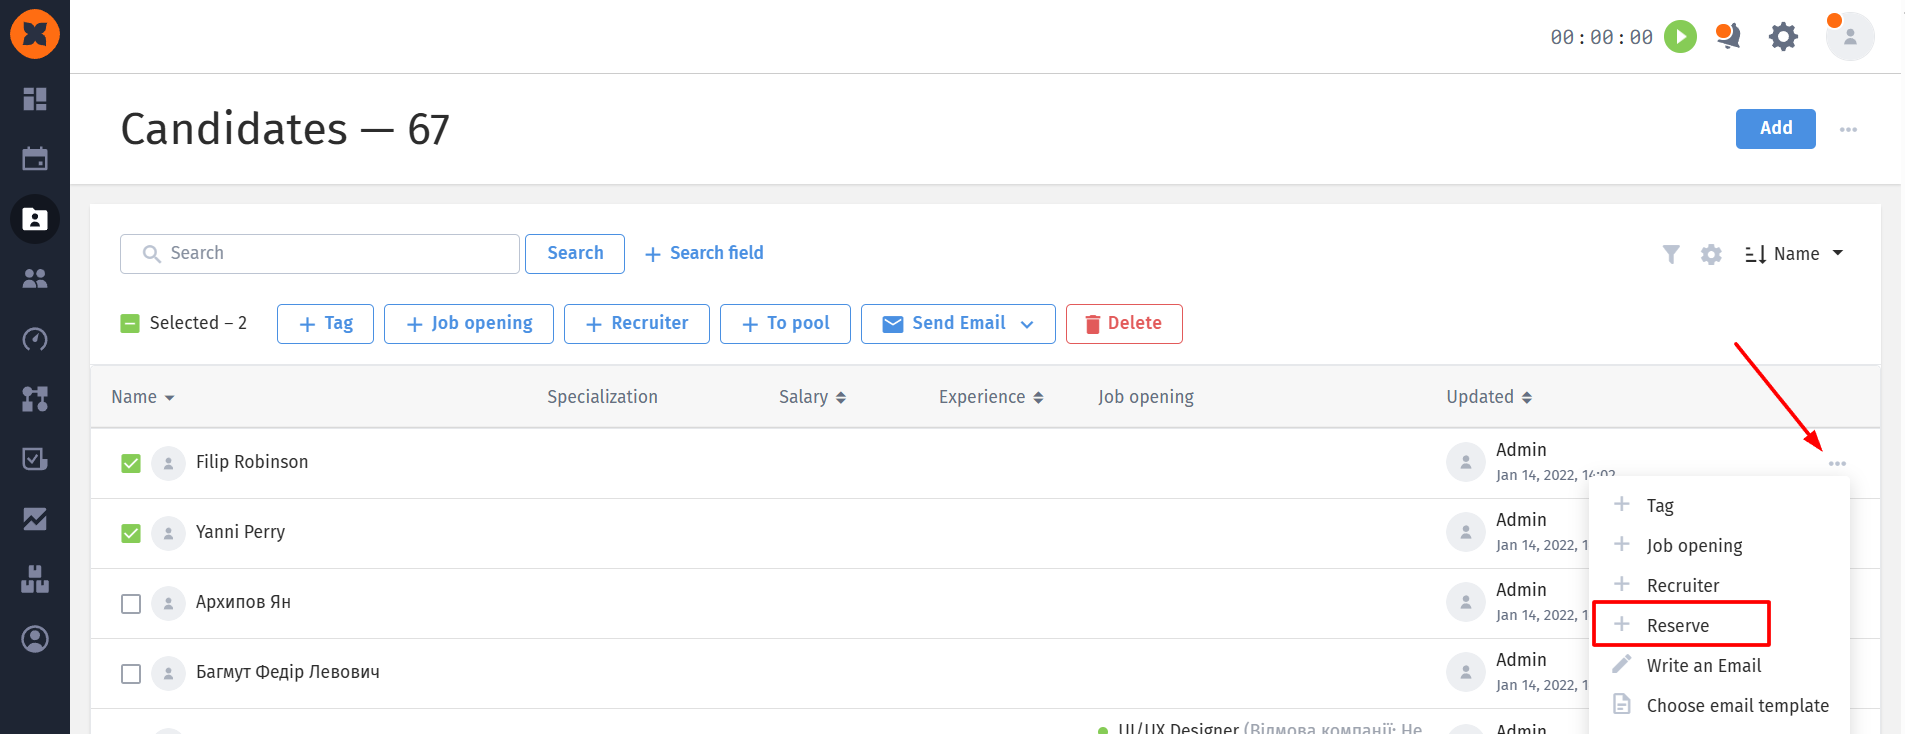
List context menu: quickly add a candidate using the three-dot menu next to the relevant candidate;
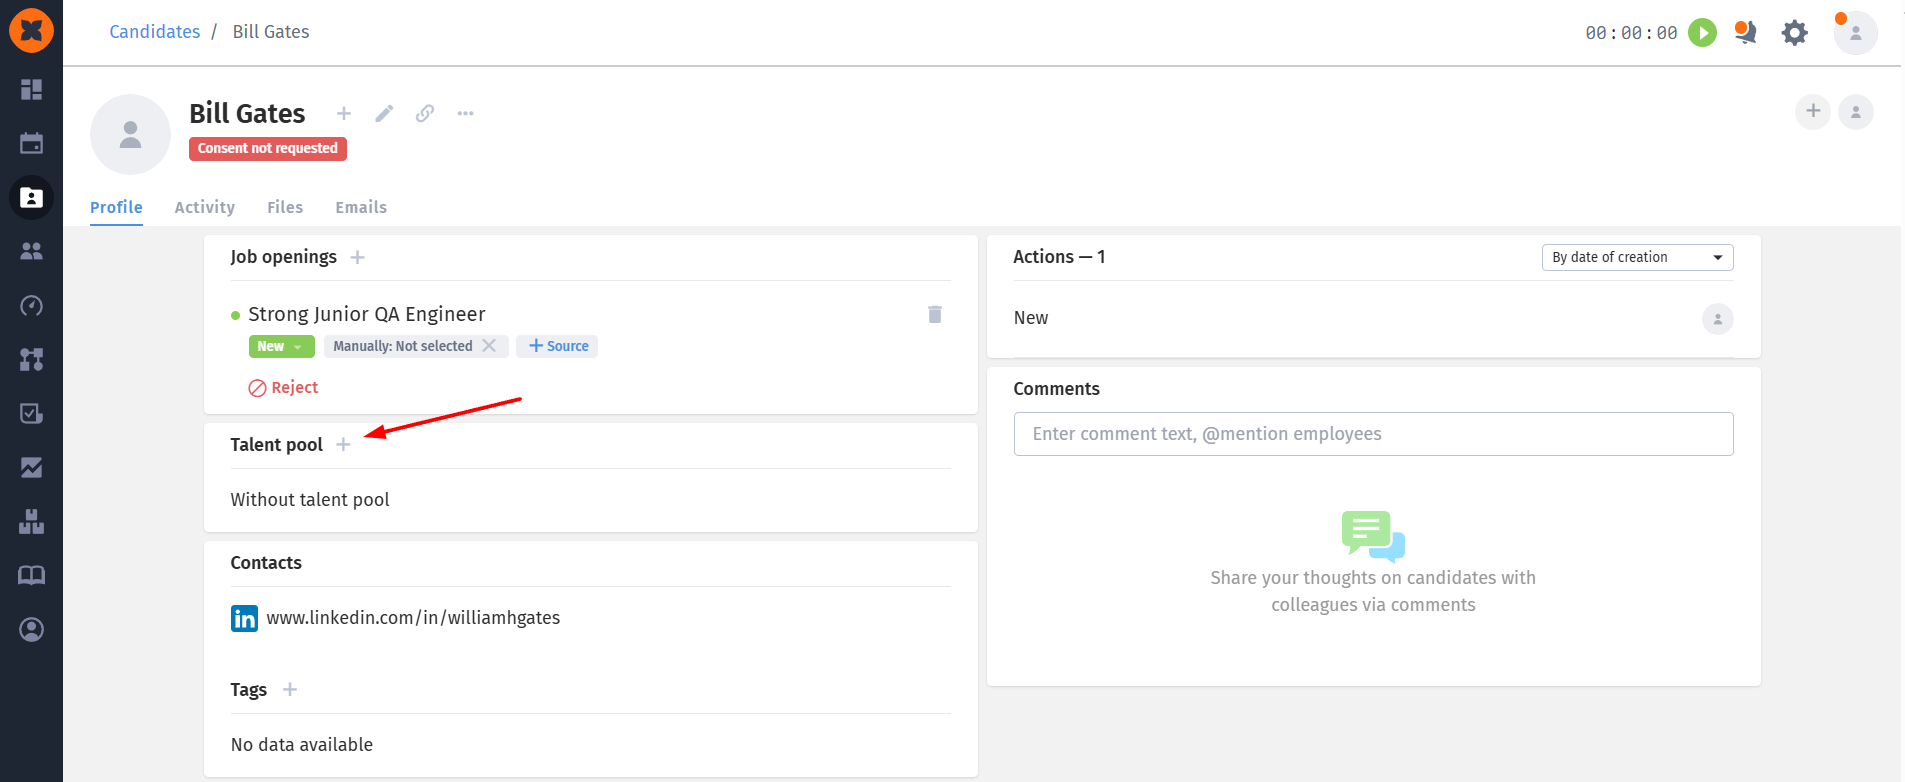
Candidate profile block: the new interactive “Talent pool” block allows you to add a candidate to a pool with a single click using the “+” button;
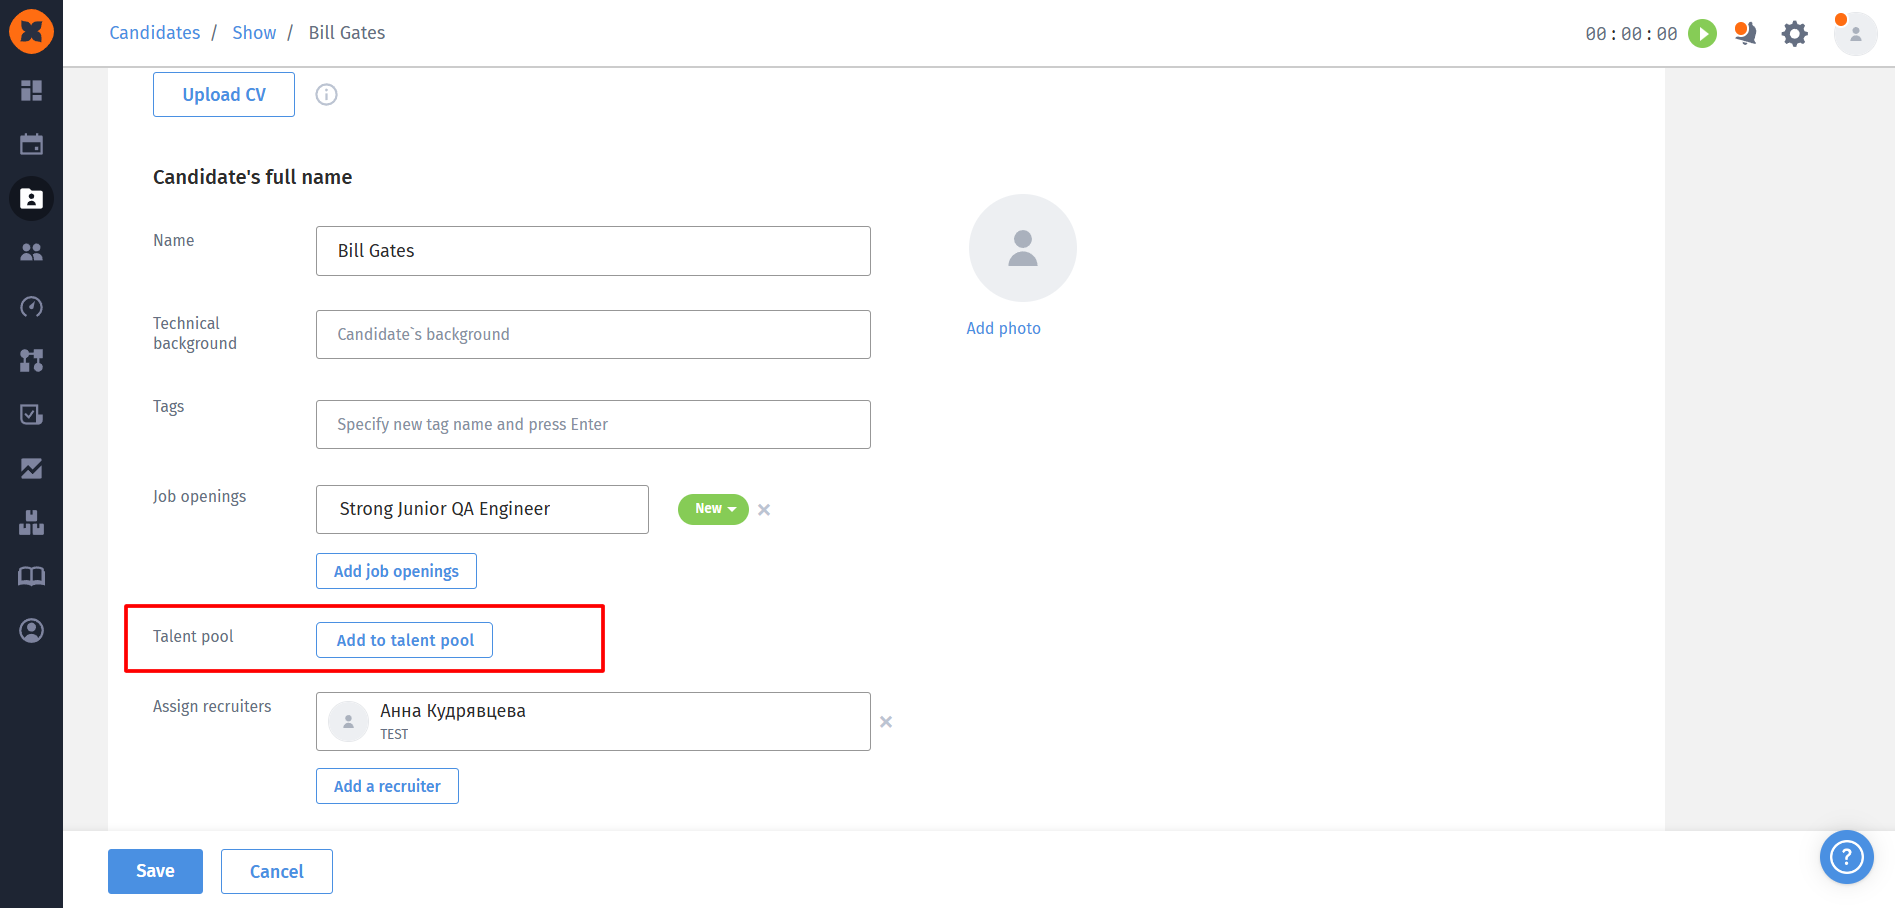
Candidate creation and editing form: a quick pool selection button has been added;
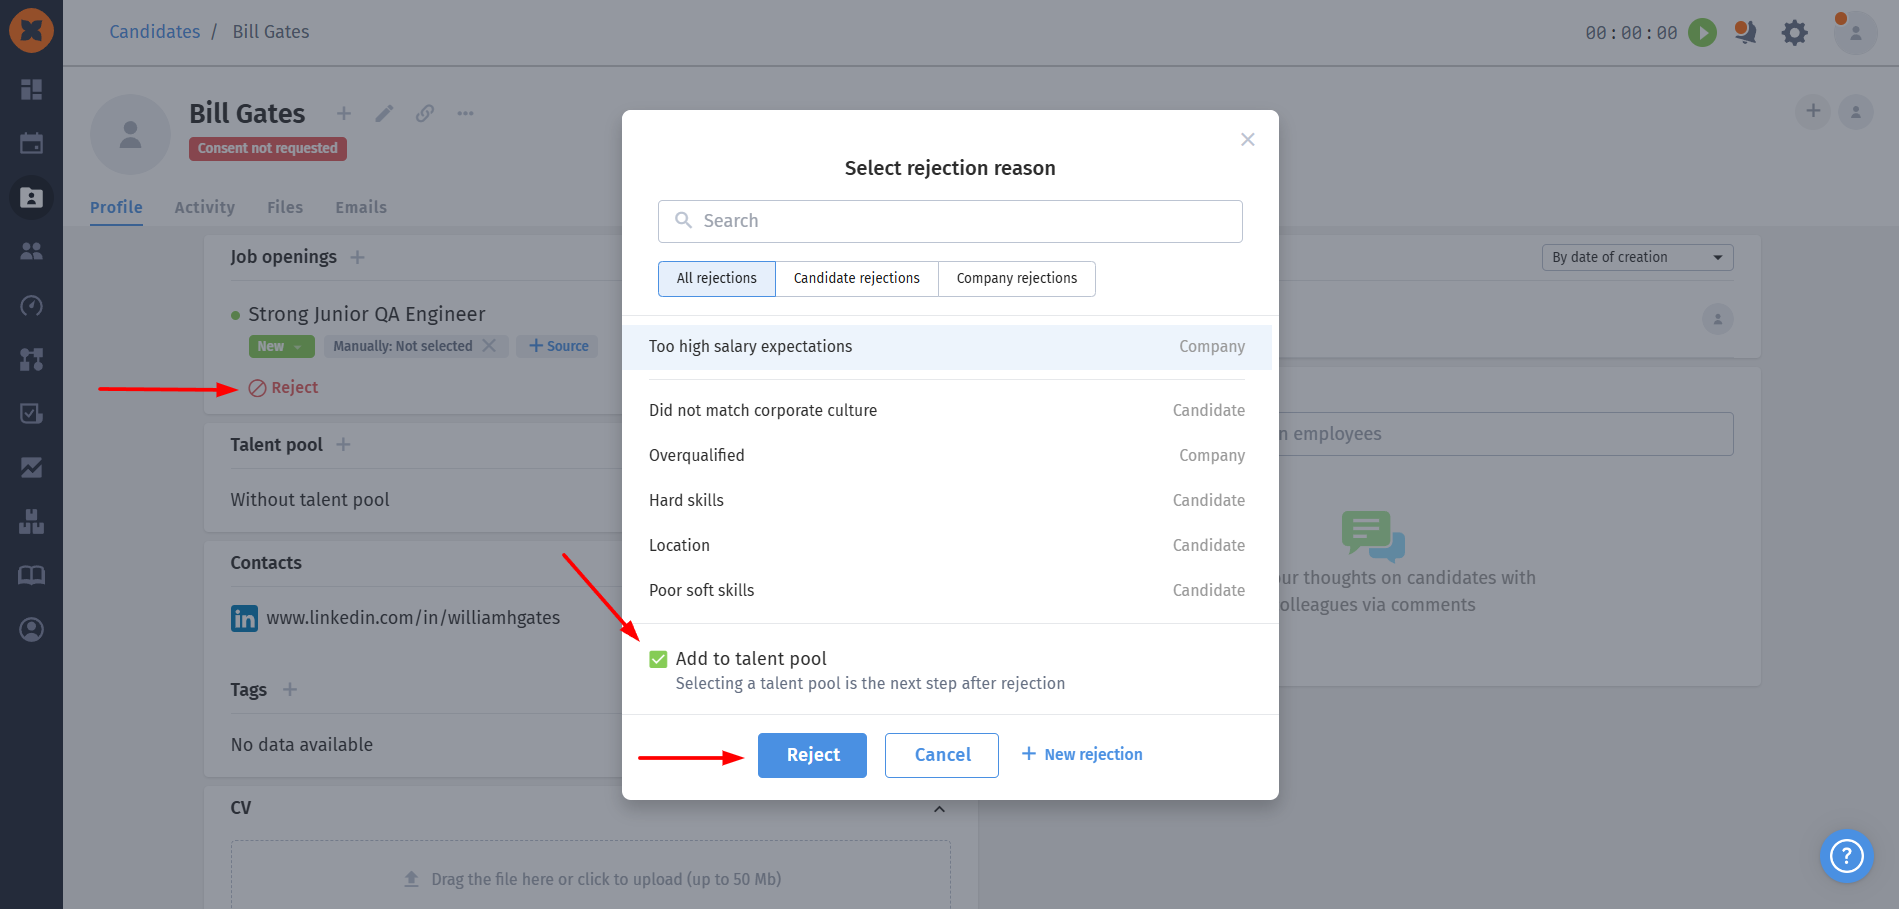
Adding a candidate during rejection: when moving a candidate to the “Rejected” stage, either from the candidate profile or by dragging them to the rejection stage on the vacancy Kanban board, the system automatically offers an “Add to Pool” checkbox. If the checkbox is enabled, a window for selecting the desired pool will open after the rejection is confirmed.
A “Candidates” tab with a counter has been added to the pool details. Clicking it immediately takes you to the general candidate list with the corresponding filter automatically applied.
If the pool is empty, the system displays the message “No candidates yet” and a button for quickly navigating to the general candidate list.
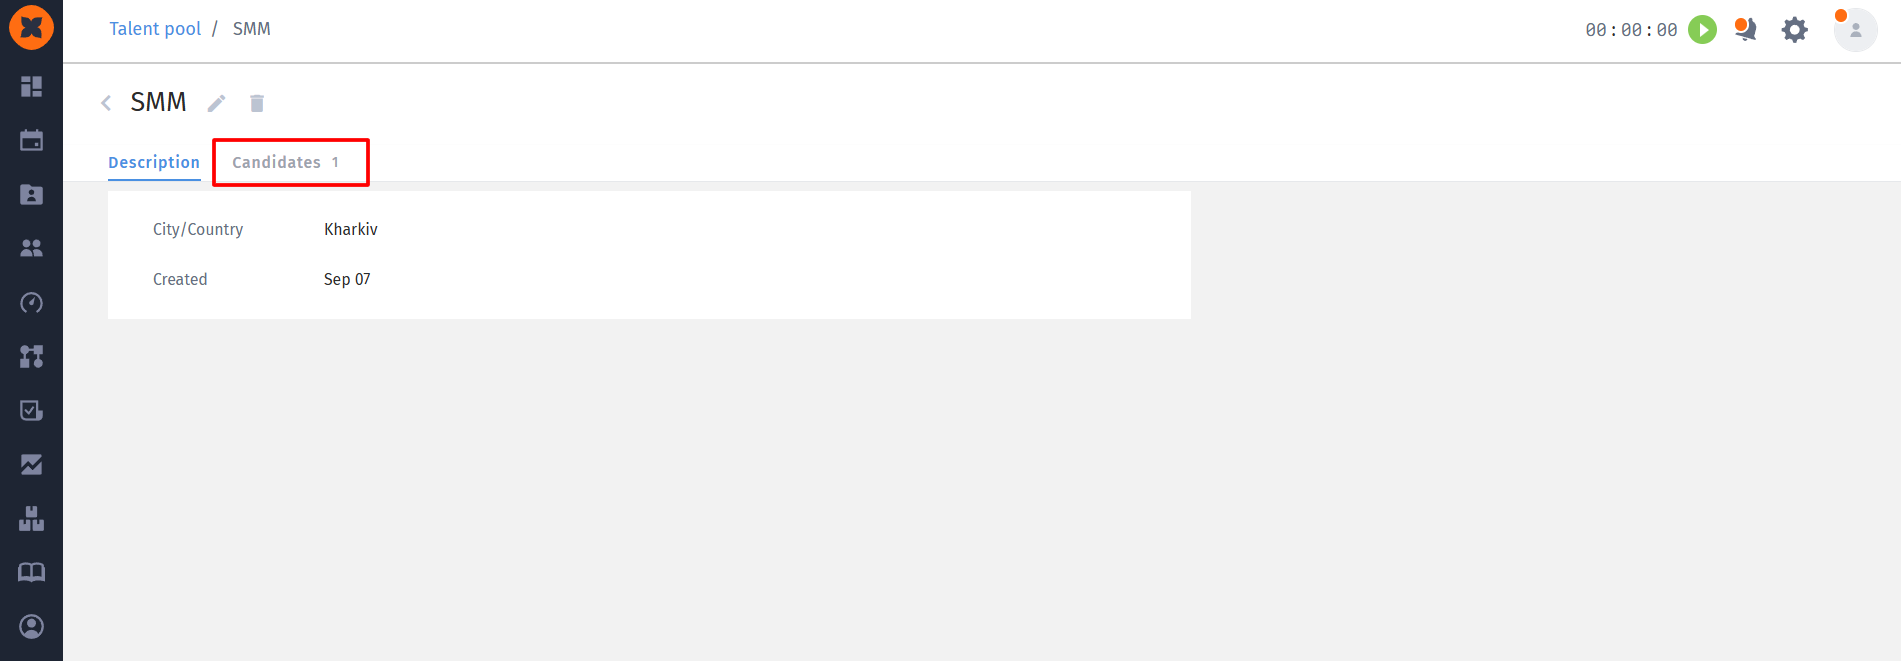
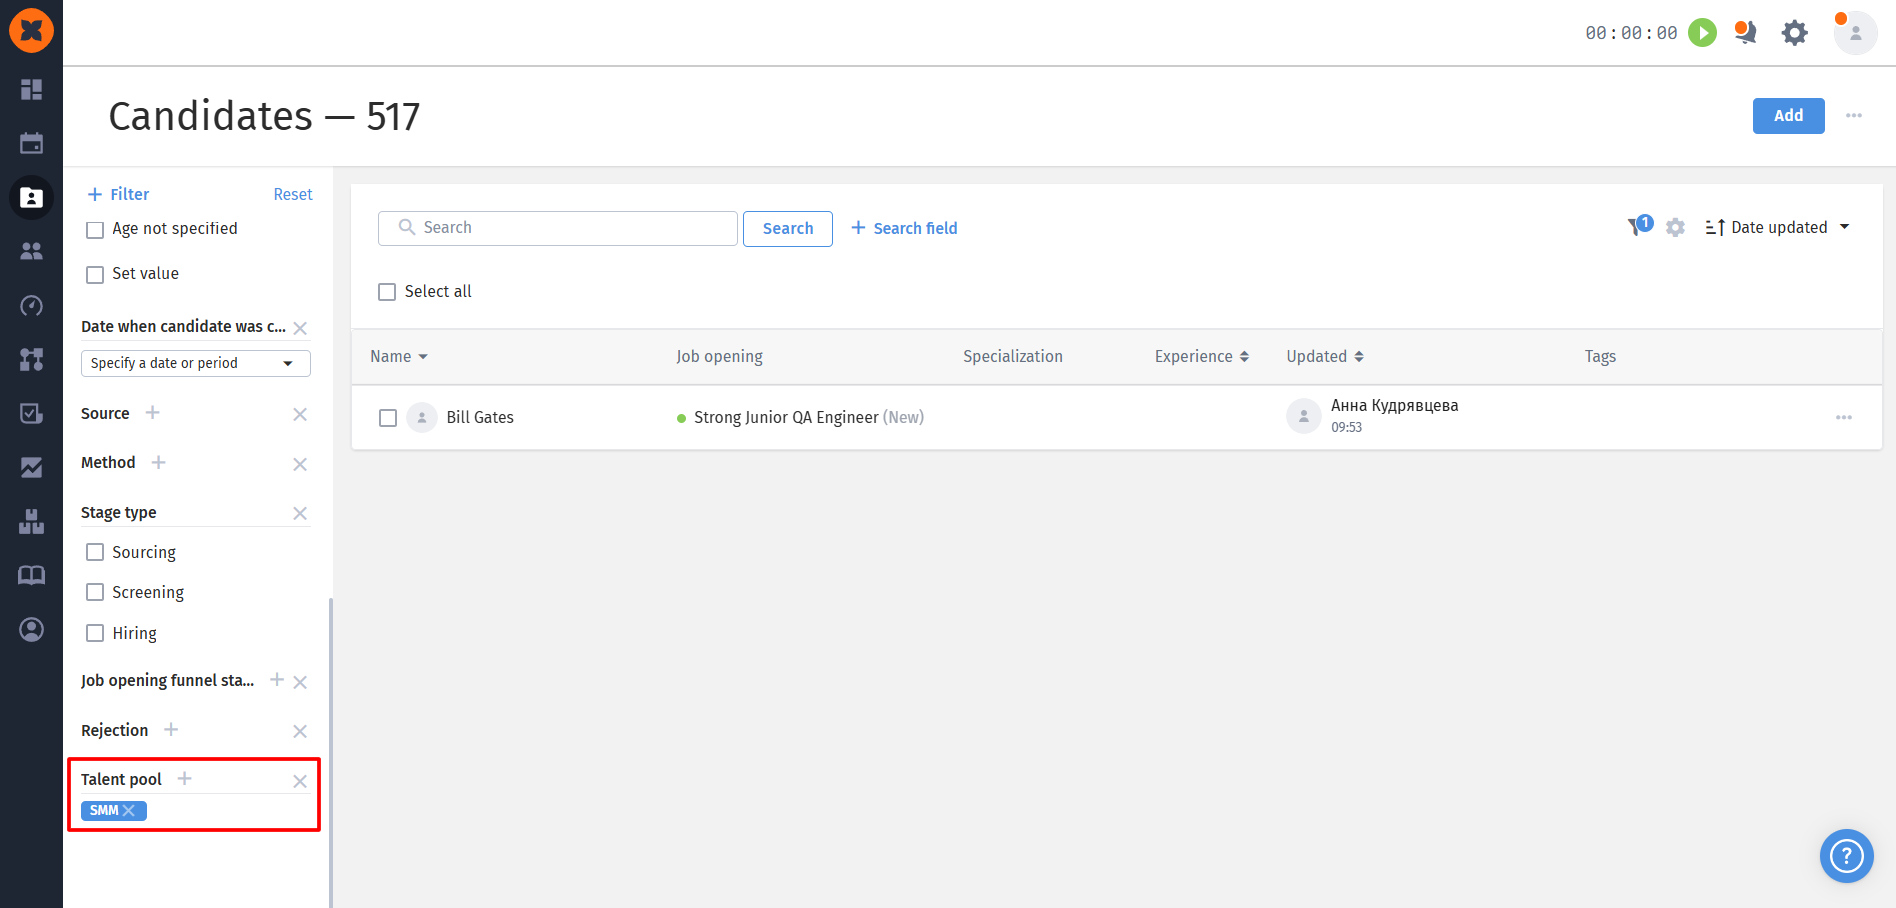
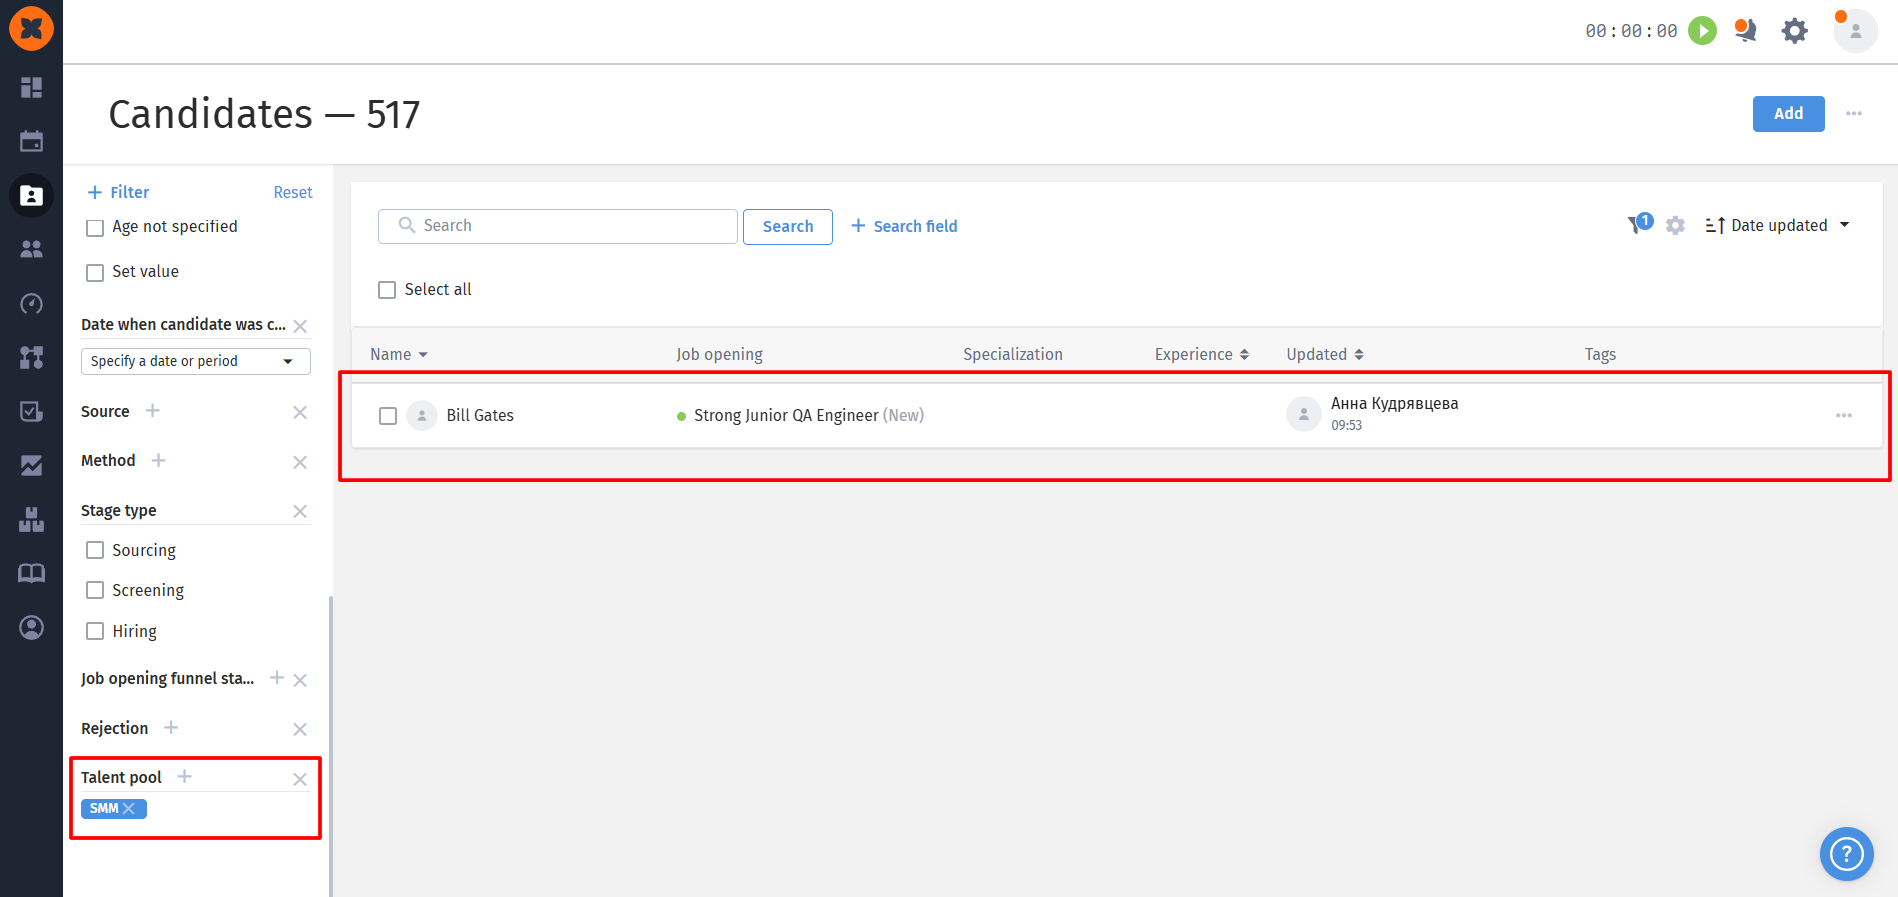
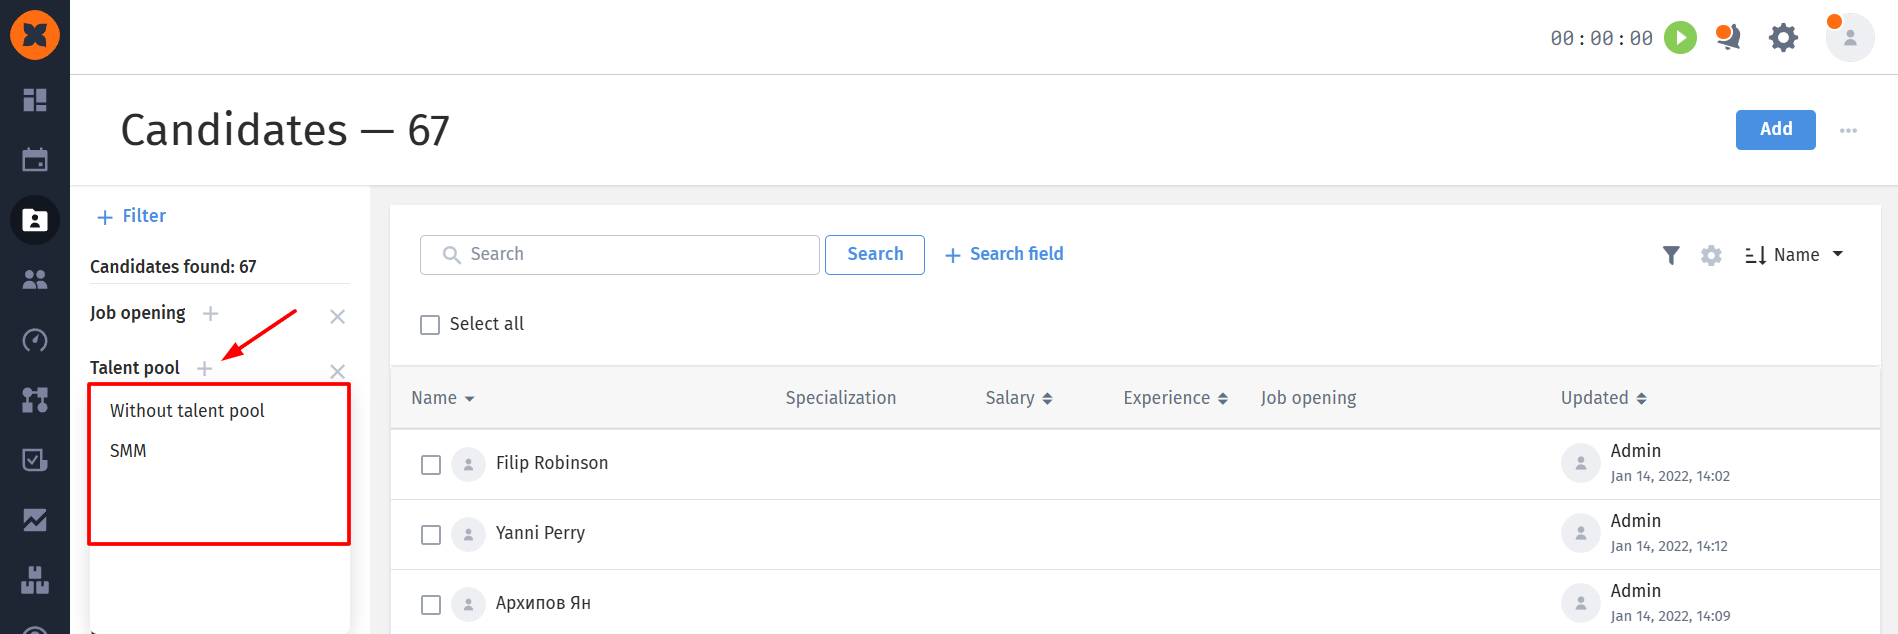
A new “Candidate Pool” filter has been added. The “No Pool” option is displayed first by default, allowing you to quickly filter candidates who are not yet assigned to any pool.
Only pools containing at least one candidate are displayed in the filter list.
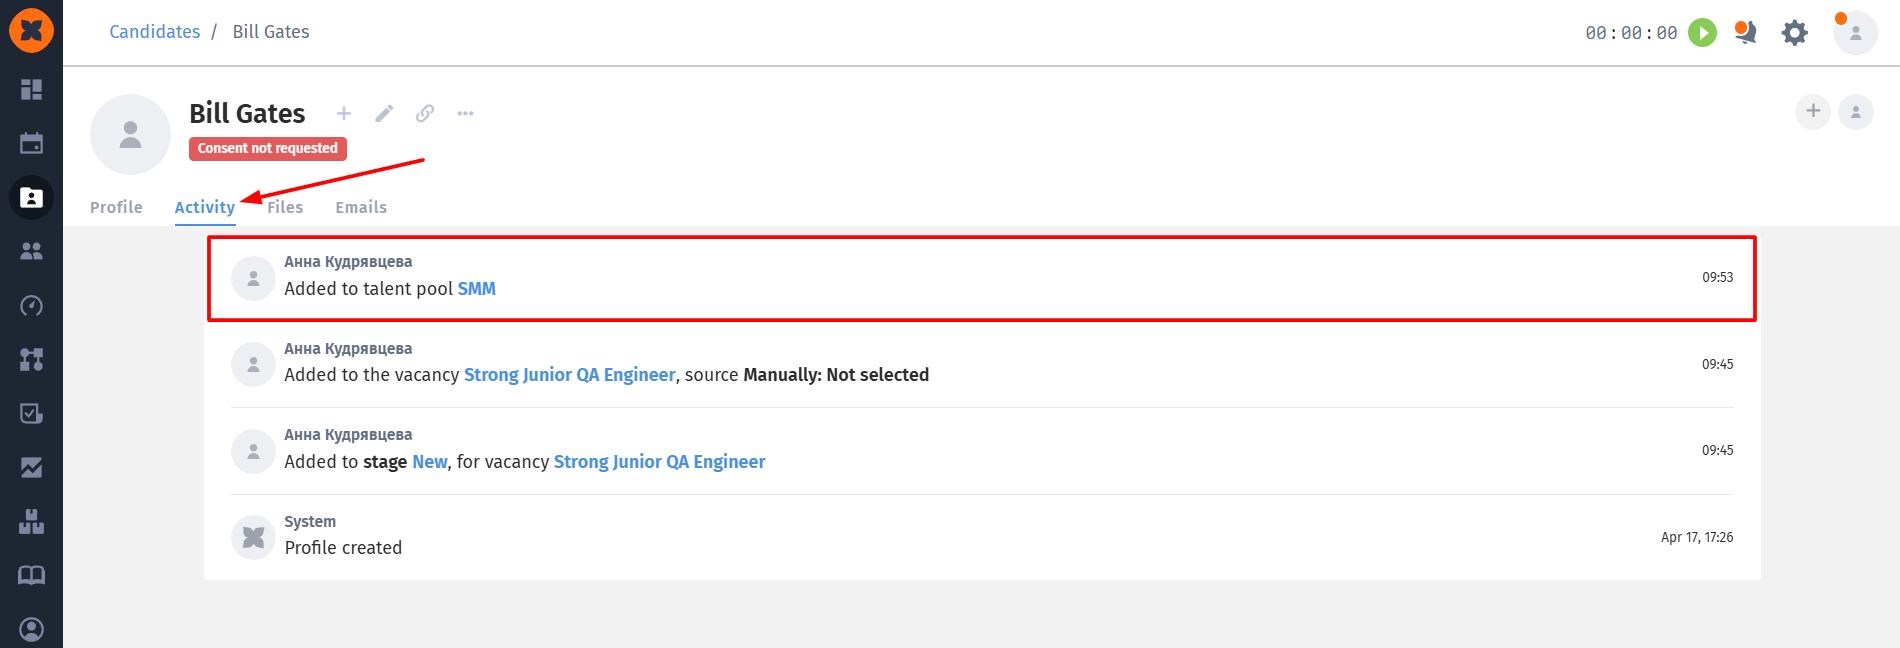
Every time a candidate is added to a pool, the action is recorded in the “Activity” tab of their profile, with an option to navigate directly to the relevant pool.
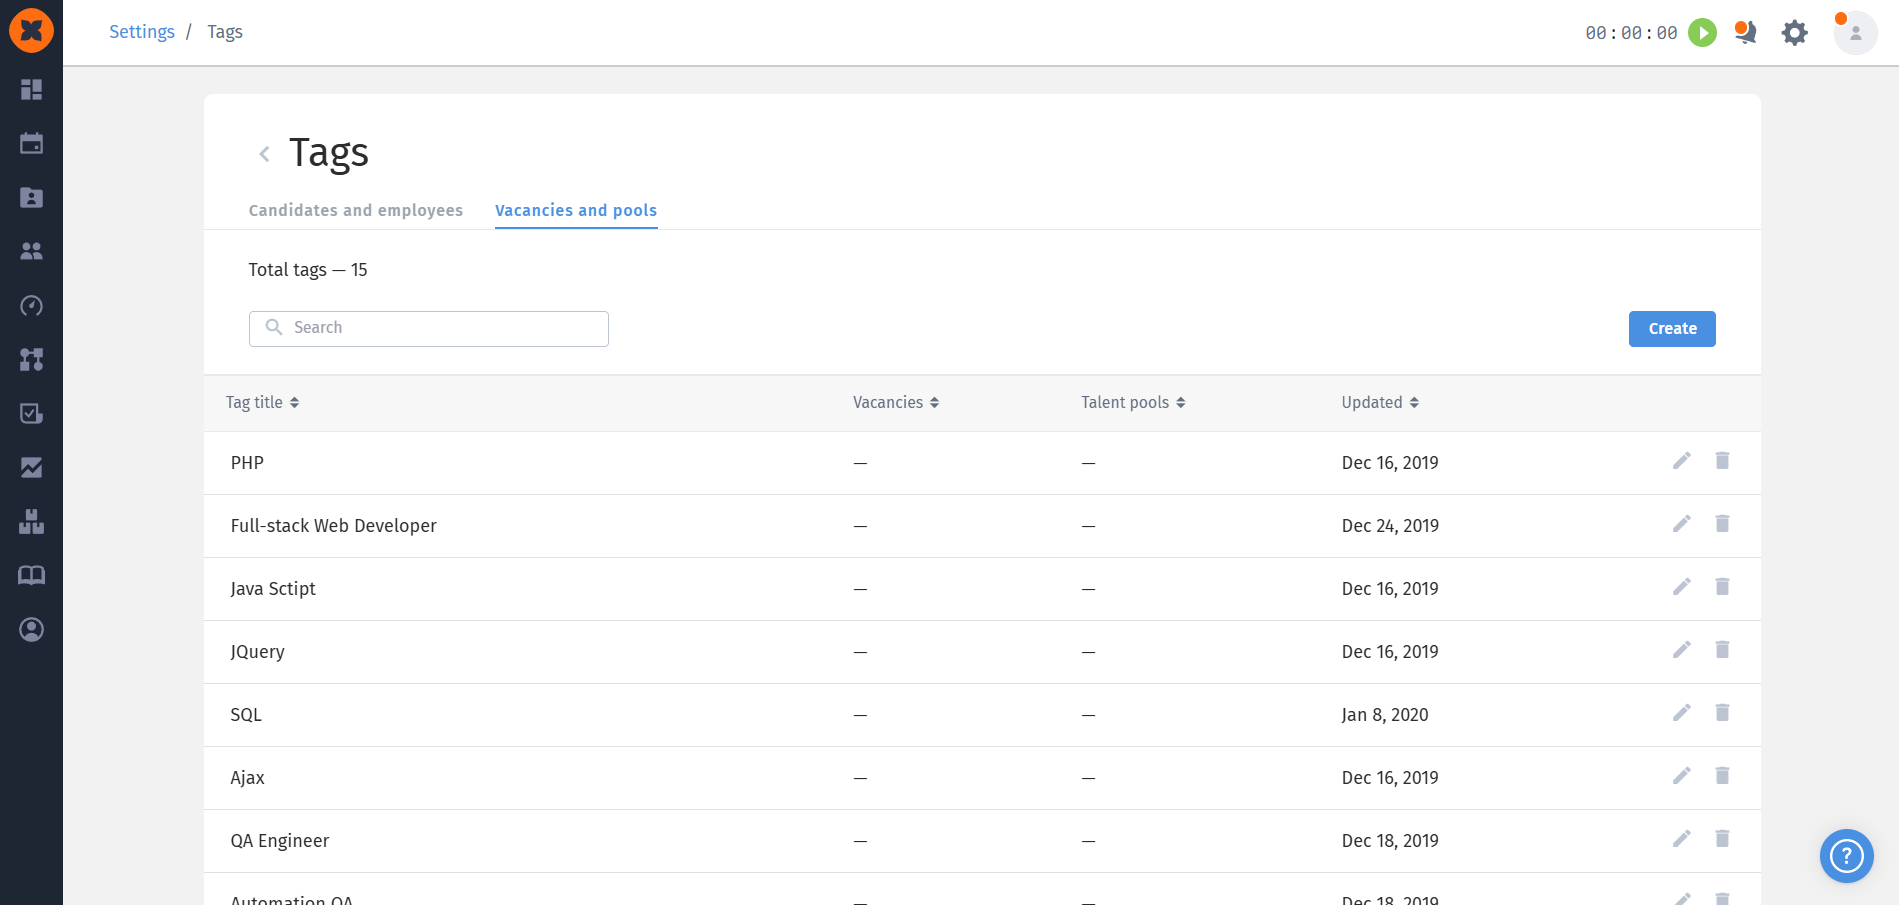
The “Vacancies and Pools” tab in the tag settings now contains two separate columns showing the exact number of vacancies and pools where each tag is used.
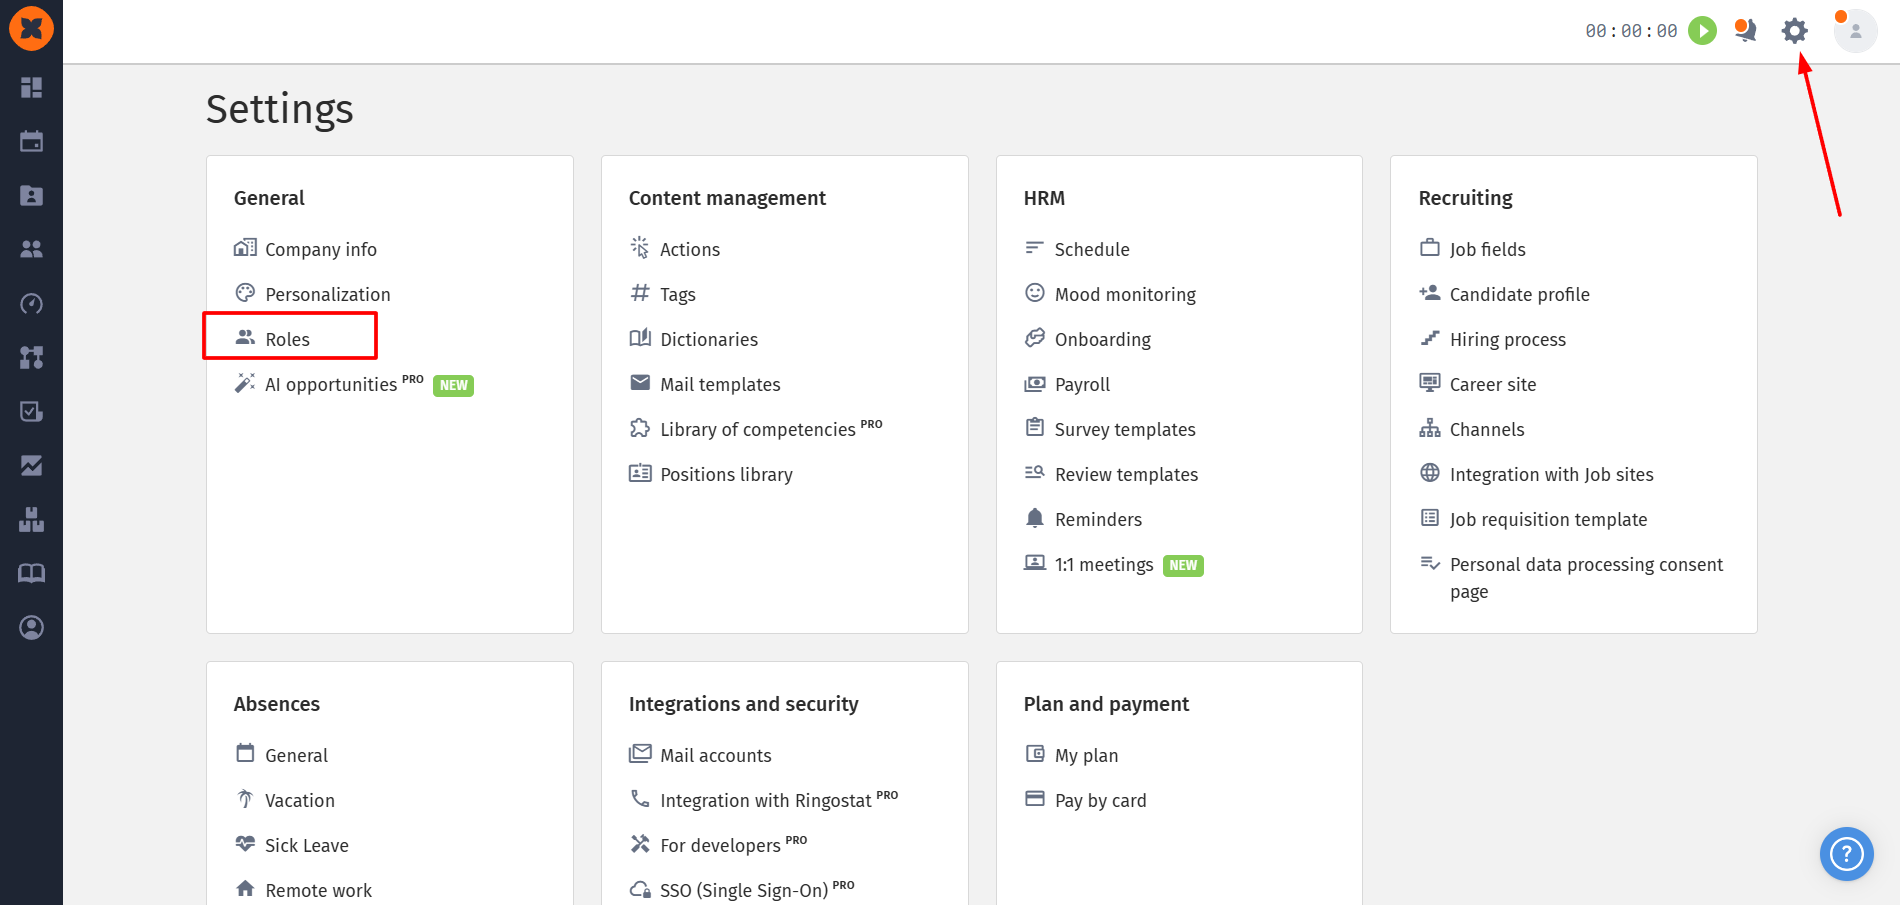
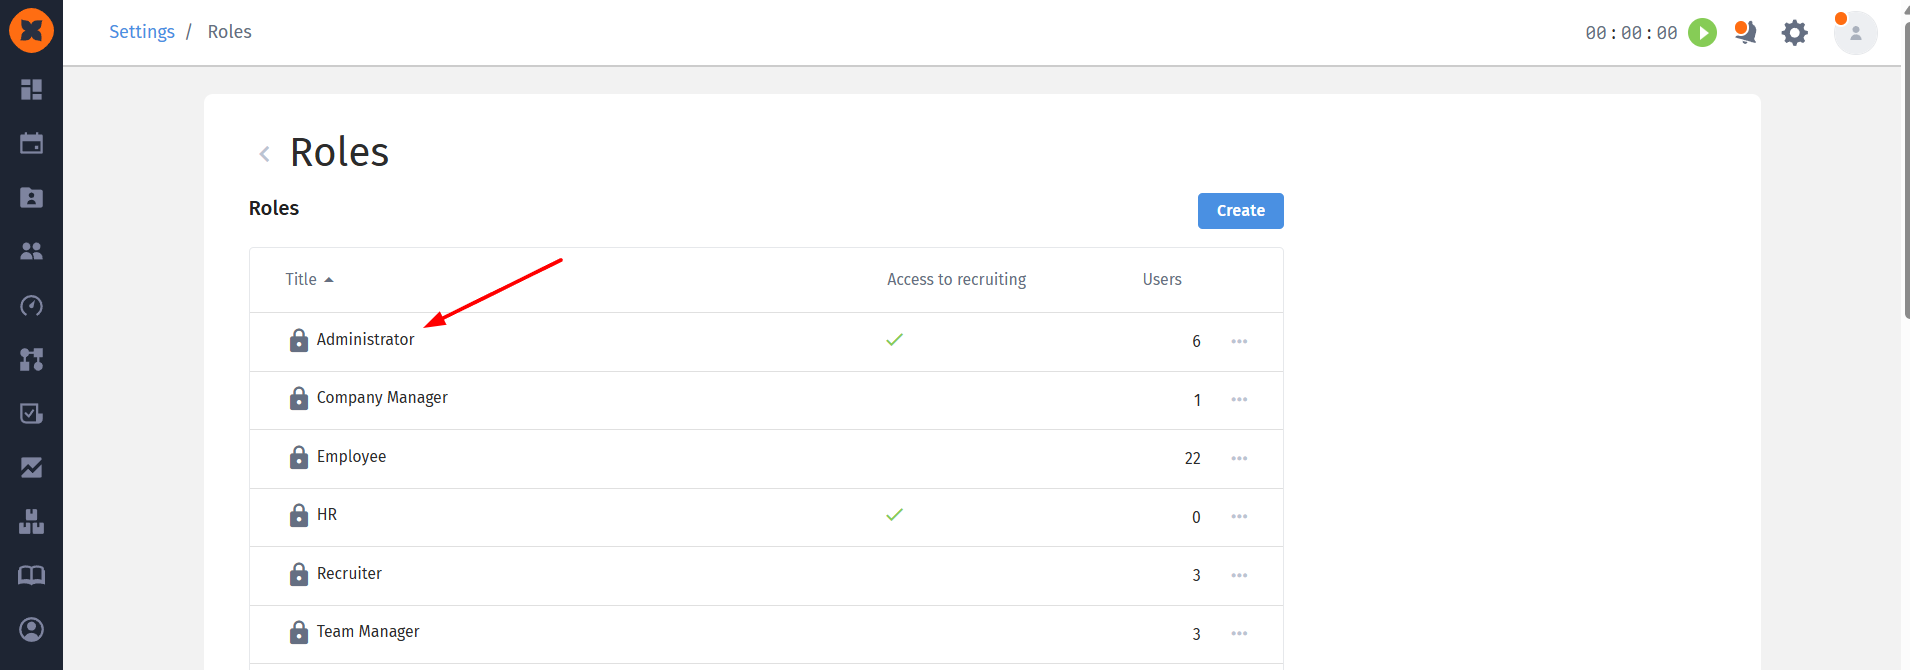
No more routine work when configuring access! Managing access permissions for a large team is now faster and more convenient. If you need to move a group of employees from one role to another (for example, change the custom role assigned to several HR specialists), you no longer need to do this individually.
Go to “Settings” - “Roles” and open the required role;
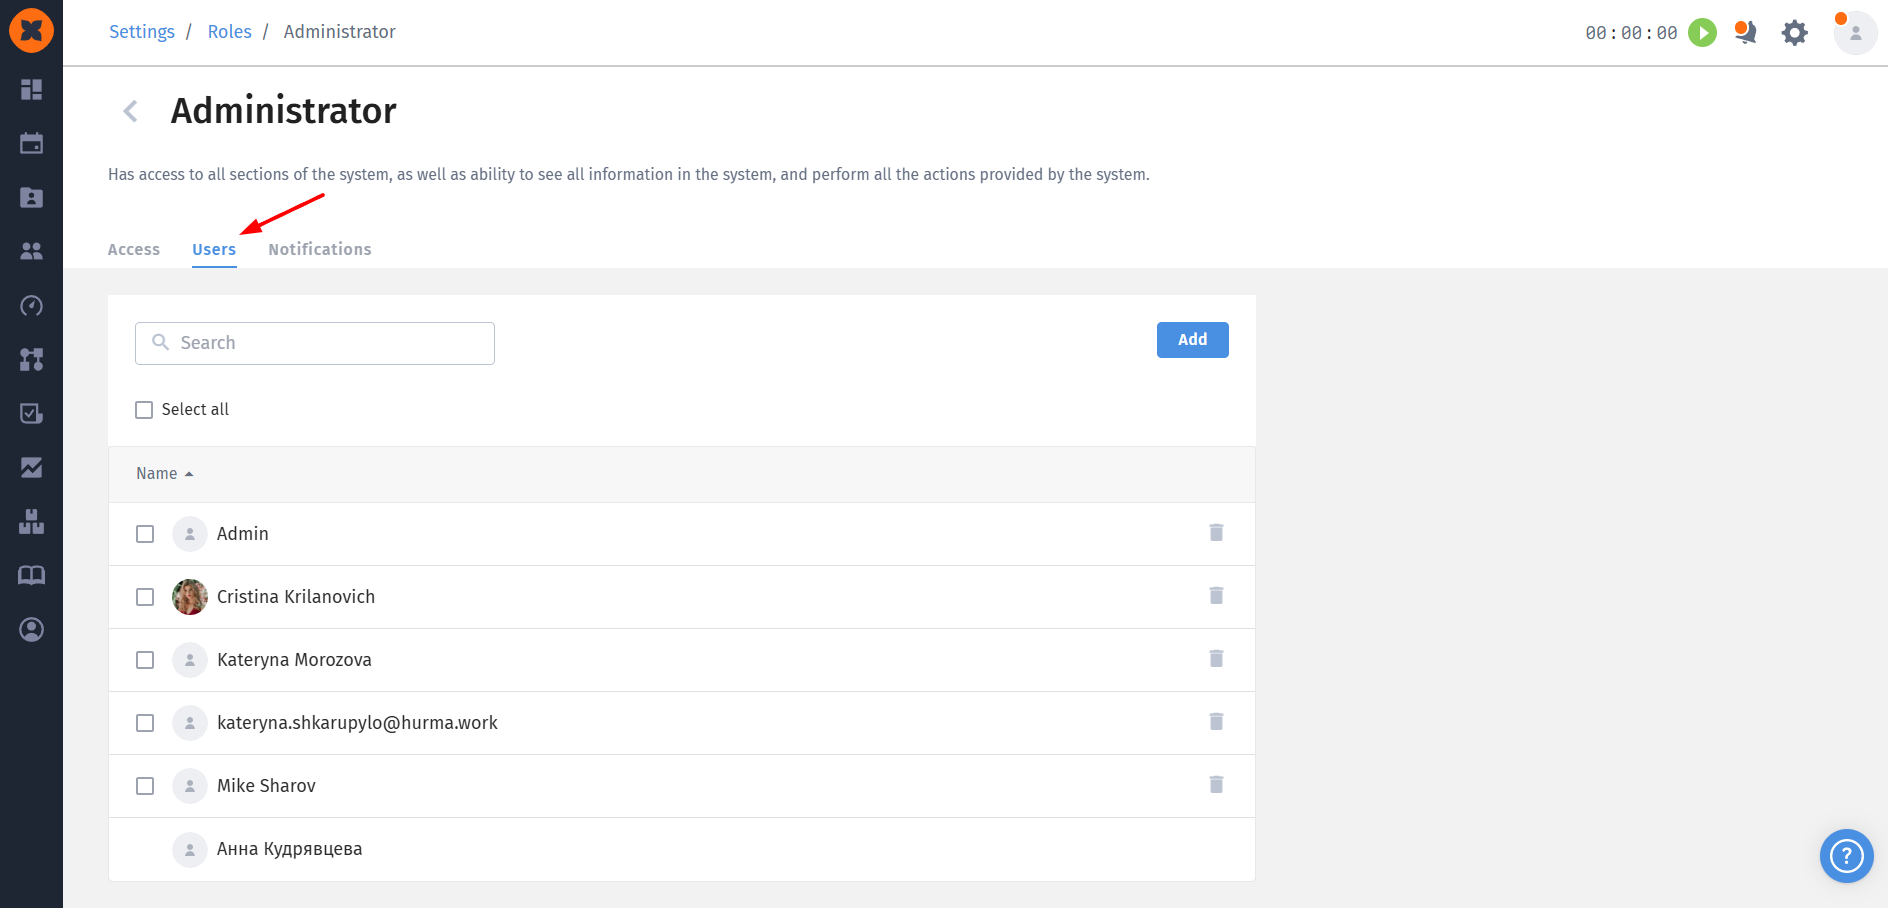
Go to the “Users” section;
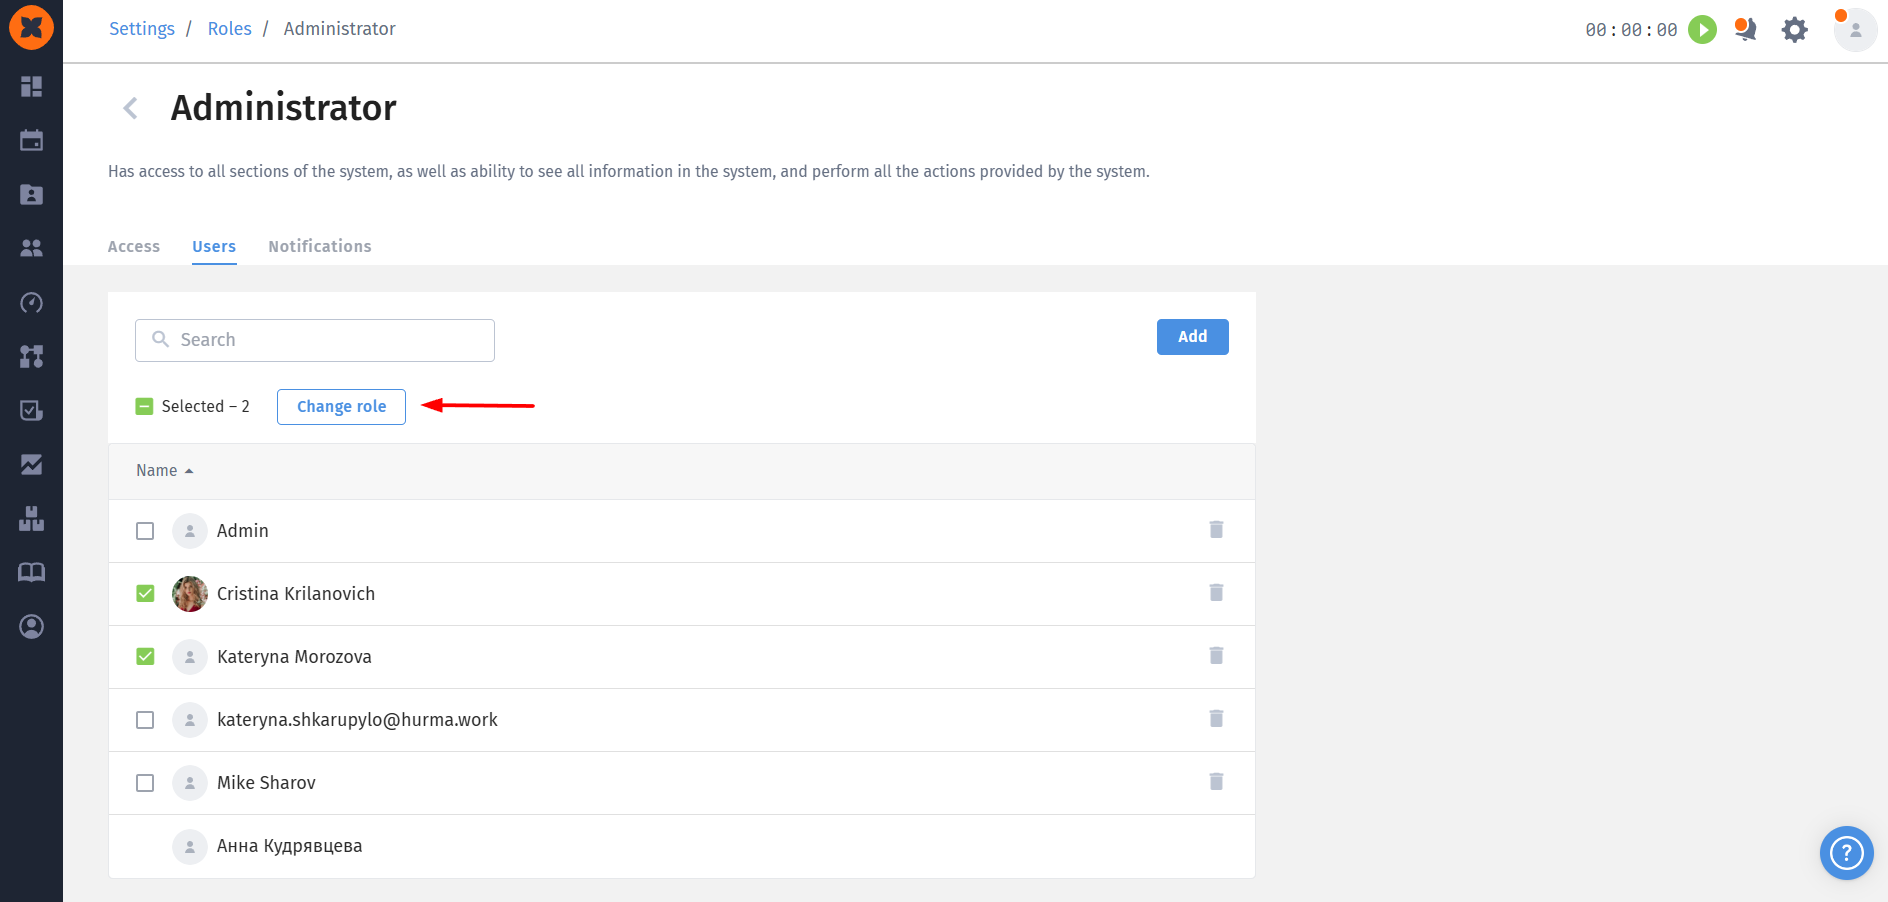
Select the employees whose roles you want to change (or select everyone if needed), then click “Change role”;
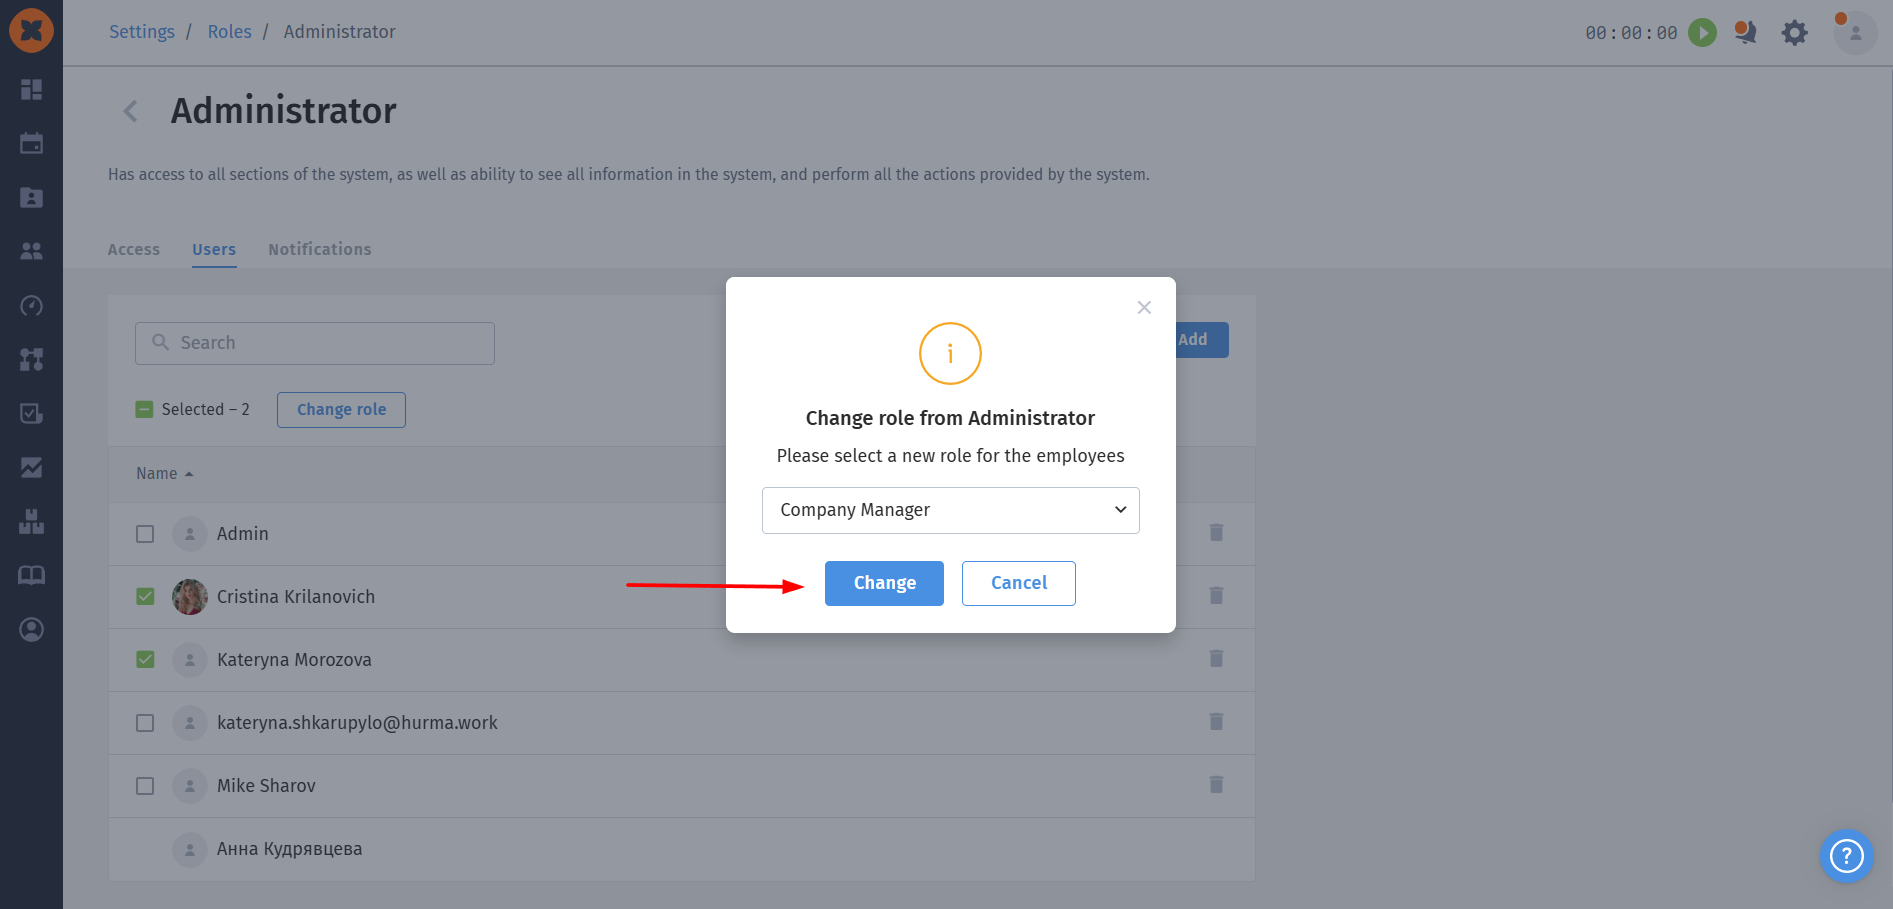
In the pop-up window, select the new role for the selected employees from the dropdown list and confirm the action by clicking “Change”.
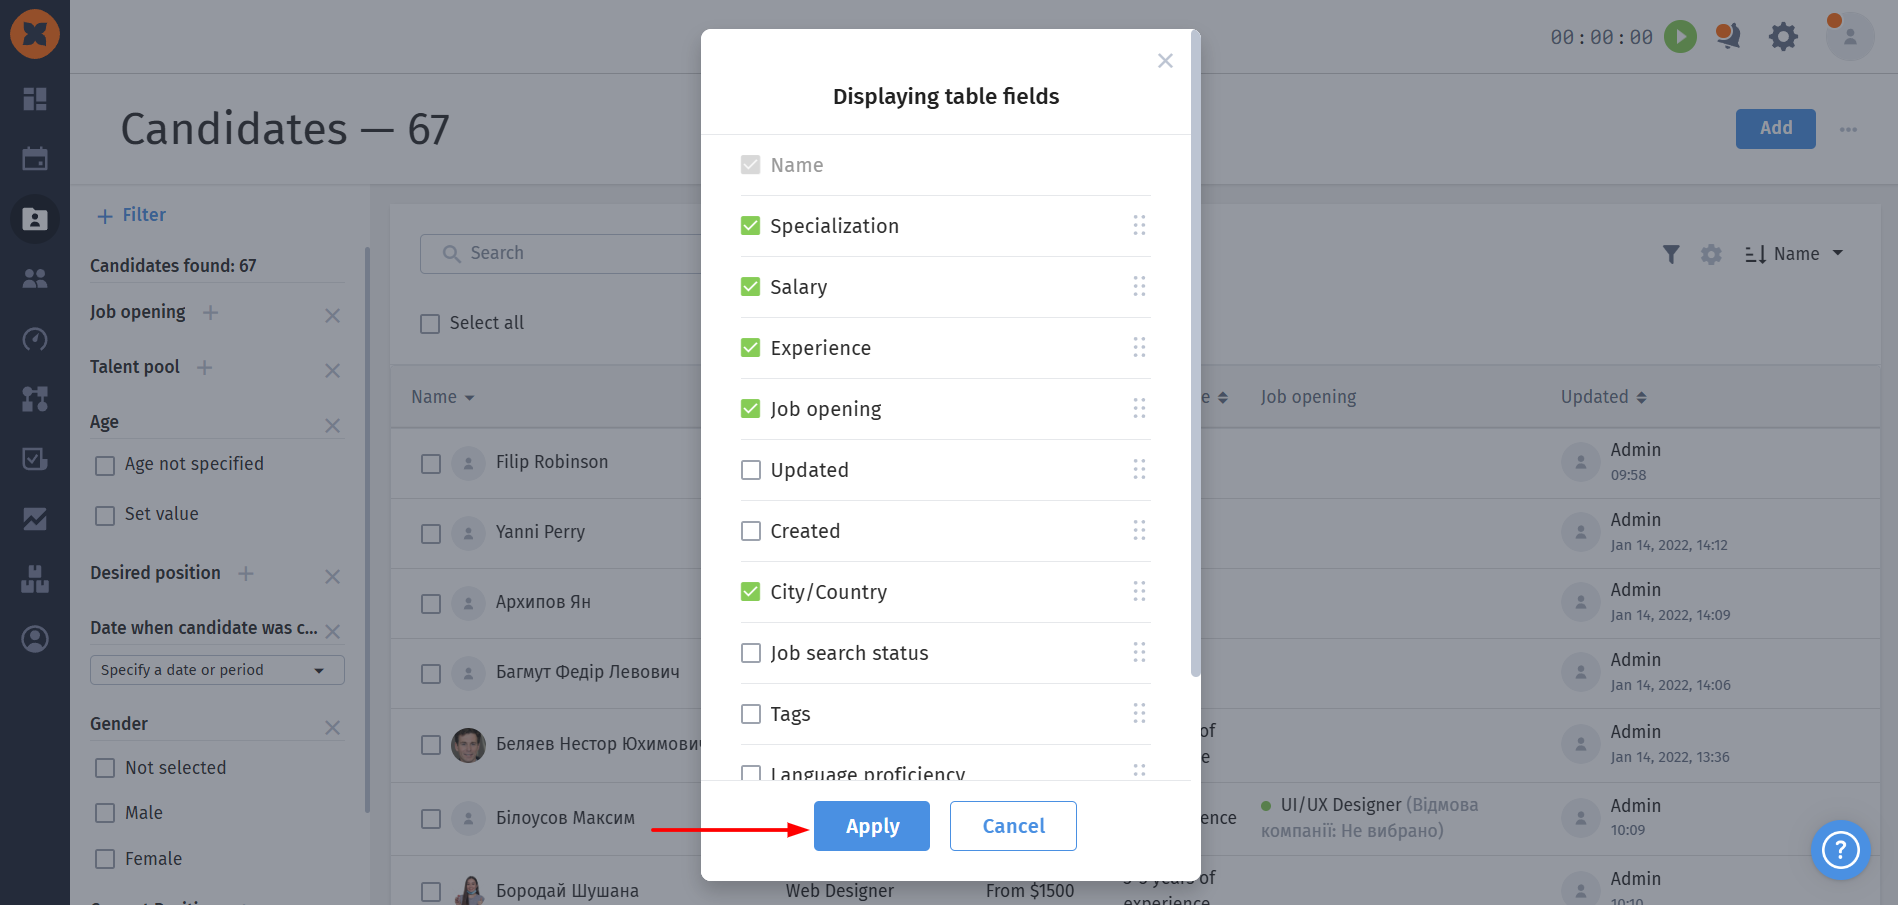
Customize your workspace to suit your needs: each user can now independently choose which data is displayed in the main candidate database table. This allows you to hide unnecessary information and bring the criteria that matter most to you to the forefront.
The list of available columns now includes:
System fields (for example: Specialization, Salary, Vacancy, Job opening, City/Country, Experience, Updated, Job search status, Tags, AI Score, Languages, etc.);
Custom fields that you have created yourself under “Settings” - “Candidate profile”.
You can not only select which fields to display, but also easily reorder the columns directly in the settings. Simply click and hold the six-dot icon to the right of the required field and drag it up or down to set the desired order in which the columns will appear from left to right in the table.
Go to “Recruiting” - “Candidates” and click the settings (gear) icon in the top-right corner of the table.
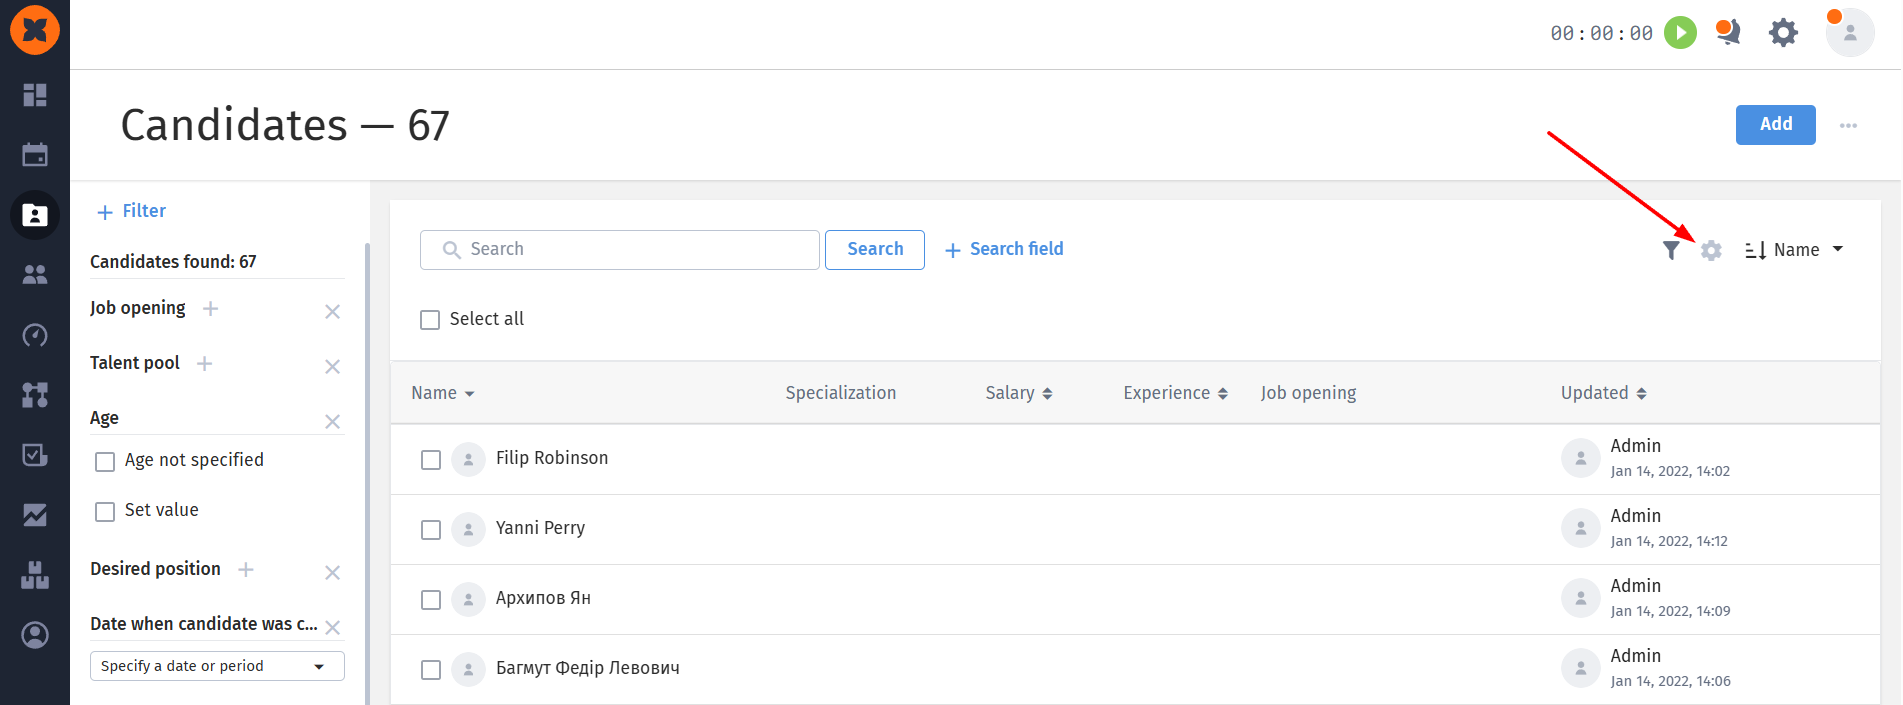
In the “Displaying table fields” modal window, select the fields you want to see in the table and drag them into the desired order.
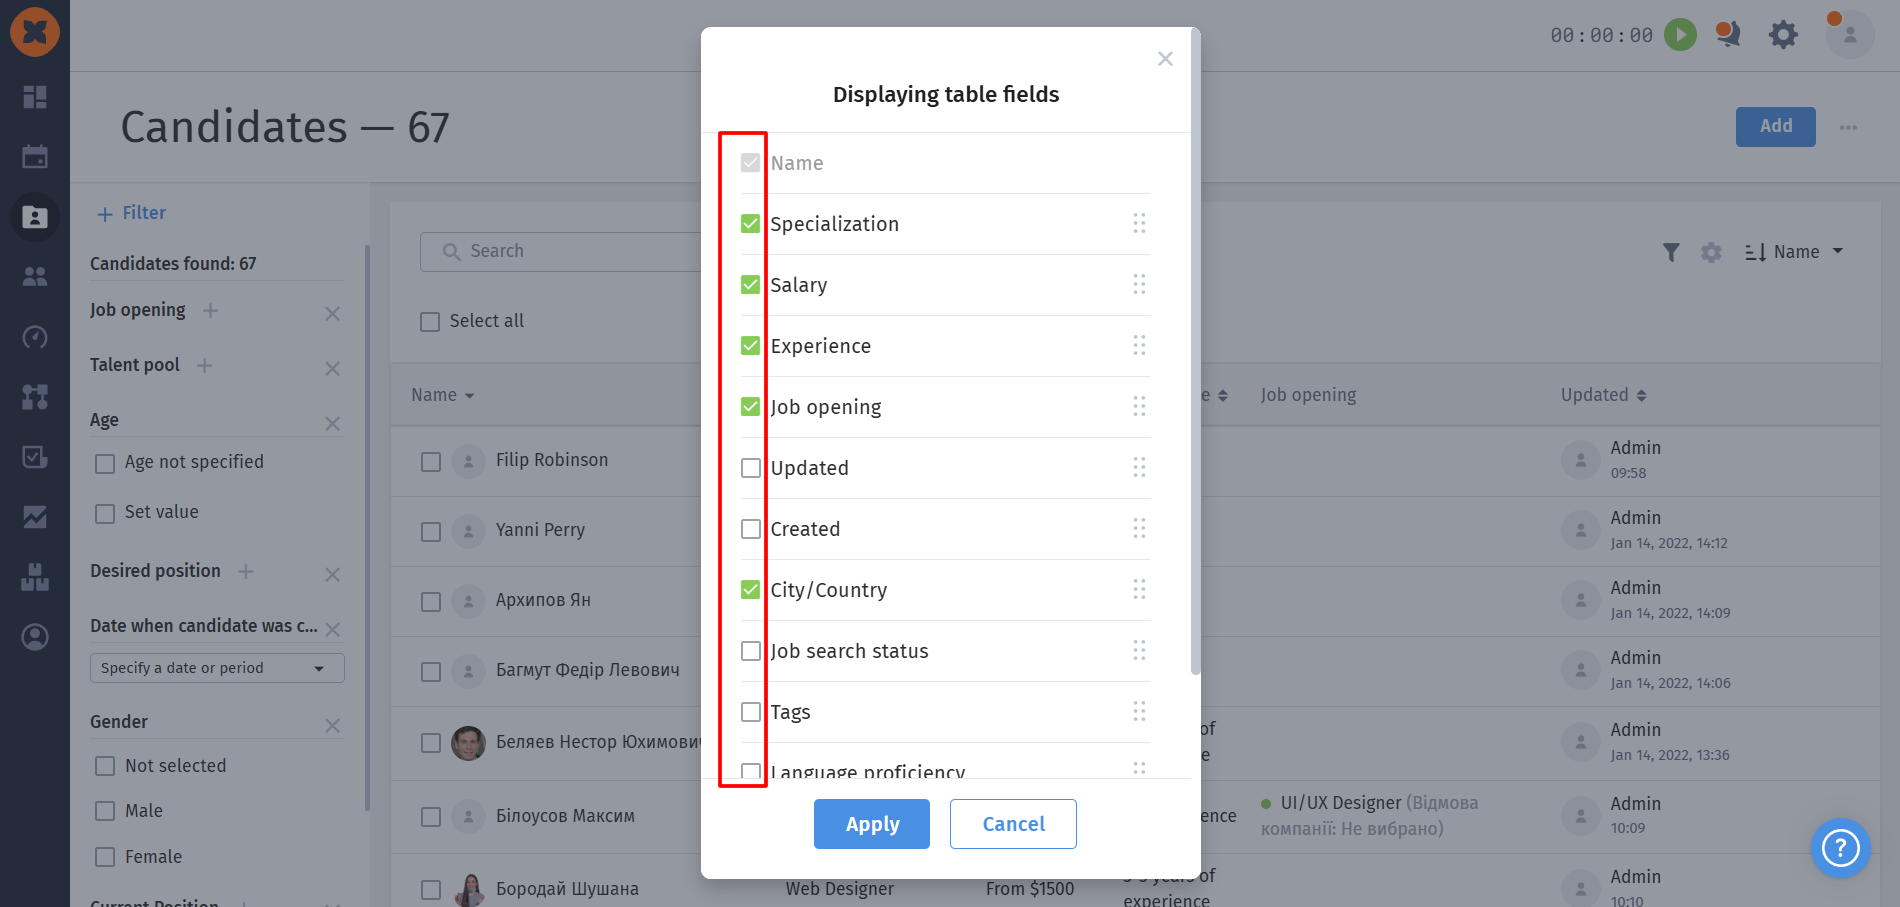
You can not only select which fields to display, but also easily reorder the columns directly in the settings. Simply click and hold the six-dot icon to the right of the required field and drag it up or down to set the desired order in which the columns will appear from left to right in the table.
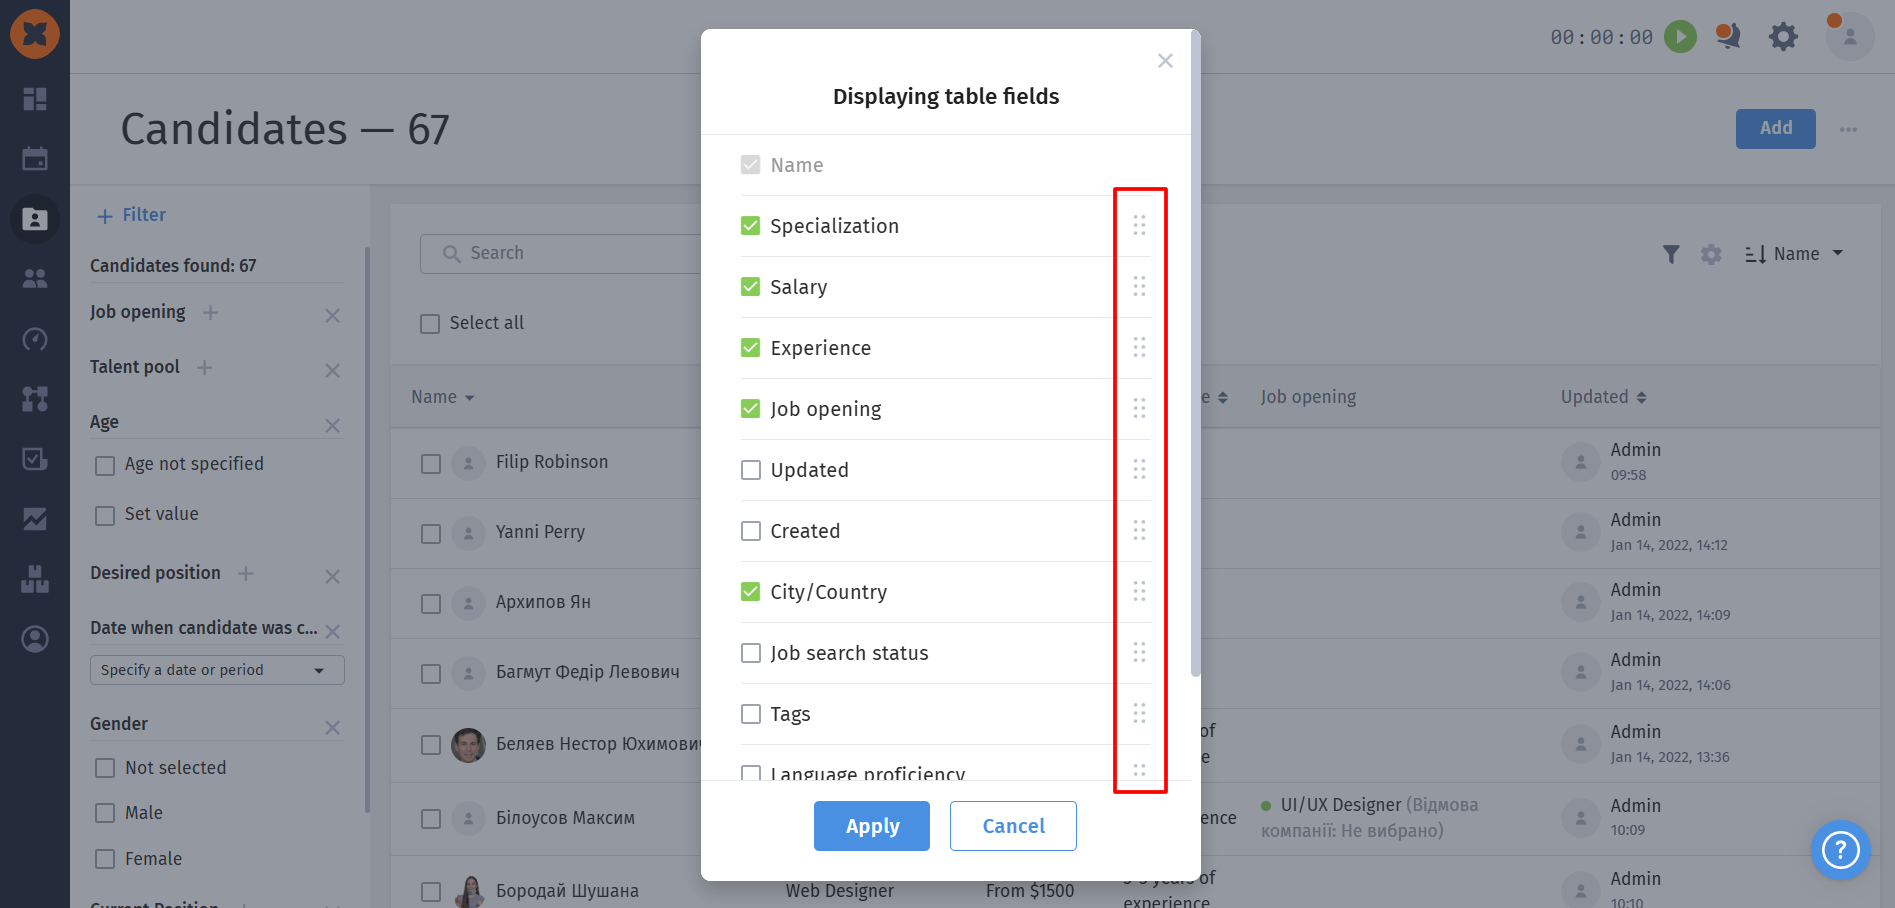
Click “Apply” to save your personalized view of the candidate database.